Resolution Scaling: Best Settings for Short-Form Video In
Other

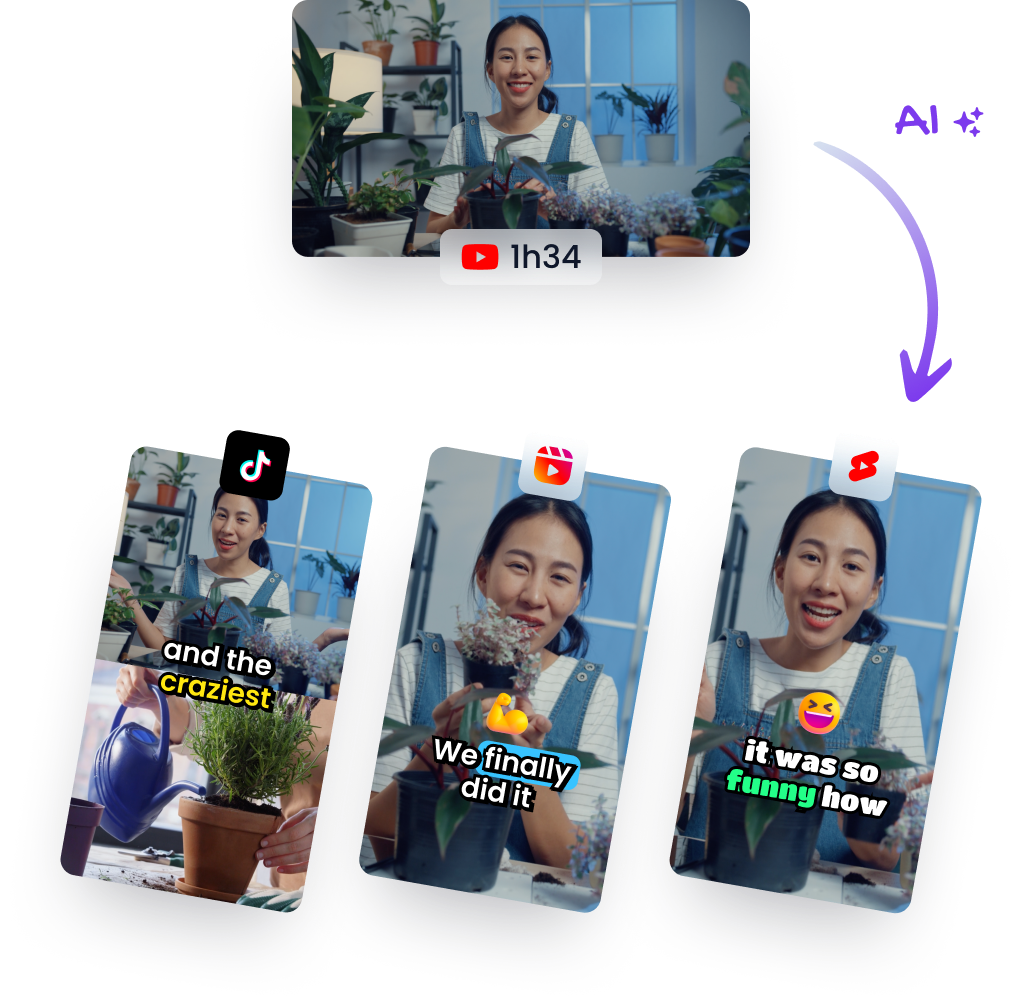
You've got a great horizontal interview, a clean podcast recording, or a sharp webinar, and then the export gets cropped into a vertical short that looks soft the second it hits a phone. The frame still contains the right moment, but the faces are tiny, the text is mushy, and the clip feels like it lost confidence in the move to 9:16. That's where resolution scaling stops being a technical term and starts being the difference between a clip people watch and a clip they swipe past.
Why Resolution Scaling Matters for Short-Form Video
Most creators notice the problem at the same moment. A 16:9 YouTube segment gets chopped into a 9:16 TikTok or Reel, and the shot that looked crisp on a desktop monitor now feels cramped, blurry, or oddly zoomed. The issue isn't just cropping, it's the way the frame has to be scaled to fit a new canvas without wrecking readability or visual stability.
That matters because short-form platforms reward fast comprehension. If the subject is too small, the caption area is crowded, or the face keeps drifting out of frame, viewers don't stay long enough to care about the message. In practice, poor scaling creates a chain reaction, weaker clarity leads to less retention, and weaker retention gives the platform fewer reasons to keep distributing the clip.
Resolution scaling is the invisible backbone of repurposing. Every time you turn a long-form recording into a vertical short, you're choosing how much of the original frame to preserve, how much to enlarge, and how to balance the two against quality loss. If the source was recorded well, scaling can help you reframe intelligently. If the source was recorded poorly, scaling can only manage the damage.
For creators who keep asking why a clip looks “off” after export, the answer is usually not the edit itself. It's the scaling decision underneath it. A useful starting point is this practical guide on why Instagram stories turn blurry, because the same clarity problem shows up again when long-form content gets pushed into vertical social formats.
Understanding Resolution Scaling Fundamentals
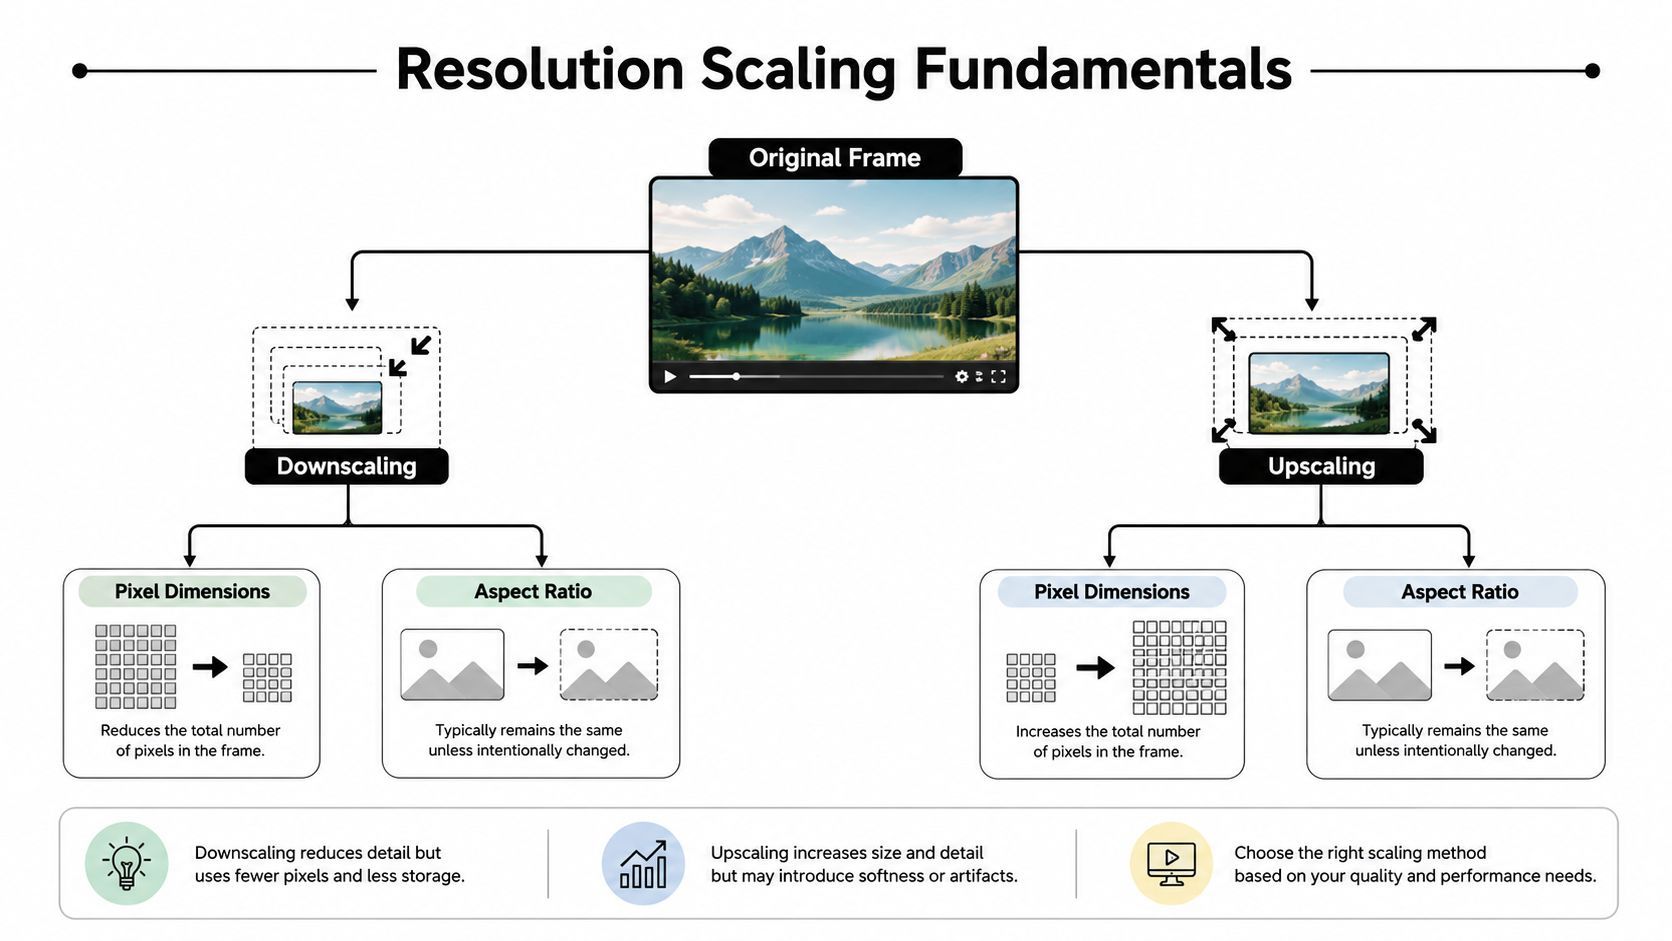
At its simplest, resolution scaling means changing the pixel dimensions of a video frame. You can downscale by making the frame smaller, or upscale by making it larger. The catch is that pixel math doesn't behave like volume in a bucket, it behaves like area, so changes hit harder than most creators expect.
Pixel math changes faster than intuition suggests
A scale change applies per axis, not just to the total frame. That's why cutting the scale to 50% reduces rendered megapixels by 75%, because width and height both shrink, and the pixel count drops as width × height. Godot's documentation explains that halving the scale factor cuts rendered megapixels by a factor of 4, and TechSpot notes that custom resolution is computed by multiplying both width and height by the scale factor on each axis (Godot documentation on resolution scaling, TechSpot on resolution scaling in gaming).
That same quadratic behavior is why a small render reduction can feel surprisingly effective in real workflows. A frame that drops a little in width and height can relieve a lot of processing pressure, which matters whenever you're converting a long recording into multiple short clips and still want sharp text, clean faces, and stable motion.
Practical rule: if the source already looks soft at full size, shrinking it doesn't fix the softness. It only makes the softness smaller.
The historical context explains why scaling became practical
Scaling didn't become a mainstream workflow concept until common display standards settled in. Industry histories point to the 1987 IBM VGA standard of 640×480 pixels as an important baseline, following earlier formats like 320×200 CGA and 640×350 EGA, and later moving through 720p (1280×720), 1080p (1920×1080), and 4K (3840×2160) (HP's display history reference). Once the ecosystem agreed on common reference points, software and hardware could render at one size and display at another with far less friction.
That history matters for creators because repurposing relies on the same logic. Your long-form source has one native frame. Your short-form destination has another. Resolution scaling is the bridge between them, and the bridge works best when you know exactly what each side can carry.
Native size, target size, and the scale factor
The easiest way to think about it is this. The source resolution is what you captured. The target resolution is what the platform expects. The scale factor is the decision between them, and it determines whether you're preserving detail, discarding it, or trying to synthesize it.
A 1080p source moved into a vertical 9:16 frame can still look good if the subject remains large enough after reframing. A low-resolution source has less room to maneuver, so the same crop can become unforgiving. That's why the source ceiling matters so much; the scaling choice can only work with the pixels that were recorded.
Comparing Downscaling, Interpolation, and AI Upscaling Methods
Different scaling methods solve different problems, and creators usually run into all three when they repurpose long-form footage. Downscaling is the cleanest option when the source is too large for the destination. Interpolation upscaling fills in missing pixels mathematically. AI upscaling tries to reconstruct plausible detail using learned patterns. None of them are magic, but each can be the right tool in the right workflow.
Downscaling is the safest choice when you have excess detail
If your source was captured at a higher resolution than your export target, downscaling is usually the least risky move. You're removing pixels, not guessing at them, so the image generally stays coherent. That's why downscaling often looks more natural than aggressive enlargement, especially on clips with subtle motion, clean graphics, or text overlays.
For repurposed shorts, downscaling is useful when the original frame includes more image than the vertical crop needs. A well-framed interview with a high-resolution source can survive the reduction because the important part of the frame stays clear. The trade-off is simple, you gain efficiency and sometimes cleaner output, but you don't gain any new detail.
Interpolation upscaling is a mathematical guess, not a recovery method
Interpolation methods such as bilinear, bicubic, and Lanczos estimate new pixels from the ones already there. That can make a frame look smoother, but it can't restore information that was never captured. A blurry face stays blurry, just larger. That distinction matters a lot when a creator assumes “upscaling” means “improving.”
The core limitation is visible in everyday imagery and in signal-processing terms. Enlarging a blurry input doesn't recover the missing detail, it only spreads the blur over a bigger area (MathWorks discussion of image enlargement and detail limits). That's why interpolation is best viewed as a compatibility tool, not a rescue tool.
AI upscaling is strongest when the source is good but undersized
AI upscaling uses neural networks to predict and reconstruct plausible detail. In creator workflows, that usually means sharper output than traditional interpolation, especially when the source has enough structure for the model to work with. It's the method many creators reach for when converting horizontal 1080p footage into vertical shorts and they want the result to look less like a crop and more like a native mobile clip.
Best use case: use AI upscaling when the frame is already decent, but the output needs to feel more intentional on a phone screen.
A practical caution still applies. AI can improve perceived sharpness, but it can also invent texture where the original was plain. That's fine on skin, fabric, or background detail if the result stays believable. It's risky on text-heavy content, logos, and fine product shots, where invented detail can become visual noise.
MethodBest ForQuality OutputProcessing SpeedUse Case
Downscaling
Oversized source footage
Usually clean and stable
Fast
Preparing higher-res footage for a smaller target
Interpolation upscaling
Basic enlargement needs
Smooth, but limited detail recovery
Very fast
Quick compatibility fixes
AI upscaling
Good footage that needs stronger perceived clarity
Often sharper, with more reconstructed detail
Slower
Vertical repurposing of 1080p interviews, podcasts, and webinars
If you want a practical example of how reframing and zoom choices affect the final crop, this video zoom workflow guide is a useful companion reference.
Balancing Quality, File Size, and Processing Time
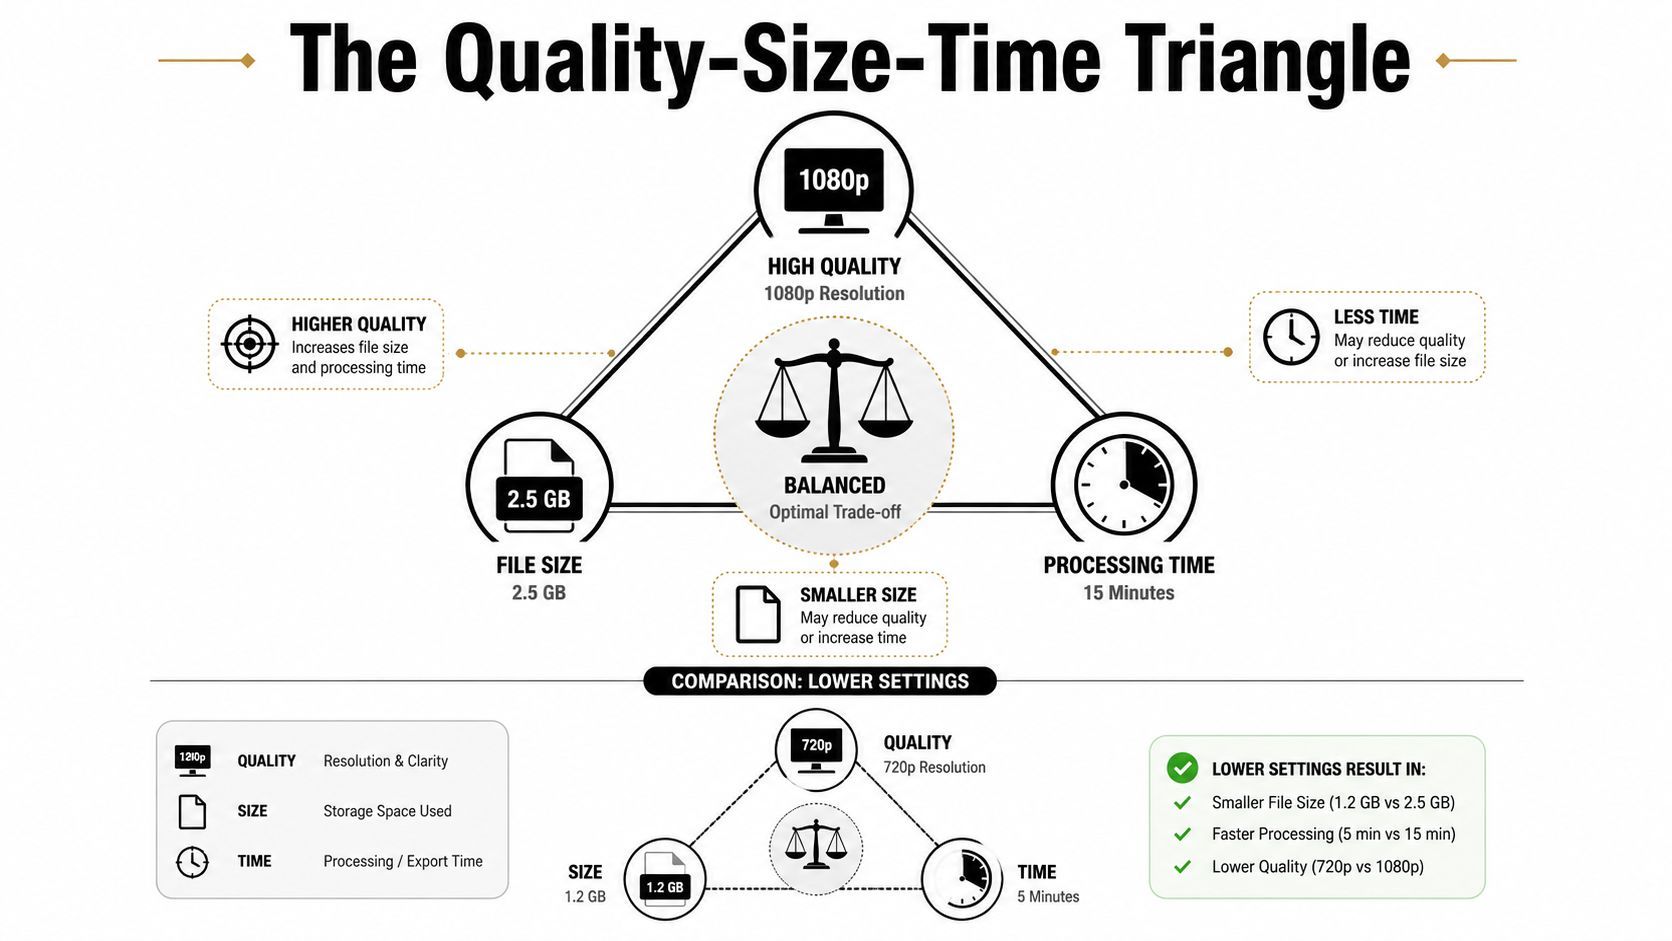
Every scaling decision lives inside a three-way trade-off. You can push for higher visual quality, smaller files, or faster processing, but you rarely get all three at once. For creators turning one long recording into a batch of shorts, that trade-off shows up immediately in export time, storage load, and how forgiving the result looks after platform compression.
Higher resolution costs more than it seems
The jump from 1080p to 4K is not a small bump. It goes from 1920×1080 to 3840×2160, which is exactly 4× as many pixels, about 8.3 million versus about 2.1 million (TechSpot on resolution scaling and 4K pixel count). That's the kind of multiplication that changes how long previews take, how heavy exports feel, and how much room you have for batch work.
That same source reports that an 83% resolution scale at 4K produces an internal render size of 3200×1800, and can yield up to a 27% improvement in average frame rates in some cases (TechSpot). The exact number isn't the lesson for social creators, the shape of the relationship is. A modest shift in render size can have an outsized effect on performance because pixel count falls quadratically.
Social platforms compress differently, so feed them good source material
TikTok, Instagram Reels, and YouTube Shorts all re-encode uploads, so you're not controlling the final delivery chain completely. The best move is usually to upload a file that already looks clean in the frame, not one that depends on the platform to rescue softness. That's especially true for clips with captions, speaker names, charts, or other fine detail.
For Instagram in particular, the practical game is to avoid feeding compression a file that's already borderline. A useful reference on how to avoid Instagram compression helps explain why a clean source export matters before the platform touches it. The same principle holds across short-form platforms, the cleaner your source, the less damage the re-encode usually exposes.
Use the platform to finish the job, not to do it all
Sometimes it makes sense to process at a lower internal resolution and let the platform handle the final display scaling. That works best when the source is already clear, the crop is stable, and the clip doesn't rely on tiny on-screen details. It works poorly when the frame includes dense text or when the face fills too little of the vertical canvas.
A clip can survive compression if the important subject is big, centered, and readable before export. If it isn't, no platform resize is going to save it.
Practical Workflow for Repurposing Long-Form Video
The cleanest repurposing workflow starts with the source, not the edit. A creator uploads a podcast episode, webinar, or YouTube recording, lets the system find strong moments, and then checks whether those moments still feel strong once the frame is forced into vertical. That sequence matters because the scaling decision is only as good as the moment selection around it.
Start with the source that can survive a crop
A 16:9 interview with the speaker sitting too far from camera will never feel as crisp in 9:16 as one that was framed with headroom and center space in mind. If the original recording has decent resolution but weak composition, reframing can still help. If the source is both soft and badly framed, no amount of resizing will make it look native to short-form.
That's why the first pass should always ask two questions. Is the subject large enough to read on a phone, and does the crop leave room for captions without crushing the face? If the answer to either one is no, the clip needs adjustment before export, not after.
The strongest practical workflows use AI to identify clips, then manually verify the framing before publishing. That combination is faster than trimming every segment by hand, and it avoids the common mistake of trusting auto-crop alone when the speaker shifts off-center.
Reframe, then inspect the weak spots
A good vertical workflow keeps the subject centered while the camera view changes from horizontal to vertical. That's especially useful in interview, podcast, and webinar footage, where the speaker moves but the message stays valuable. The right crop protects the face, captions, and any on-screen graphic that the audience needs to understand the moment.

When the output looks soft, the problem is usually one of three things. The crop is too aggressive, the source resolution is too thin for the vertical frame, or the export settings are forcing the clip through another unnecessary round of compression. That's also where a broader content repurposing playbook becomes useful, because the scaling fix works best when it sits inside a repeatable workflow instead of a one-off export habit.
Batch work is where the time savings appear
Once the first clip is clean, the true value comes from processing multiple moments from the same long-form source. One podcast can produce several shorts, but only if the framing and export settings stay consistent. Repeating the same adjustments clip by clip wastes time and introduces quality drift.
The most reliable creator workflow is simple. Pick the clip, check the crop, verify caption placement, confirm the output still reads on a phone, then export in the same profile across the batch. That consistency matters more than chasing a perfect file every time.
If you're handling a long source library, this guide to turning long video into short video is a useful reference for organizing the workflow before you start trimming.
Before and After Examples of Resolution Scaling Done Right
The cleanest examples usually come from content that already has something worth preserving. A podcast interview, a webinar, or a panel discussion can all look strong in short form if the crop respects the speaker and the frame doesn't force the viewer to hunt for the action. The difference between “usable” and “awkward” usually comes down to how carefully the scaling is handled.
Podcast interview with a tight vertical crop
A typical podcast clip starts as a horizontal 1080p recording. If you naively crop it for TikTok, the guest's face may land too small, and the shot can feel like it's hanging in the center of a tall, empty frame. With AI-assisted reframing and a smarter vertical crop, the face stays larger and the captions sit where the eyes can still track them.
The key is not to oversell what upscaling can do. It can make the clip feel sharper and more appropriate for vertical viewing, but it cannot recover detail that the camera never captured. If the original talking head was already soft, the best outcome is usually a cleaner-looking delivery, not a miracle.
Webinar speaker moving across the frame
Webinars create a different scaling problem because the speaker often shifts position, points at slides, or steps away from the camera's most flattering angle. Smart reframing helps here because it follows the speaker instead of freezing the crop. That keeps the subject visible while preserving enough of the scene for context.
Interpolation alone often disappoints. If text is involved, soft scaling can make the words harder to read, not easier. For slide-heavy content, the better move is usually to protect the readable area first, then decide whether the clip is worth keeping as a short at all.
Rule of thumb: if the frame depends on tiny text, you're not really scaling a short, you're compressing a slide deck into a phone screen.
Common mistakes that wreck the output
Over-sharpening is one of the fastest ways to make upscaled footage look worse. It creates halos around faces and edges, which looks especially bad on social platforms that already compress hard. Another mistake is using the wrong interpolation method for text-heavy content, because the letters may survive the crop but lose legibility after export.
The biggest strategic mistake is ignoring the source ceiling. If the original recording doesn't contain enough detail, no workflow can invent it. That's why the best repurposed shorts usually come from footage that was captured cleanly enough in the first place.
Your Resolution Scaling Decision Framework
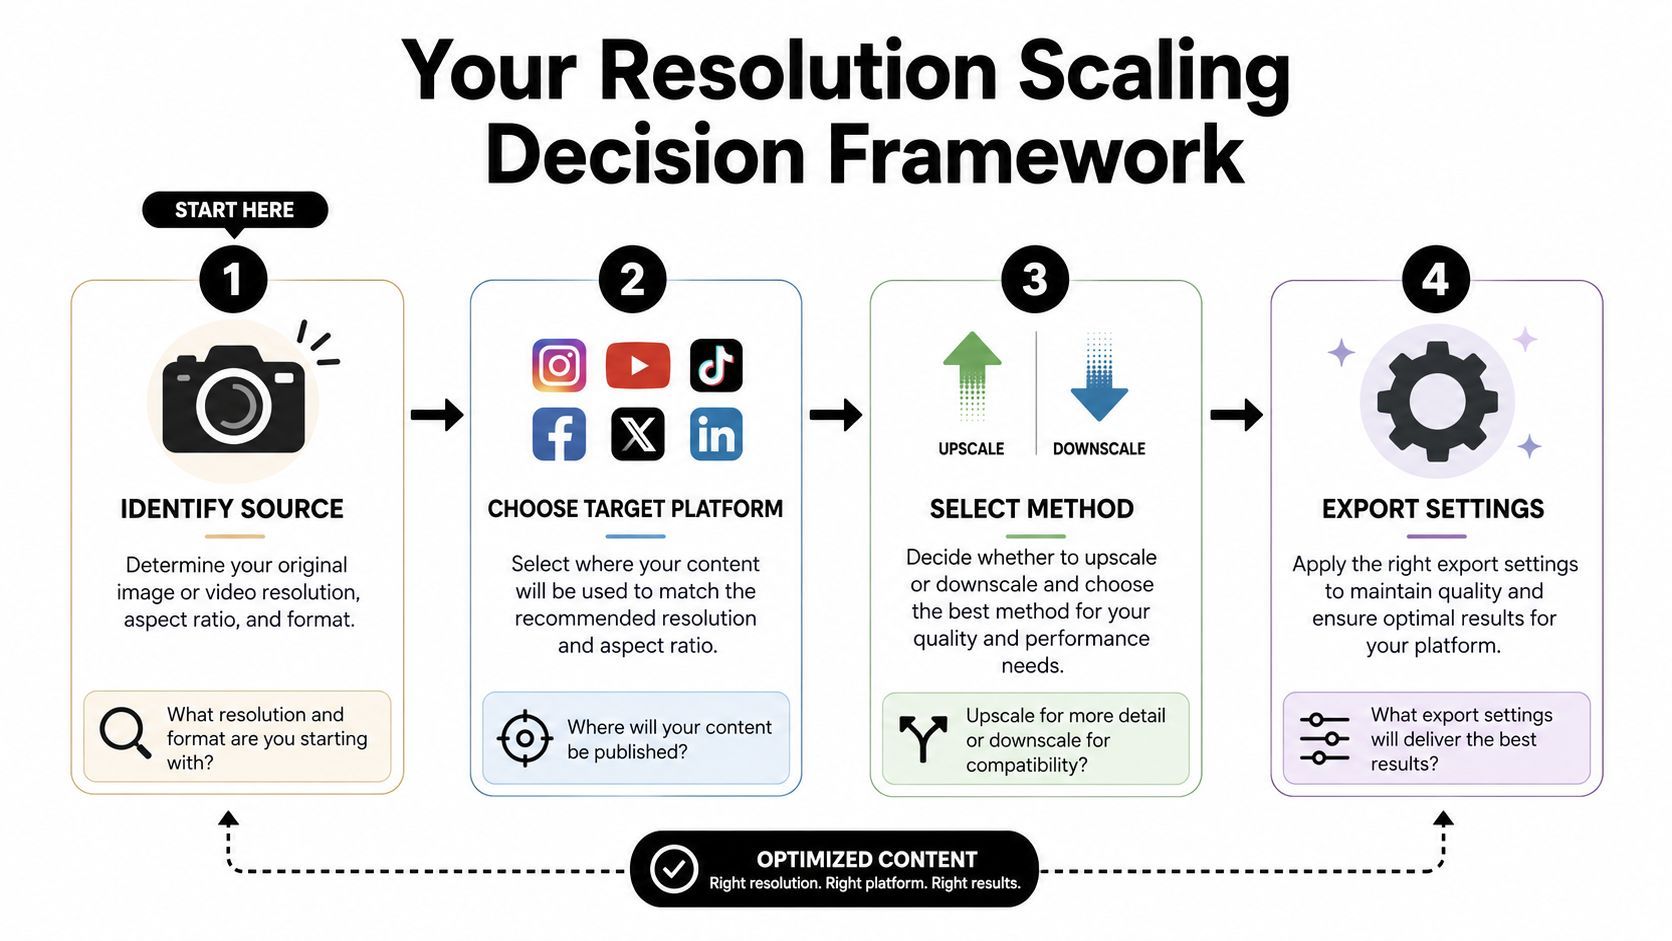
The right decision path is usually shorter than people expect. Start with the source resolution, ask what the target platform needs, then decide whether the job is mainly downscaling, interpolation, or AI-assisted upscaling. After that, check the crop on a phone, because that's where the frame either works or falls apart.
A fast creator checklist
- Identify the source first: If the original clip is already crisp and oversized for the target, downscaling is usually the cleanest path.
- Choose the target platform next: Vertical social outputs need subjects, captions, and motion to remain readable on a small screen.
- Select the method with intent: Use interpolation for simple enlargement, AI upscaling when the source is decent but undersized, and avoid pretending soft footage can be fully rescued.
- Verify before publishing: Check the frame on an actual phone, because desktop playback hides problems that become obvious in-feed.
When to re-record instead of resize
If the clip is mission-critical and the source is too soft, too far away, or packed with tiny details, re-recording is often the smarter decision. That's especially true for educational clips, product demos, and any moment where viewers need to read something specific. Scaling can help with repurposing, but it can't turn weak capture into strong capture.
For podcast clips, webinar highlights, interview snippets, and YouTube excerpts, the practical standard is the same. Preserve the subject, protect readability, and avoid unnecessary processing that makes the output heavier without making it better. Once that pattern is in place, every future repurpose gets faster and more predictable.
If you want to turn long-form recordings into vertical shorts without fighting framing, captions, and export settings on every project, try Klap. It's built for exactly this workflow, from reframing and resizing to getting clip-ready output fast. Visit Klap and see how much cleaner your next repurposed video can look.