How to Zoom Video for Social Media Without Losing Quality
Other

When you zoom into a video, you’re essentially scaling up the footage inside an editing app to highlight a specific area. This is often called a digital crop, and it’s an essential skill for reframing horizontal videos into vertical clips for TikTok or for pulling your audience’s focus right where you want it. In fact, a study by Buffer found that vertical videos on Instagram Stories have a completion rate up to 90% higher than horizontal videos, making smart framing critical.
Why Smart Zooming Is a Social Media Superpower
Knowing how to zoom into your video is more than just a technical tweak—it’s a powerful storytelling tool, especially on the fast-scrolling social media feeds we all live on. Getting this right turns standard footage into a scroll-stopping story. This is a game-changer for platforms like TikTok, Instagram Reels, and YouTube Shorts, where the vertical 9:16 format is king.
There’s a massive difference between a lazy, static crop and what we call intelligent reframing. A simple crop just punches in on one part of the frame, and frankly, it often looks amateur. Intelligent reframing, on the other hand, feels intentional. It’s dynamic and guides the viewer’s eye smoothly.
Directing Viewer Attention
A well-timed zoom is like a director pointing a finger, showing the audience exactly what matters in that moment. Here are some actionable ways to use it:
- Podcast Clips: Zoom in on a host’s face the second they react to a wild comment. Suddenly, you feel the emotion in a way a wide shot just can't deliver.
- Product Demos: A smooth push-in can highlight a tiny, game-changing feature on a new gadget, making its value crystal clear.
- Tutorials: Magnifying a critical step in a software demo or a DIY project ensures your audience won't miss the important details.
This kind of strategic direction is what keeps people watching. When viewers feel guided, they stick around, which boosts your video's watch time—a golden metric that social media algorithms love.
Actionable Insight: A thoughtful zoom does more than just make your video fit a vertical screen; it actively tells the story. You’re turning a passive viewer into an engaged follower. The goal isn't just to crop, but to compose.
Once you master this, your mindset shifts. You stop just trying to fill the screen and start crafting a much more compelling visual story that actually connects with people.
Understanding the Different Ways to Zoom a Video
When you hear "zoom a video," you might be thinking of one specific action, but in reality, editors use a few different techniques. Not all zooms are created equal, and picking the right one depends entirely on what you're trying to accomplish.
Some zooms are just for a quick quality check, while others are permanent edits that create cinematic motion. Let's break down the three main methods you'll encounter.
Playback Zoom: The Temporary Magnifying Glass
The most basic method is a Playback Zoom. This isn't really an "edit" at all. It's the temporary zoom you use within a media player or your editing software to get a closer look at a specific detail in your footage.
Think of it as a digital magnifying glass. You might use it to check if your subject is perfectly in focus or to inspect the background for any unwanted distractions before you commit to a permanent change. Once you zoom out, the video file itself is completely unchanged.
Digital Crop: The Permanent Reframe
Next up is the Digital Crop, which is what most people mean when they talk about zooming in. This is a permanent edit where you scale up your footage to fill the frame, effectively cropping out the edges to focus on a smaller area.
This is the go-to technique for reframing a horizontal video for vertical platforms like TikTok or Shorts. Be careful, though—there’s a trade-off. Pushing a 1080p clip too hard, say beyond 150%, often leads to a noticeable drop in quality. The image can start to look soft, blurry, or even pixelated. Your original source resolution is everything here.
Ken Burns Effect: The Dynamic Zoom
Finally, we have the Ken Burns Effect. Instead of a static, punched-in shot, this technique adds smooth, subtle motion. It involves an animated pan and zoom across a clip, guiding the viewer's eye from one point of interest to another.
It's a fantastic way to add a bit of life to still photos or to build drama and engagement in a video clip. What was once a simple, static shot becomes a more dynamic visual experience.
To help you decide which approach to take, we've put together a quick comparison table.
Video Zoom Methods at a Glance
Zoom TypeBest ForEffect on FileQuality Impact
Playback Zoom
Temporarily checking focus or details.
None. It's a view-only function.
None, as it doesn't alter the file.
Digital Crop
Permanently reframing shots for different aspect ratios.
Permanent. The video is cropped and scaled.
High risk if zoomed too far; depends on source resolution.
Ken Burns Effect
Adding motion to static shots or creating a cinematic feel.
Permanent. Keyframes are added to create motion.
Moderate risk; quality can degrade during the zoom.
This table gives you a clear snapshot of how each method works and where it shines, making it easier to choose the right tool for your specific editing needs.
The decision tree below also offers a great visual guide for when a simple crop is enough versus when a more intelligent, dynamic zoom might be the better choice.
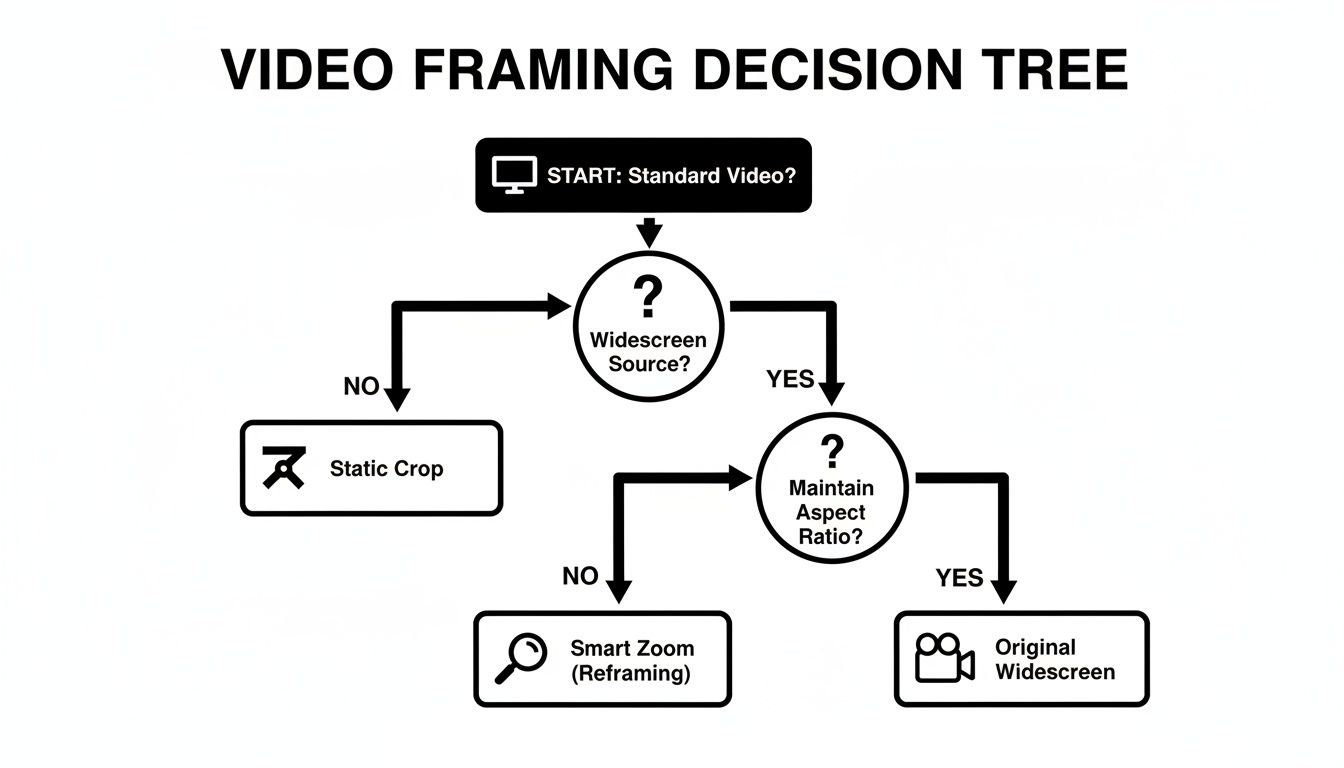
Ultimately, the key is to consider your subject. If they're stationary, a simple crop might do the trick. But if they're moving around the frame, a more advanced reframing strategy will deliver much better results.
Getting Hands-On: Manual Zooms in Your Go-To Editor
Alright, let's get into the nitty-gritty of zooming a video with the tools you probably already use. Whether you’re parked at your desk or editing on the fly, mastering manual controls is what gives you that fine-tuned power over your final shot. To really nail this, you need the right software, but that doesn't always mean the most expensive. There's plenty of cheapest video editing software out there that gets the job done beautifully.
For the Desktop Warriors
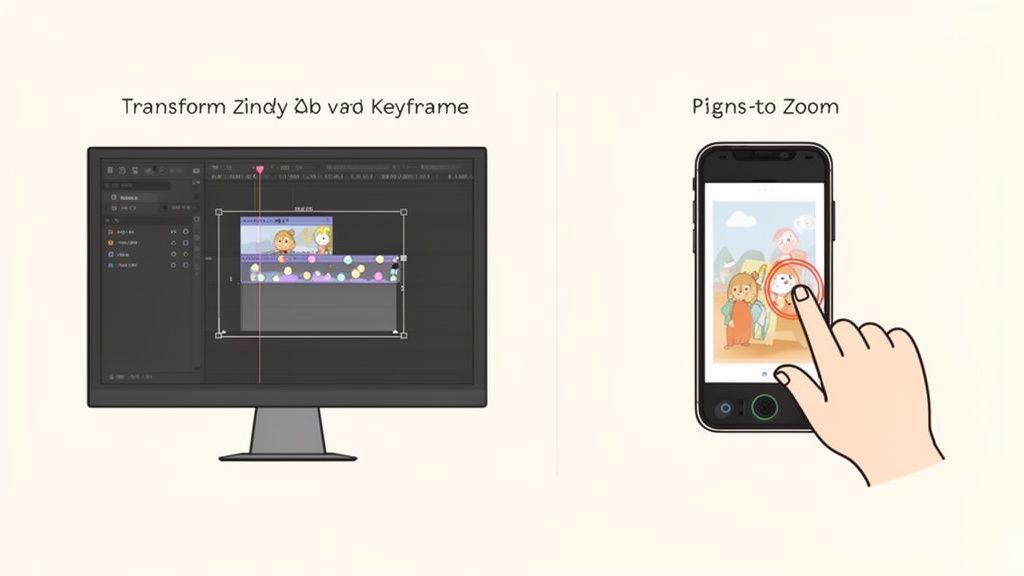
If you're editing on a computer, you're likely using an industry workhorse like Adobe Premiere Pro or DaVinci Resolve. The secret sauce here is combining transform controls (like scale and position) with keyframes.
Think of a keyframe as a bookmark for your settings. It tells the software exactly what the zoom level should be at a specific moment.
Here's the step-by-step: you might set one keyframe at the start of a clip with the scale at 100%. Then, a few seconds later, you drop another keyframe and crank the scale up to 130%. The software automatically fills in the frames between those two points, creating a smooth, animated zoom. This is how you get those slick, professional-looking push-ins that gently guide the viewer’s attention without feeling abrupt.
Editing on the Move With Mobile Apps
For creators churning out content on their phones, apps like CapCut make this process feel way more natural. Instead of plugging in numbers, you can often just use a simple pinch-to-zoom gesture right on the video preview to create your keyframes. It's a much more tactile and intuitive way to reframe your shots on the spot.
The workflow is pretty much the same idea, just with your fingers:
- Add a keyframe where you want the zoom to begin.
- Move the timeline marker to where you want it to end.
- Pinch the screen to zoom in, and the app will automatically create the second keyframe for you.
You'd be surprised at how much control this gives you on such a small device, making it perfect for creating dynamic content from anywhere. If you want to dive deeper, we have a whole guide on how to crop video for social media.
Pro Tip: Want to zoom without your footage turning into a pixelated mess? Always film in a higher resolution than you plan to edit in. If you shoot in 4K but your project timeline is 1080p, you can zoom in up to 200% before you see any quality loss.
This ability to dynamically zoom is something we take for granted now. The journey from the clunky Picturephones of the 1960s to the crisp digital zooms we use today was supercharged by tech advancements in the 1990s. As broadband internet went from being in just 5% of U.S. homes in 2000 to over 85% by 2020, the appetite for high-quality video exploded, making features like this essential for keeping viewers engaged.
Automating Your Workflow with AI-Powered Reframing
While manual keyframing gives you the ultimate control, let's be honest—it's a massive time sink. Creators report that editing can take up to 7 times longer than filming, and manual reframing is a huge part of that.
If you're consistently trying to turn long-form content into a steady stream of vertical shorts, the hours you spend nudging frames back and forth become a serious bottleneck. This is where AI completely changes the game.
AI-powered reframing tools do all the tedious work for you. Instead of hunting for the right moment and setting keyframes, the AI scans your entire video, identifies who's talking, and intelligently crops and pans to keep them perfectly centered in a vertical 9:16 frame.
The result isn't some jarring, static crop. It’s a smooth, dynamic motion that feels like a human editor was behind the controls. You can find some of the best AI video creation tools that integrate these smart reframing capabilities.
How AI Reframing Works in Practice
Tools like Klap have made this process incredibly simple. You just drop in a link to your long-form video—a YouTube podcast, a webinar, you name it—and the AI gets to work. It doesn't just reframe; it finds the most engaging hooks and generates dozens of potential clips in minutes.
Here’s a look at Klap's interface. You can see how easy it is to review and fine-tune the clips the AI finds for you.
From this dashboard, you can make quick adjustments to the start and end points or tweak the automatically generated captions. What used to take hours of editing now becomes a quick review session.
This shift to automation is happening everywhere in video. Think about what Zoom Video Communications did for meetings. Launched in 2011, its user base exploded from 10 million to over 300 million daily participants during the 2020 pandemic because it made virtual connection effortless. Klap’s AI does for content repurposing what Zoom did for meetings: it solves a huge friction point with a simple, automated solution.
This approach frees you up to focus on strategy instead of getting bogged down in execution.
With the heavy lifting of reframing handled, you can publish more content, more consistently. For any creator trying to scale their output, giving an AI reel generator a try can be a major productivity boost. You let the tech handle the mechanics of how to zoom a video, so you can focus on the bigger picture.
How to Preserve Video Quality When Zooming
We’ve all seen it: a video zooms in, and suddenly the crisp footage turns into a blurry, pixelated mess. It’s the fastest way to make your content look amateur. The good news is that keeping things sharp is totally possible, but it starts before you even think about editing.
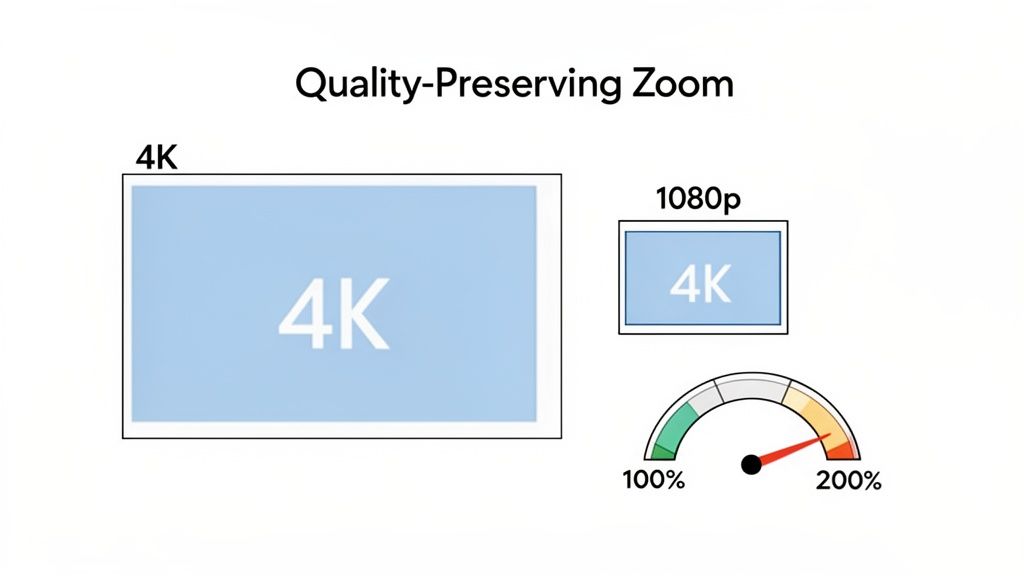
The golden rule is pretty simple: always shoot in a higher resolution than you plan to export. If you’re making 1080p vertical shorts for TikTok or Reels, filming in 4K gives you a massive canvas to play with. You literally have four times the pixel data, which means you can punch in pretty deep without seeing any obvious quality loss.
Know Your Zoom Limit
Even when you start with a high-resolution file, you can't just zoom in forever. Think of it like stretching a photograph—eventually, the image just falls apart.
For standard 1080p footage, a good rule of thumb is to avoid scaling beyond 150-200%. Once you push past that, you’ll start to see that tell-tale softness and digital noise creep in, which cheapens the look of your video.
Actionable Insight: Preserving quality isn't just about what you shoot in. Your export settings are the final gatekeeper. You can do everything right and then ruin it all with over-compression at the end, which will make your zoomed-in shots look even worse.
Fine-Tune Your Export and Stabilization
To make sure your final video looks as good as it possibly can, you have to nail the export. Here are a few actionable tips I always follow:
- Choose a High Bitrate: A higher bitrate means more data per second of video. For a 1080p video, aim for a bitrate of at least 10-12 Mbps to keep zoomed-in footage looking detailed and clean.
- Apply Stabilization: When you crop in tight, any little camera shake becomes way more obvious. A touch of stabilization can smooth out that jitter and make the shot feel much more professional.
- Resize Before Exporting: If you need to resize videos for different platforms, always do it inside your editor. This gives you maximum control over the final output and prevents other apps from compressing it poorly.
Follow these steps, and every zoomed-in clip you create will look sharp and polished, no matter the screen.
Common Questions About Zooming Video
Even when you've got the basics down, a few tricky questions about zooming always seem to come up. Nailing the answers to these will save you a ton of headaches and help you avoid common pitfalls that can tank your workflow. Let's tackle them head-on.
How Much Can I Zoom Before My Video Looks Bad?
This is the big one, and the honest answer is: it depends entirely on your original footage.
If you're working with a standard 1080p (HD) video, you can usually push the zoom to about 130% before things start looking soft or pixelated. Go much further, and the quality loss becomes obvious.
But here’s a pro tip: if you film in 4K and edit on a 1080p timeline, you have a massive amount of creative freedom. You can zoom in up to 200% and the footage will still look perfectly crisp and clear. You’re essentially just cropping into a much larger image, so there’s no quality loss at all.
What’s the Best Way to Zoom in on a Moving Subject?
Following a person or an object as it moves across the screen requires a dynamic zoom, and there are a couple of ways to handle it.
The old-school, manual approach is to use keyframes. You’d set a starting point, move forward a few frames, adjust the position and scale, set another keyframe, and repeat. While this gives you pinpoint control, it's incredibly time-consuming. Seriously, it can take ages.
Actionable Insight: A much faster and smarter way is to use an AI auto-reframe tool. It automatically identifies the main subject and generates a smooth pan and zoom to keep them perfectly in the shot. You get a natural, professional-looking result in a fraction of the time.
Can I Zoom a Video After It's Already on Social Media?
Unfortunately, the answer is a hard no. Once a video is uploaded to Instagram, TikTok, or YouTube, the framing is baked in. You can’t go back and make zoom or reframing adjustments.
This is exactly why getting your composition right in the editing phase is so crucial. All your zooming decisions have to be locked in your video editor before you hit that export button and publish the final file.
Ready to stop wasting time on manual reframing? Let Klap’s AI turn your long-form videos into dozens of perfectly zoomed, social-ready shorts in minutes. Try it for free at https://klap.app.
