How to iMovie Crop Video on Mac and iPhone in 2026
Other

You've got a clip that looks fine on your phone, fine in Finder, and fine everywhere except iMovie. The moment you drop it into a project, the frame changes. Black bars appear, heads get cut off, or the shot zooms in harder than you wanted.
That's usually when people assume they missed a setting. In most cases, they didn't. The friction comes from how iMovie handles framing, especially when you're trying to do modern social repurposing with a tool that still thinks like a widescreen editor.
If your job is simple, iMovie can still get you across the line. If your job is turning webinars, podcasts, interviews, or YouTube uploads into short vertical clips, the pain shows up fast. Cropping becomes one of those tasks that sounds basic until you do it ten times in one project. And if you're also cleaning up spoken audio after reframing, this guide on polishing videos with Isolate Audio is a practical companion because crop problems and rough audio often show up together in repurposed clips.
Why Is Cropping a Video in iMovie So Tricky
You import a vertical clip that looked fine on your phone, drop it into iMovie, and the app immediately starts negotiating with your framing. Instead of treating crop as an output choice, iMovie treats the project frame as the rule and asks your footage to adapt.
That is the friction. iMovie is built around a widescreen editing model, so cropping often feels less like composition work and more like damage control, especially if the end goal is TikTok, Reels, Shorts, or square social posts.

For traditional edits, that design is workable. For repurposing, it gets clumsy fast. A single interview clip might need one frame for YouTube, another for Shorts, and a tighter punch-in for Reels. iMovie can get you there, but usually through manual clip-by-clip adjustments instead of a workflow built for multi-format output.
What usually makes it feel harder than it should
The confusion usually comes from a few predictable problems:
- Portrait footage enters a horizontal project by default. iMovie preserves the project shape first, so vertical clips often end up boxed in or cropped harder than expected.
- The word “crop” means different things in different places. Sometimes you're resizing the visible area. Sometimes you're filling the frame. Sometimes Ken Burns is adding motion and making the issue look like a crop mistake.
- Social framing takes repetition. If you are turning a long recording into several short clips, you often have to reposition each shot manually.
- Preview and final intent can drift apart. The frame may look acceptable in the timeline, then feel wrong once exported for a phone screen.
That last part matters more than people expect.
On a basic home movie, a slightly awkward crop is easy to ignore. On social content, bad framing costs attention. If the speaker's eyes are too high, captions cover the mouth, or the subject slips off-center after a cut, the video looks amateur even when the footage itself is solid.
I run into this most with repurposed talking-head content. The edit is usually simple. The framing is what slows everything down. And if you're also cleaning up dialogue after reframing, this guide on polishing videos with Isolate Audio is a useful companion because crop fixes and audio cleanup often happen in the same pass.
Why iMovie feels dated for vertical work
iMovie can crop a shot. What it does not do well is treat aspect ratio as a publishing strategy.
That gap is why the tool feels older than it looks. Modern creators rarely make one version of a video and call it done. They cut a horizontal master, pull vertical excerpts, protect room for captions, and keep faces centered for mobile viewing. iMovie handles pieces of that process, but it does not make the process efficient.
So the problem is not that cropping is hidden. The problem is that iMovie's framing tools were designed for a widescreen-first workflow, and social repurposing exposes that limitation every time you try to turn one source clip into multiple formats.
Understanding iMovie's Three Framing Tools
Most iMovie frustration comes from using the wrong framing mode. The app gives you three separate tools for dealing with what's inside the frame: Fit, Crop to Fill, and Ken Burns. They sound close. They aren't.
iMovie Framing Tools Compared
ToolPrimary Use CaseWhat Happens to Your VideoBest For
Fit
Preserve the full shot
Keeps the whole frame visible and adds black bars if needed
When you can't afford to lose any visual content
Crop to Fill
Fill the project frame
Zooms and crops parts of the image to remove bars
Tight reframing and cleaner widescreen output
Ken Burns
Add motion
Animates a slow pan and zoom between two framing points
Slideshows or shots that need subtle movement
If you want a broader mental model before editing, this guide to mastering video aspect ratios is useful because a lot of “crop” confusion is really aspect ratio confusion.
Fit keeps everything, but adds bars
Fit is the least destructive option. iMovie keeps your original composition intact and uses black bars when the source clip doesn't match the project frame.
That sounds safe, and it is. But it's also why vertical footage often looks awkward in iMovie. The app preserves the whole image, then wraps empty space around it to satisfy the project shape.
Use Fit when the edges matter. Screen recordings, slides, product demos, and interview frames with on-screen text often survive better this way.
Crop to Fill is the tool people usually mean
When most users search for imovie crop video, they're really looking for Crop to Fill. This is the manual reframing tool that lets you choose which part of the clip should remain visible.
It's useful because it removes black bars. It's dangerous because it removes part of your image.
Practical rule: If you switch to Crop to Fill, check the edges of the frame before you commit. Titles, hands, and subtitles often get clipped first.
Ken Burns is often the hidden culprit
Ken Burns isn't a crop tool in the traditional sense, but it affects framing by adding movement between a start frame and an end frame. If your clip seems to zoom unexpectedly, this is often why.
That's great for still photos and some B-roll. It's usually not what you want for talking-head footage, webinars, or repurposed social clips where stable framing matters.
A fast way to visualize the process:
- Need the full image? Use Fit.
- Need to remove bars and focus on one area? Use Crop to Fill.
- Need motion? Use Ken Burns, but only on purpose.
Step-by-Step Guide to Cropping on Mac
On Mac, the workflow is straightforward once you know where iMovie hides the control. The catch is that it's easy to click around without selecting the clip properly, which is why people think the crop button is broken.
Start with clip selection
Click the clip in your timeline first. Don't skip this. iMovie's cropping flow requires 3 to 5 distinct user actions per clip, and one of the most common pitfalls is failing to select the clip before opening crop controls. When that happens, the controls don't work and you end up restarting, which adds a 45 to 90 second friction point per clip (reference).
Once the clip is selected, look above the viewer for the crop icon. Open it, then choose Crop to Fill if your goal is to zoom in and remove bars.
Adjust the frame carefully
After you enable Crop to Fill, iMovie places an adjustable frame over your clip in the viewer. Drag the edges to define the visible area, then move the frame to reposition the crop.
This part is where desktop iMovie is better than mobile for precision. You can make smaller framing changes and judge edge placement more reliably, especially on interviews and screen recordings.
A few practical habits help:
- Check faces first. Eyes drifting too close to the top edge make the crop feel accidental.
- Watch lower thirds and captions. These are easy to trim off without noticing.
- Preview before finalizing. A frame that looks fine while paused can feel too tight in motion.
Here's a visual walkthrough if you want to see the Mac flow in action:
Apply, review, and reset if needed
Click the checkmark to apply the crop. Then play the clip inside the timeline, not just the frozen frame in the viewer. Motion reveals bad crops quickly.
If you need to undo the framing, go back into the crop tool and reset it manually. That's one of iMovie's slower habits. It doesn't always encourage fast experimentation, so it's better to make deliberate changes than lots of tiny random ones.
The Mac version is workable for one or two clips. It gets tedious when you're reframing several extracts from one long source video.
Cropping on iPhone and iPad The Mobile Workflow
The mobile version of iMovie handles cropping differently enough that people who switch between devices often get tripped up. On Mac, you drag a frame. On iPhone and iPad, you work with gestures.
How the mobile crop actually works
iMovie's cropping system differs by platform. macOS uses a Crop to Fill button with an adjustable frame, while iOS and iPadOS use a gesture-based pinch-zoom system, which creates a different editing experience for creators moving between devices (reference).
To crop on iPhone or iPad:
- Tap the clip in the timeline so iMovie knows which video you want to edit.
- Tap the magnifying glass icon to enter the zoom and crop view.
- Use a two-finger pinch or spread gesture to zoom in or out.
- Drag the image to reposition the visible area.
- Preview the shot and confirm it before moving on.
If you just need a fast crop without a full project workflow, a dedicated online crop video tool can be simpler than doing repeated pinch adjustments inside iMovie.
Where mobile is better
The mobile version is fast for rough framing. If you're standing in line, posting quickly, or fixing one talking-head clip for social, the gesture workflow feels more direct than the Mac interface.
It's also easier to make quick visual judgments because touching the frame is more intuitive than hunting for toolbar controls.
Where mobile gets frustrating
Precision is the trade-off. Pinch-to-zoom is convenient, but it's less exact when you're trying to keep text aligned, leave headroom, or crop multiple clips consistently.
That matters most for:
- Interview clips where two speakers need balanced framing
- Screen recordings where app windows should stay readable
- Batch repurposing where several clips need the same visual treatment
If your editing jumps between phone and desktop, expect the same clip to feel different on each device. iMovie treats framing as a platform-specific interaction, not a universal one.
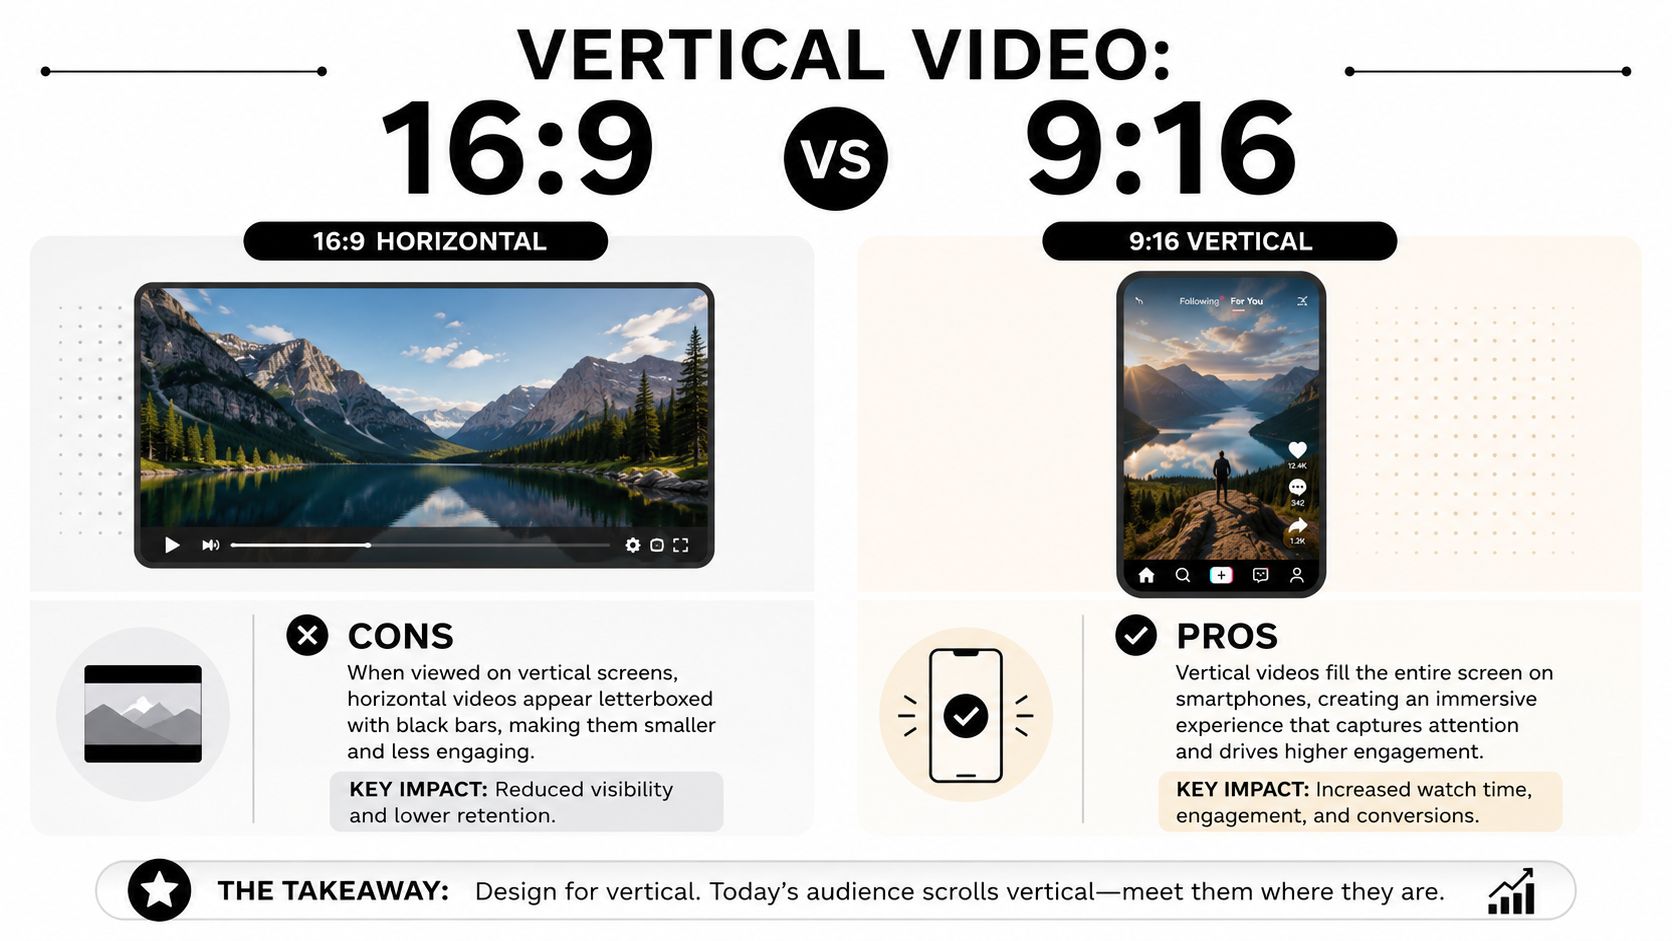
Solving the Vertical Video Problem in iMovie
You finish a clean horizontal edit, then remember you also need a Reel, a TikTok, and a vertical LinkedIn cut. In iMovie, that is usually the moment the friction starts.
iMovie can crop a shot, but it still treats the project like a widescreen timeline first. That design choice matters. Vertical delivery feels like a workaround layered on top of a 16:9 editor, not a format the app was built to support.
The problem shows up fast when one source video has to feed several channels. A webinar clip might need a standard YouTube version, a square teaser, and a vertical talking-head cut with readable captions. If LinkedIn is part of that mix, these B2B LinkedIn video best practices are a useful reminder that framing affects readability, pacing, and how professional the final post feels.
Why iMovie slows down vertical repurposing
The issue is not cropping itself. The issue is repeatable vertical framing.
In iMovie, the usual workflow is awkward:
- Import the clip into a standard project
- Reframe inside a horizontal canvas
- Export and check whether the subject still sits correctly in a vertical crop
- Fix anything that feels off, sometimes in another app
That is manageable for one clip. It gets tedious fast if you are cutting a podcast, interview, webinar, or course recording into several short posts.
I run into the same wall with moving subjects. A static crop can work for one centered talking head. Once the speaker shifts left, gestures wider, or shares a screen, iMovie stops feeling like a practical social repurposing tool and starts feeling like a manual patch.
Where iMovie still works
iMovie is fine for a few jobs:
- one-off portrait clips
- simple head-and-shoulders reframes
- quick social posts where exact composition is not a priority
It falls short when you need consistency across multiple exports, especially if text overlays, subtitles, or product demos need to stay visible.
That is the workflow gap. Social editors rarely need just a crop tool. They need aspect-ratio changes, subject-aware reframing, and a faster way to produce several versions from the same source. That is why a guide on changing video aspect ratio for social clips is often more useful than another set of iMovie crop instructions.
The practical trade-off
If you already edit in iMovie and only need an occasional vertical post, forcing the crop can be good enough. If vertical content is part of your weekly publishing workflow, iMovie adds extra checking, extra exports, and extra chances to miss framing problems until the final file is out.
That is usually the point where creators start questioning the setup. Not because iMovie cannot crop video, but because social repurposing asks for a workflow iMovie still does not handle cleanly.
Troubleshooting Common iMovie Cropping Issues
Some crop problems come from a missed setting. Others come from how iMovie handles framing under the hood. If a clip looks wrong, check the crop mode first, then check the project format, then export a short test before you trust the final file.
Why is iMovie cropping my video automatically
Start with Ken Burns. If that option is on, iMovie is animating between two frames, so the shot can look like it is randomly pushing in or drifting off-center. Switch to Fit if you want the full frame visible, or Crop to Fill if you want a fixed tighter composition.
Also check the clip orientation. Portrait footage dropped into a standard widescreen project often looks cropped even when iMovie is just forcing it to match the project frame.
Why do black bars keep showing up
Black bars usually mean the clip is set to Fit. iMovie is preserving the whole image and filling the unused space instead of cutting anything off.
If you want the frame to fill the screen, choose Crop to Fill and drag the crop box until the important part of the shot stays visible. If the bars only appear after export, test a short section first. iMovie can look correct in the timeline and still surprise you in the output file.
Why does the export look different from the timeline
This is one of the more annoying iMovie habits, especially with vertical footage and aggressive reframing. The timeline can suggest everything is fine, then the exported file comes back with framing that feels slightly off or less consistent than what you approved.
A few checks usually save time:
- Duplicate the project first so you have a clean fallback.
- Reduce extreme crops if the subject is already close to the edge.
- Export a short sample before rendering the whole piece.
- Check the exported file on a phone, not just on your desktop preview.
- Split crop and zoom decisions if you are trying to do both at once. This guide on zooming video without muddy framing decisions helps with that workflow.
If you keep hitting mismatches, that is usually the point where iMovie stops feeling like a quick editor and starts feeling like a workaround. For social repurposing, the extra export checks add up fast.
Why overlay clips won't crop the way you expect
Overlay clips are more limited than primary timeline clips. Picture-in-picture and cutaway elements still live inside the main project frame, so they do not crop with the same freedom you might expect from a layered editor.
In practice, that means logos, screenshots, or vertical inserts often need to be cropped before import. If you are building social edits with stacked layouts, reaction clips, or product demos, this is one of the places where iMovie shows its age.
The fastest fix is often simplifying the layout before you spend more time fighting the crop controls.
If you are tired of repeating that process for every vertical cut, Klap is built for the workflow iMovie struggles with. It turns longer videos into social-ready clips, handles reframing for mobile formats, and cuts down the manual crop-check-export loop that iMovie makes hard to avoid.
