How to Add Background Music in Video for More Views
Other
You've got the edit done. The cuts are tight, captions are in, and the video still feels flat.
That usually isn't a visual problem. It's an audio problem. A silent or poorly scored video feels unfinished, especially on social platforms where pacing, emotion, and momentum matter immediately.
Knowing how to add background music in video isn't just about dropping a song under your footage. The useful skill is choosing a track that supports the message, mixing it so speech stays clear, and doing it in a way that still works when you're turning one long video into a stream of shorts.
Finding and Licensing Your Perfect Soundtrack
Music changes how people read a video. It creates pace, fills dead space, and gives transitions something to land on. A 2024 Descript study found that 73% of high-performing social clips with more than 1M views used royalty-free background music, with a 35% uplift in completion rates versus original audio-only videos.

That doesn't mean every video needs dramatic music. It means the soundtrack has a job. Sometimes that job is energy. Sometimes it's subtle texture under dialogue. Sometimes it's just smoothing awkward silence between cuts.
Know what license you're actually using
A lot of creators get tripped up here because the labels sound similar.
- Royalty-free means you can usually use the track without paying per play or per use after the license terms are met.
- Copyright-free is often used loosely and can be misleading. Most music is still owned by someone.
- Creative Commons can work, but the exact license matters. Some versions require attribution. Others restrict commercial use or edits.
If you publish client work, brand content, or monetized videos, I'd avoid guessing. Use a library with clear terms and keep the license record with the project files.
Practical rule: If you can't explain your right to use a track in one sentence, don't put it in the edit.
Libraries are useful, but they're only half the decision. The better question is whether the music fits the video's role. If you're experimenting with formats that remix existing media, this guide to video mashups is worth reading because music choice becomes even more important when footage already carries a built-in tone.
Pick the track by function, not by personal taste
A song you like isn't always a song that works. Start with the footage.
Video typeMusic direction that usually worksWhat often fails
Tutorial or explainer
Light lo-fi, ambient, minimal percussion
Busy melodic tracks that compete with speech
Documentary clip
Sparse cinematic bed, restrained piano, soft pulse
Overly epic music that feels forced
Product promo
Clean electronic rhythm, confident pulse
Lyrics that pull focus from visuals
Comedy or talking-head short
Subtle groove, quick sting, light texture
Music that telegraphs the joke too hard
Use this quick filter before you commit:
- Mood fit: Does the track support the emotional tone already in the footage?
- Pacing fit: Does the rhythm match your cut speed?
- Platform fit: A YouTube essay can carry a slower bed. A Reel usually needs quicker energy.
- Dialogue fit: If your voice is the main event, the music should stay out of its frequency range as much as possible.
- Loopability: If you need to trim or extend the edit later, can the track survive a loop without sounding hacked together?
Creators waste time searching for the “perfect” song. In practice, the better move is choosing a track that does its job cleanly and doesn't create legal or mixing problems later.
How to Add Music Using Desktop Video Editors
Desktop editors are still the cleanest option when you want control. Adobe Premiere Pro, DaVinci Resolve, and Final Cut Pro all handle this the same way at the workflow level. You import the video, import the music, place them on separate tracks, trim for timing, then mix so one doesn't crush the other.
The key is separation. Put dialogue or production audio on one track and music on another. That gives you room to cut, fade, duck, and rebalance later without damaging the original clip.
The universal timeline workflow
A simple desktop workflow looks like this:
- Import both files Bring in your video and your music file first. Don't edit music directly into the camera audio track.
- Place music on its own audio track In most editors, dialogue sits on A1 and music goes below it on A2 or A3. That sounds minor, but it keeps the session organized when you need to automate levels.
- Trim to the story, not just the runtime Cut the music to land with the visual beats. If the video changes tone midway, the soundtrack should reflect that.
- Add basic fades A tiny fade-in and fade-out usually sounds more intentional than a hard start or stop.
- Lower the music immediately New editors usually leave the music too loud. Pull it down before you do anything else, then build up only if the video can support it.
If you're still deciding what editor to use, this roundup that lets you compare free video editing tools is useful because it shows which apps are better for timeline editing versus fast social exports.
What works better than drag and hope
Most weak edits fail in the same places. The music starts at full volume, loops awkwardly, and masks the first line of dialogue. The fix is usually basic discipline, not advanced audio engineering.
Put the music under the scene. Don't let the music become the scene unless that's the point of the video.
A few habits make a noticeable difference:
- Cut on phrase endings: Music edits sound cleaner when they happen at the end of a bar or phrase.
- Match energy changes: If the speaker gets serious, the soundtrack should usually thin out rather than keep pushing.
- Use markers: Mark hook moments, punchlines, and scene changes before trimming the audio.
- Preview on speakers and headphones: A mix that feels balanced on studio headphones can still sound muddy on a phone.
For creators building a more permanent workflow, this video editing software comparison helps clarify where traditional editors fit versus lighter social-first tools.
Desktop editing takes longer than a quick mobile pass, but it gives you the control to make music feel deliberate instead of attached at the end.
Adding Music on Mobile and Simple Web Apps
If you publish often, speed matters almost as much as polish. Mobile apps and browser editors are built for that. They trade some control for convenience, which is often the right swap when the goal is getting short-form content out consistently.
That trade-off makes sense because short-form volume is enormous. Meta reports that global short-form video consumption hit 140 billion daily plays in 2025, and Instagram Reels with music achieve 22% higher reach.
Mobile apps are fast for native-feeling edits
Apps like CapCut and InShot are built for creators who want to add music in a few taps. The usual flow is simple: open the project, pick a built-in track or upload your own, drop it under the video, then trim and lower the volume with a slider.
That's why they're good for:
- Quick platform-native posts
- Trend-driven edits using built-in sounds
- Basic timing changes without opening a full NLE
- Creators who edit mostly on their phone
They're less ideal when you need detailed keyframes, nuanced EQ, or more complex multi-track management.
Web apps are easier for teams and templates
Canva and similar web editors feel different. They're less about a classic timeline and more about fast assembly. That's useful when you're working from templates, making simple promos, or collaborating across a team that doesn't want full editing software.
A quick comparison helps:
Tool styleBest forMain limitation
Mobile app like CapCut
Fast edits, trend response, phone-first posting
Less precise audio control
Web app like Canva
Simple branded content, reusable templates, browser access
Less flexible for detailed mixing
The trick with either option is resisting the urge to accept the default audio balance. Most built-in tracks come in hotter than they should.
A quick walkthrough helps if you want to see the mobile-style workflow in action.
Where simple tools break down
The simplified workflow is great until you have voiceover, source audio, music, and sound effects all fighting for space. That's where mobile and web editors can start to feel cramped.
Use them when:
- You need speed more than surgical control
- The edit is short and dialogue is straightforward
- You're testing ideas before building a more polished version
Move to a desktop editor when the audio starts needing real mixing, not just volume reduction.
Professional Audio Mixing to Make Your Video Shine
Adding music is easy. Making it sound intentional is the part that separates a polished edit from an amateur one.
The biggest mistake is treating audio like a single slider problem. It isn't. Music, dialogue, and natural sound all need room. When they compete, viewers feel the mess before they can explain it.
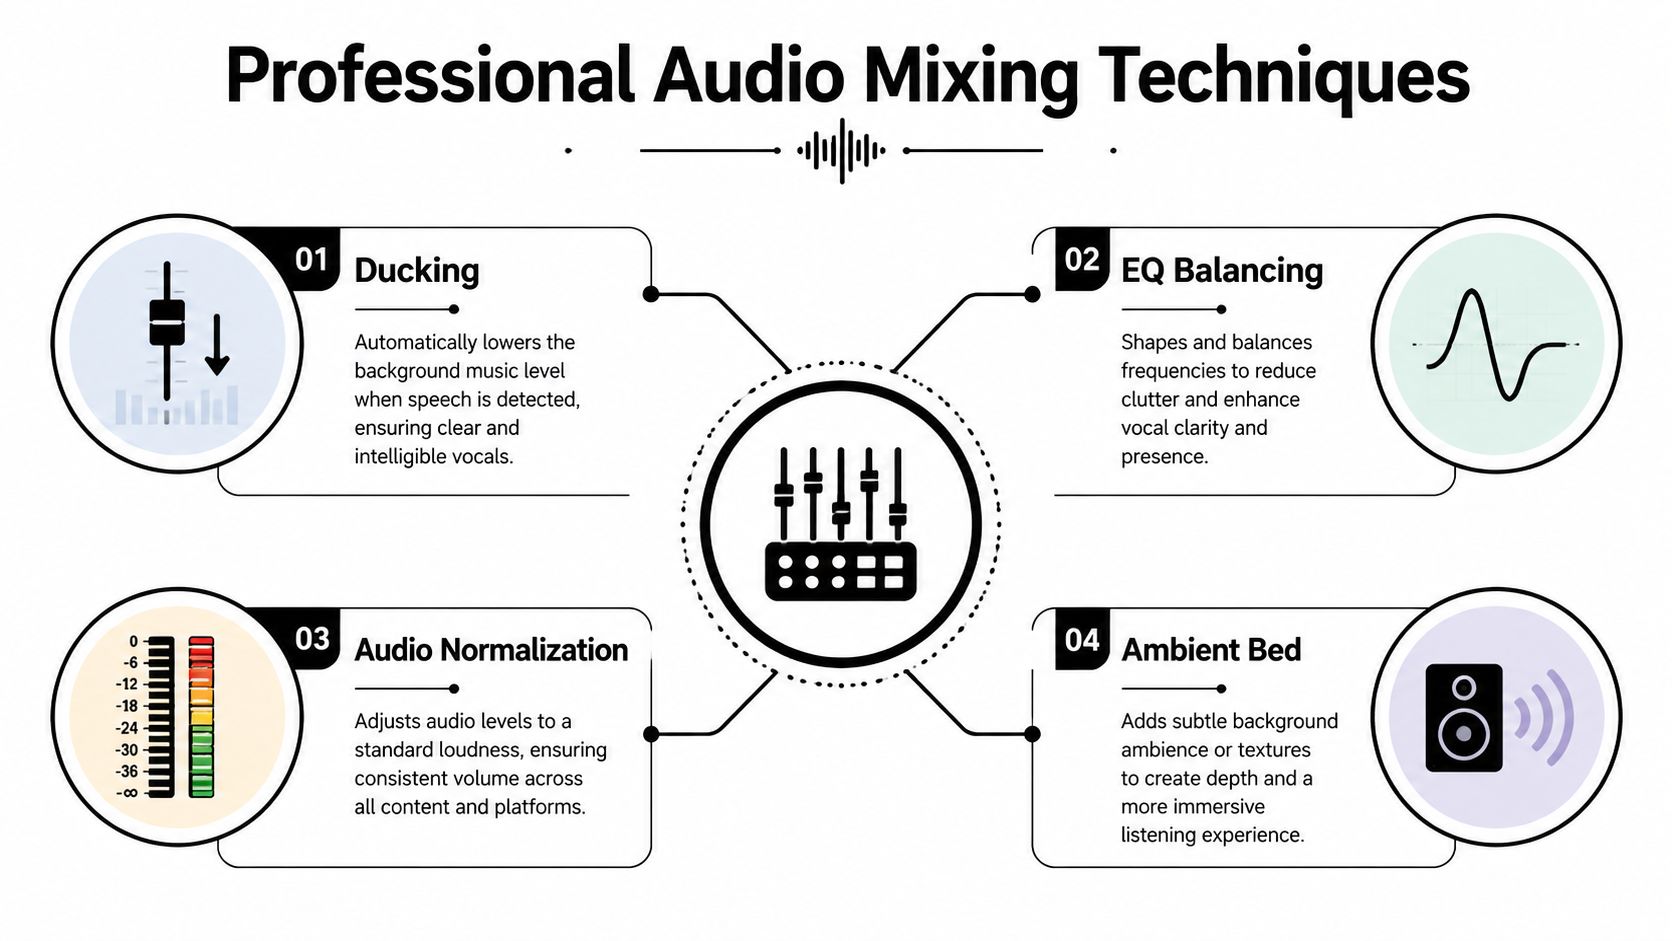
Duck the music instead of fighting the dialogue
Think of ducking like two people in a conversation. When one starts talking, the other lowers their voice. Your music should do the same.
According to Soundscape's audio mixing guidance, professional results usually place music between -18 and -12 dB LUFS. To keep speech clear, use sidechain compression to duck the music with a threshold of -30dB and a 4:1 ratio. The same source notes that 62% of amateur edits fail loudness compliance, which is tied to 30% lower retention.
If your editor supports sidechain compression, use it. If not, manual keyframes still work well.
- During speech: Lower the bed so the words stay effortless to understand.
- Between lines: Let the music rise slightly to restore momentum.
- At the hook: Keep the first spoken line especially clean. That's where drop-off happens fast.
Mix note: If viewers have to strain to hear the first sentence, the soundtrack is hurting the video, not helping it.
Fades and transitions matter more than people think
A smooth fade is small, but people notice when it's missing. Hard-starting a track can feel like a mistake, especially in talking-head content.
Use fade-ins and fade-outs when:
- Opening a clip with dialogue
- Ending a segment before a cut
- Switching tracks between sections
- Entering from silence or room tone
A short fade often sounds more human than a sharp edit. It gives the soundtrack a sense of entry and exit instead of making it feel pasted on.
Use EQ to carve space for the voice
Volume alone won't solve masking. Sometimes the music is technically quiet enough, but the vocal still sounds boxed in because both signals are fighting in the same frequency area.
A basic approach:
ProblemCommon fix
Voice sounds buried
Lower the music and carve space with EQ
Music feels muddy
Trim low-end rumble
Sibilance or harshness
Tame the bright top end on the wrong track, usually music first
If you want a thoughtful perspective on why isolated music elements can change the way people perceive a track, this Glitz and Glamour vs. Reality music commentary is an interesting read.
Good mixing doesn't call attention to itself. It clears the path so the message lands without friction.
The Smart Way to Add Music to Repurposed Social Clips
You pull a 45-minute podcast into an AI clipping tool, get 18 usable shorts, and then hit the actual editing wall. Every clip needs music that fits its hook, supports the speaker, and still feels like it came from the same brand.
That is the part standard music tutorials usually miss.
Traditional editing advice assumes one timeline, one story arc, and one soundtrack decision at a time. Repurposing for social works differently. A webinar, interview, or YouTube video can produce a full batch of shorts for Reels, TikTok, and Shorts, and each one carries a different pacing pattern and emotional tone.
The bottleneck is not adding a track. It is making repeatable audio decisions fast enough to keep publishing.
Manual selection breaks down for a simple reason. A strong clip about a hard lesson needs different music than a quick how-to tip or a high-energy opinion cut. If you choose from scratch every time, the process slows down, and the batch starts sounding random. If you reuse the same bed everywhere, the feed starts to feel templated.
A better workflow starts before you touch the music library. Group clips by intent first.
- Educational clips: light, unobtrusive beds that keep attention on the spoken point
- Story or opinion clips: tracks with more shape and tension to support pacing
- Motivational or emotional clips: stronger lift, but only if the dialogue can still lead
- Product or promo clips: cleaner rhythmic tracks that make cuts feel tighter without crowding the message
This is how I keep batch editing under control. I do not score clips one by one in isolation. I set a few audio lanes for the batch, then assign each short to the lane that fits its job.
After that, review in passes instead of finishing one clip at a time:
- Hook pass
Check the first seconds only. The music should support the opening line, not announce itself before the point lands. - Tone pass Match the track to what the speaker is saying. Fast cuts do not always need energetic music, and serious clips often perform better with restraint.
- Brand pass
Listen across the batch. The clips should feel related without sounding identical. - Platform pass
Reels, TikTok, and Shorts all reward speed, but phone playback punishes muddy audio. If the track sounds crowded on mobile, replace it or simplify it.
That process matters because repurposing is a system problem, not just an editing problem. If you're building a repeatable workflow for repurposing content for social media, music has to be part of the system from the start. It cannot be treated like decoration added after captions and cuts are done.
AI clipping tools help with speed and selection. The editor still has to make the taste decisions. The win is that you stop rebuilding your audio approach for every short and start applying a consistent set of rules across the whole batch.
That is what scales. Ten clips can go out with clear hooks, matched tone, and a recognizable audio identity, without turning post-production into the slowest part of your content strategy.
Final Touches and Tips for Viral Audio
Most creators add music near the end. The stronger move is treating music like part of the hook.
Epidemic Sound reports that mood-matched tracks boost completion rates by 28% and shares by 42%, and that editors who sync beats to hooks within 0.2 seconds can see 2.1x more engagement. That tells you where to focus. The opening seconds matter most, and timing matters almost as much as track choice.
Use this final checklist before export:
- Match the first seconds: The soundtrack should support the opening visual and spoken hook immediately.
- Check trend fit carefully: Trending sounds can help, but only if they fit the clip's tone and licensing context.
- Keep dialogue first: If the voice loses clarity on phone speakers, lower the music again.
- Trim dead air: Music can hide small pauses, but it can't save weak pacing.
- Watch the ending: A clean audio exit makes the clip feel finished, whether that's a fade, sting, or deliberate stop.
- Test on mobile: Social videos live on phones. Review the mix there before publishing.
One more thing matters in viral editing. Don't score every short the same way. Repetition makes a feed feel mechanical. Viewers might not name the problem, but they'll feel it.
When the music fits the message, the cut feels more confident. When the mix stays out of the way, people keep watching.
If you're turning long videos into short clips regularly, Klap helps streamline that workflow by converting long-form content into social-ready shorts with captions, reframing, and editing controls in one place. That makes it easier to keep your audio decisions consistent across a full batch instead of rebuilding the same process clip by clip.
