How to Schedule YouTube Shorts for Consistent Publishing (2 Easy Ways)
Content Creation

Quick Summary
This guide shows you how to schedule YouTube Shorts in advance, saving time and keeping your content consistent. We cover two simple methods: using YouTube Studio and Klap. Whether you want the basic built-in option or a faster, more flexible workflow, you’ll find exactly what you need to stay on track. For more content creation and publishing tips, check out the Klap blog.
Simplify Your Workflow and Stay Consistent with YouTube Shorts Scheduling
Creating content takes time. Between planning, recording, and editing, most YouTube creators barely have time left to hit publish between planning, recording, and editing. Manually posting Shorts every day adds even more pressure. It’s easy to forget, miss a time slot, or break consistency altogether.
Scheduling takes that off your plate by letting you queue videos in advance so they go live even when you’re not around. It’s especially useful if you’re juggling other platforms or simply want to stick to a content calendar.
In this Klap guide, we’ll show you two smart ways to schedule YouTube Shorts and discuss each option's strengths and limitations.
Why Listen to Us?
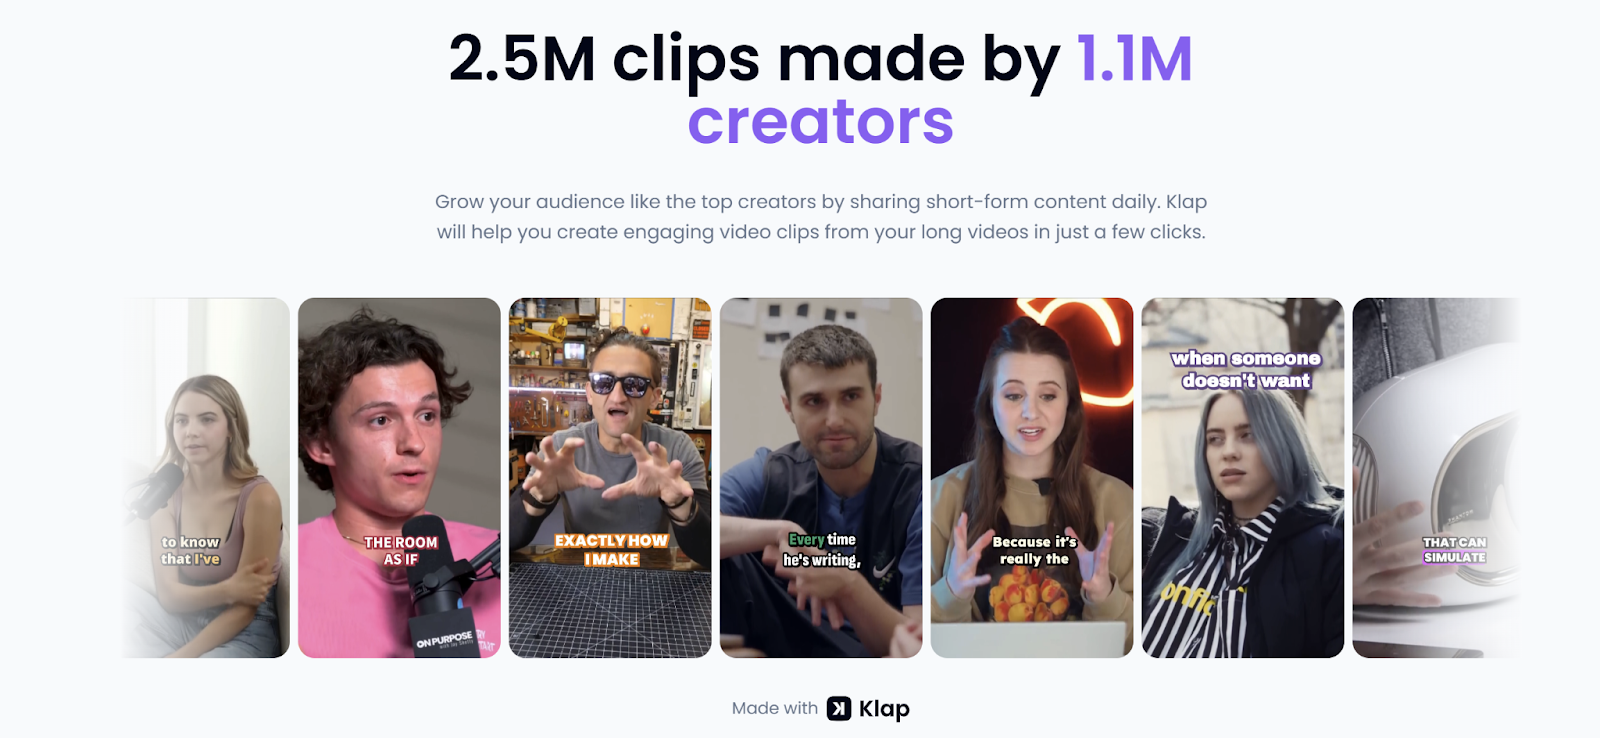
At Klap, we’ve helped over 1.1 million creators turn long-form videos into more than 2.5 million short-form clips. Our platform offers AI-powered tools built specifically for creators who value speed, quality, and consistency. We understand the real-world demands of publishing content regularly, and this guide reflects what actually works for staying on schedule with Shorts.
What Does It Mean to Schedule YouTube Shorts?
Scheduling YouTube Shorts means setting a future date and time for your Shorts to go live instead of publishing them manually. It helps maintain a consistent posting rhythm without needing to be online when the video goes out.
A typical scheduling flow for YouTube Shorts usually includes:
- Uploading your Short to YouTube Studio or a scheduling tool
- Choosing the “Schedule” option instead of “Publish”
- Setting the exact date and time for the video to go live
- Automatic publishing at the scheduled time.
This is especially helpful for creators who batch content or want to stay active across multiple platforms without the daily hassle.
Step-By-Step Guide on How to Schedule YouTube Shorts
Method 1: How to Schedule YouTube Shorts Using Klap
Klap makes creating and scheduling YouTube Shorts easy without extra tools or manual uploads. Our AI-powered Shorts maker automatically trims long-form content into short, vertical videos, and the built-in scheduler lets you publish them at the exact time you choose.
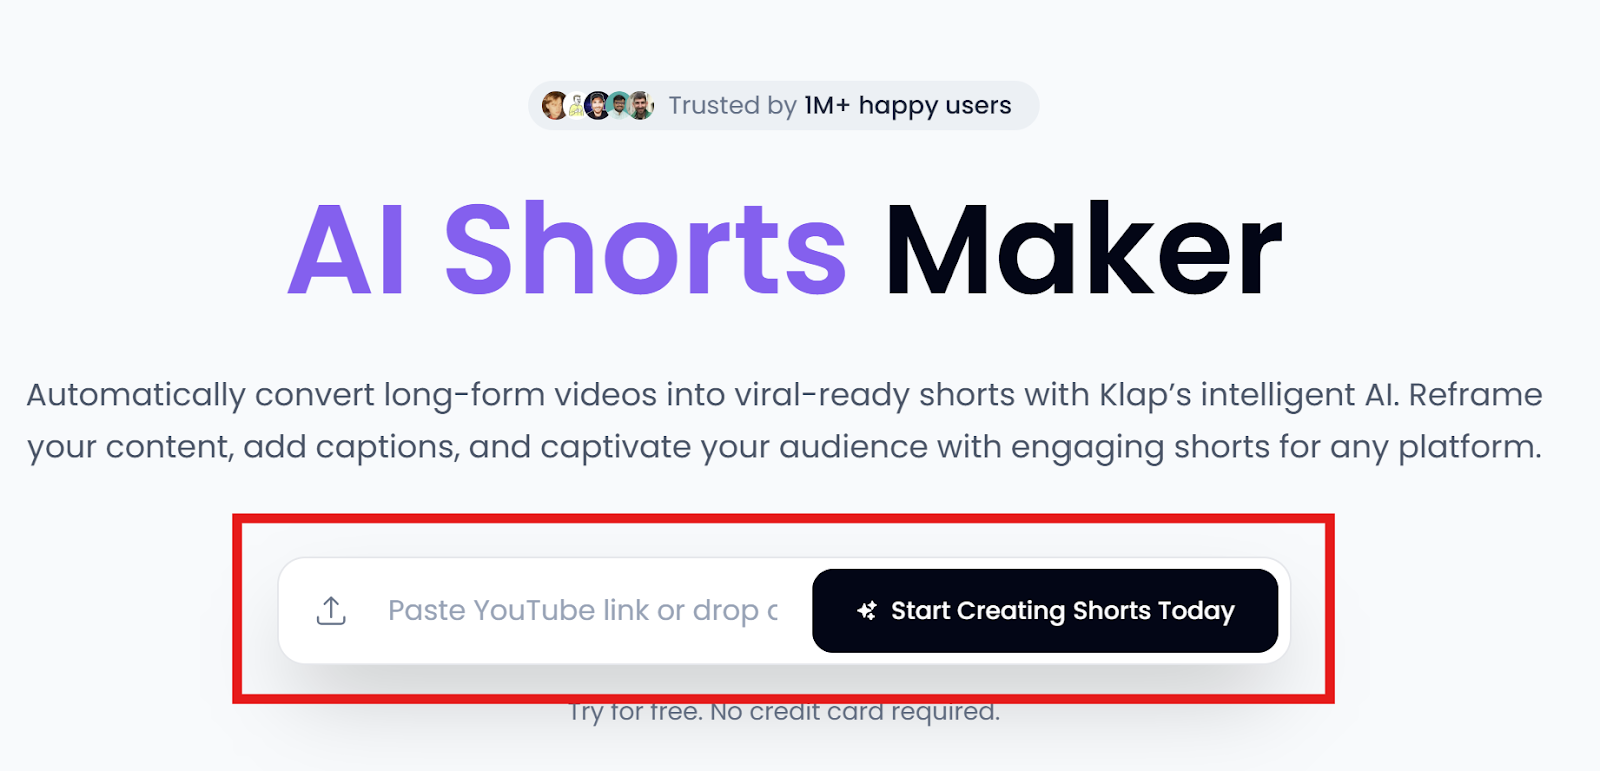
Step 1: Visit the Klap AI Shorts Maker Page
- Head to the Klap AI Shorts Maker page.
- This tool enables you to create the YouTube Short you want to schedule.
Step 2: Input or Upload Your Original Video
Uploading your source video is the first step in using the AI Shorts Maker tool. There are two options here:
- Option 1: Paste a YouTube video link into the input field to repurpose the content. You can do this by opening the video on your browser and copying its URL from your browser. Then paste it into Klap’s input field.

- Option 2: Upload a pre-recorded file directly from your device’s storage.
Once you’ve added your video, you’ll be prompted to log in or create an account.
Step 3: Log In or Create an Account
- If you’re new to Klap, set up your account for free.
- If you already have an account, just log in to continue.
Step 4: Set Your YouTube Shorts Preferences
Once you’re logged in, a pop-up will appear where you can configure your clip:
- Select the “Shorts” format
- Set the Duration to “1 min,” the default for YouTube Shorts.
- Choose your language under the Language tab
- If your video is not already in the portrait frame, enable “Reframe.”
- Then, select "Portrait" (9:16) as the dimension. This enables Klap's intelligent auto-resizing feature to resize your video.
- Finally, enable “Captions” to auto-generate subtitles.
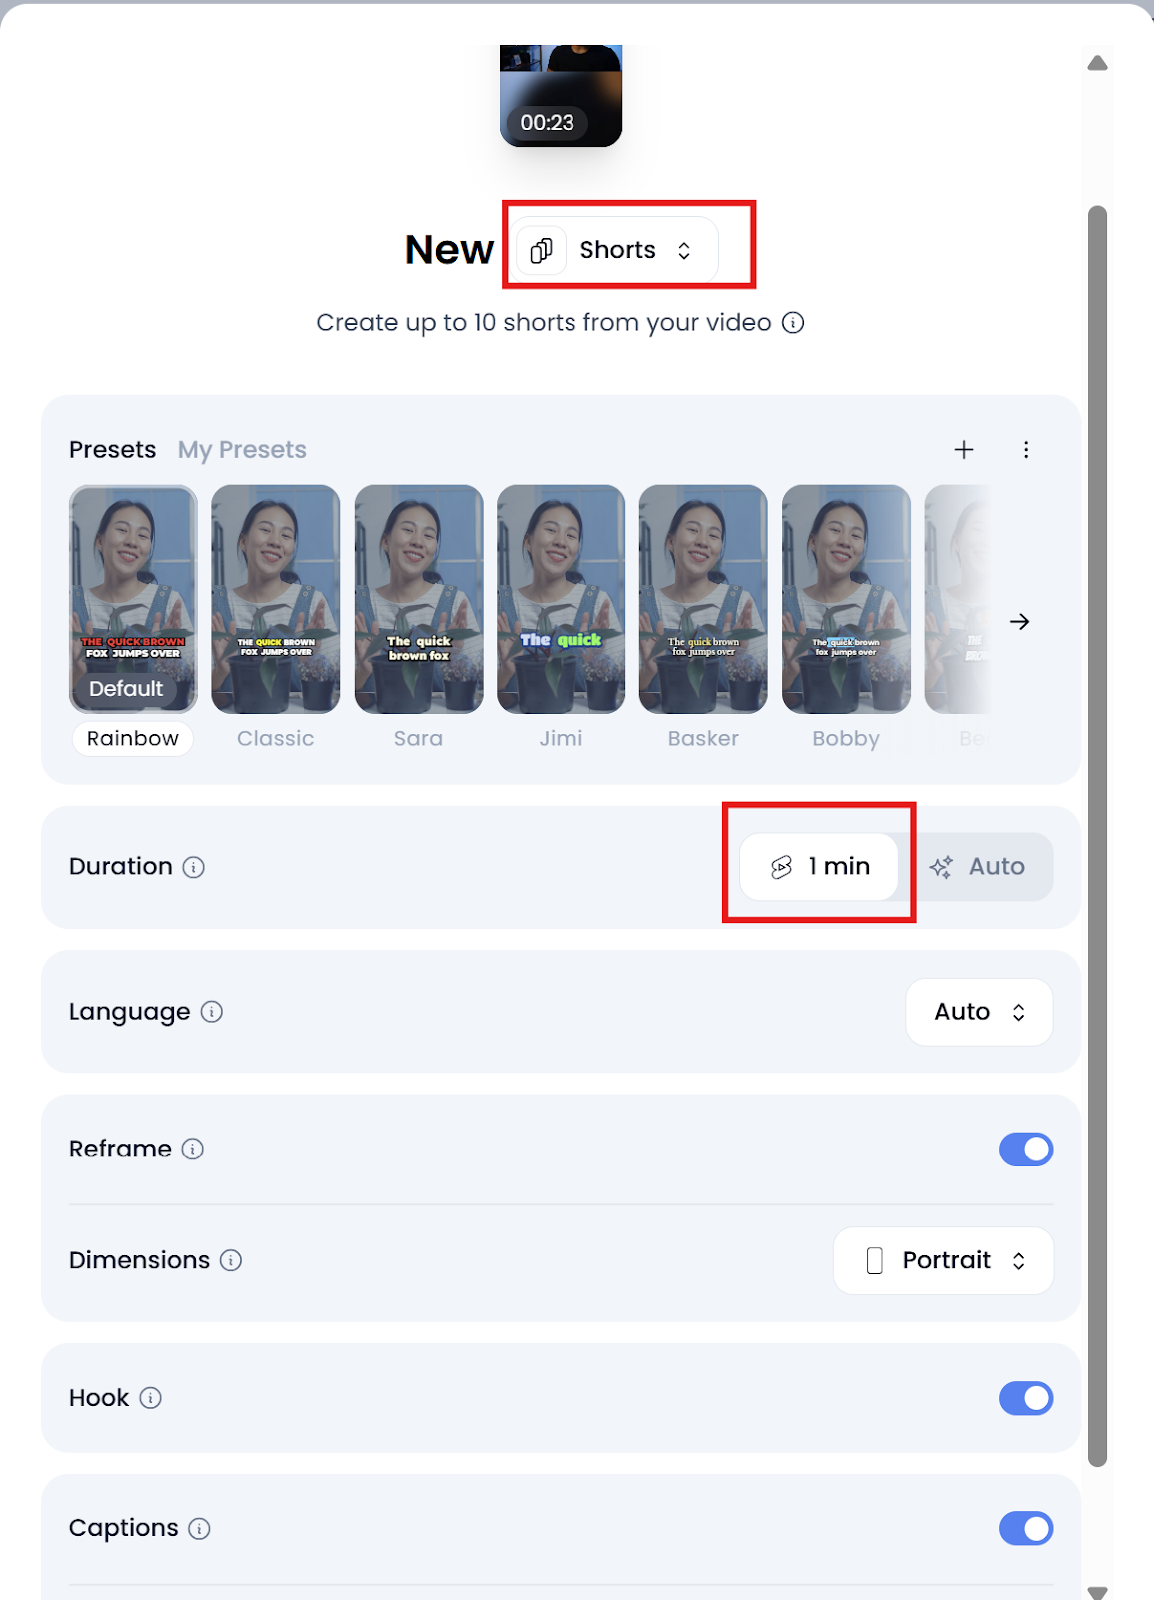
Once your settings are good to go, click Generate Shorts and let Klap’s AI work its magic. It’ll then process your video and auto-generate your shorts.

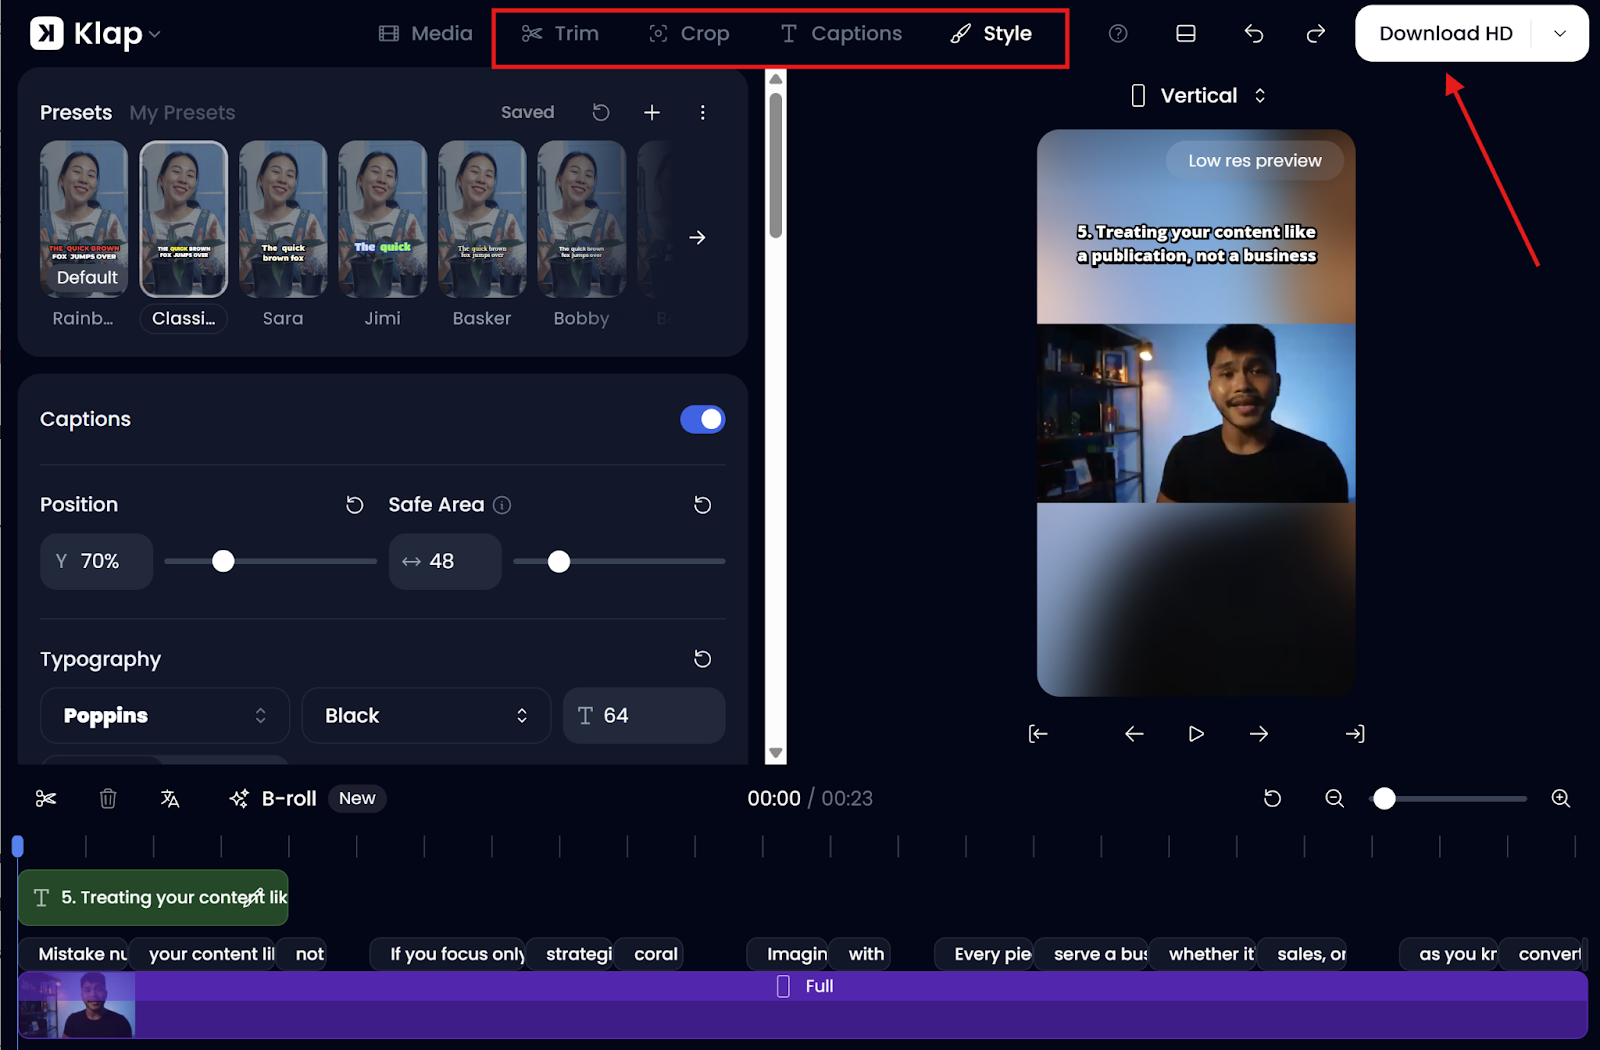
Step 5: Edit Your YouTube Short in Klap
Once generation is done, click “Edit” to refine your clip further inside Klap’s editor before scheduling.
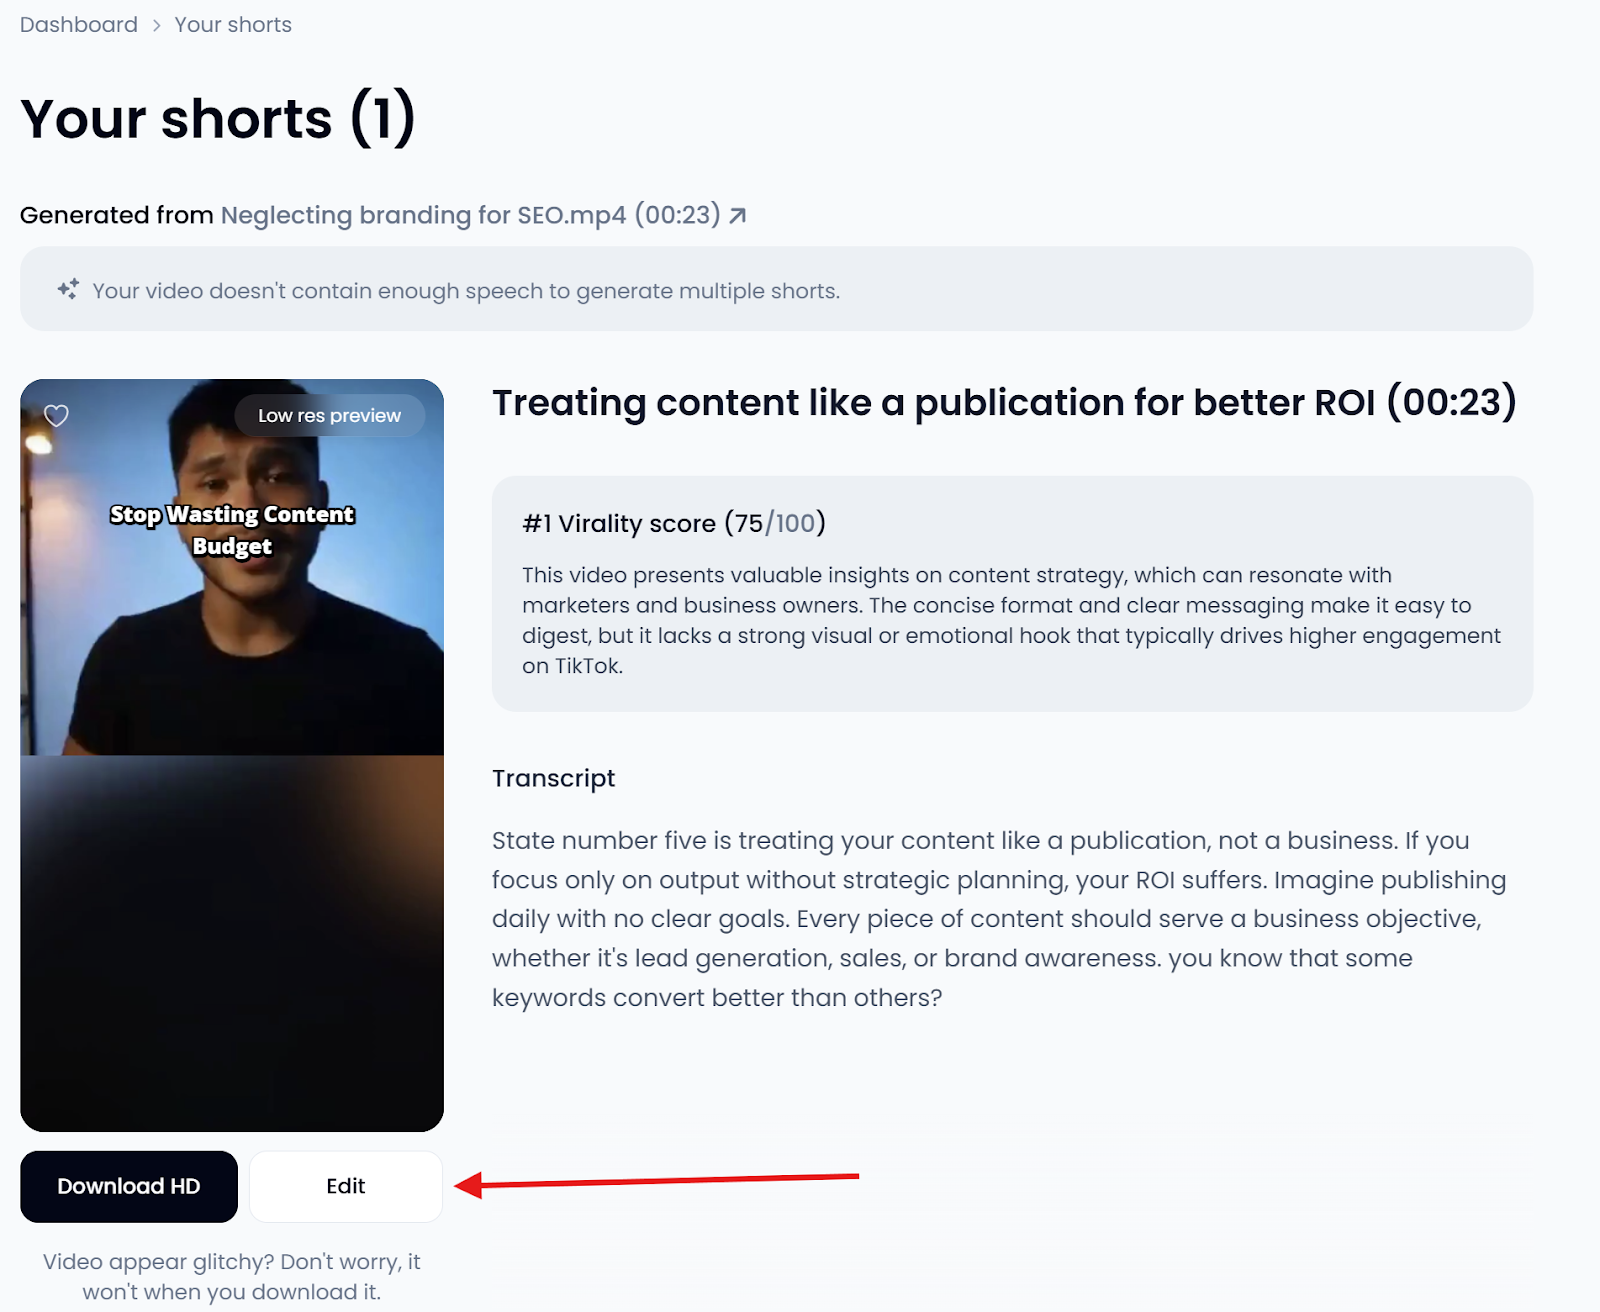
Here, you can:
- Trim: Cut out filler, remove dead air, or adjust where your TikTok video starts and ends.
- Crop: Fine-tune how your video fits into the vertical 9:16 frame. It’s a great way to highlight the speaker’s face or keep the focus centered.
- Captions: Assess the auto-generated captions from the transcribed audio and make quick edits. You can also turn individual caption lines on or off and add custom captions for clarity.
- Style: Polish your YouTube Shorts further by adjusting typography, positioning, highlights, presets, animations, emojis, overlays, etc.
Step 6: Render and Export Your Short
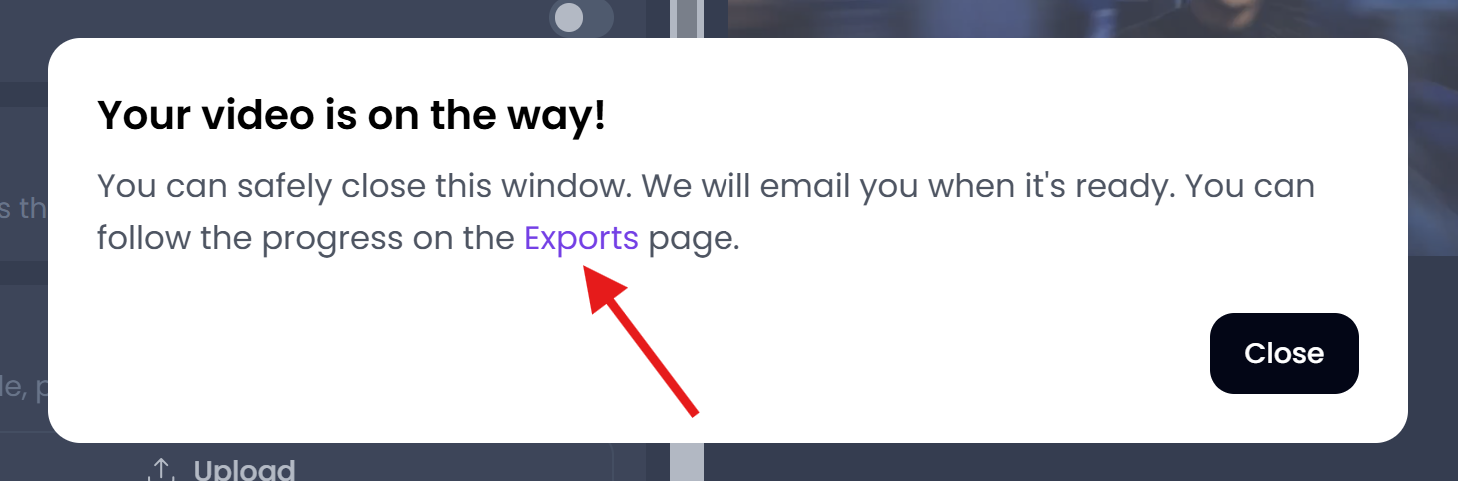
- When you’re done editing, click “Download HD” to move to the rendering stage, then click “Start Render" when prompted.
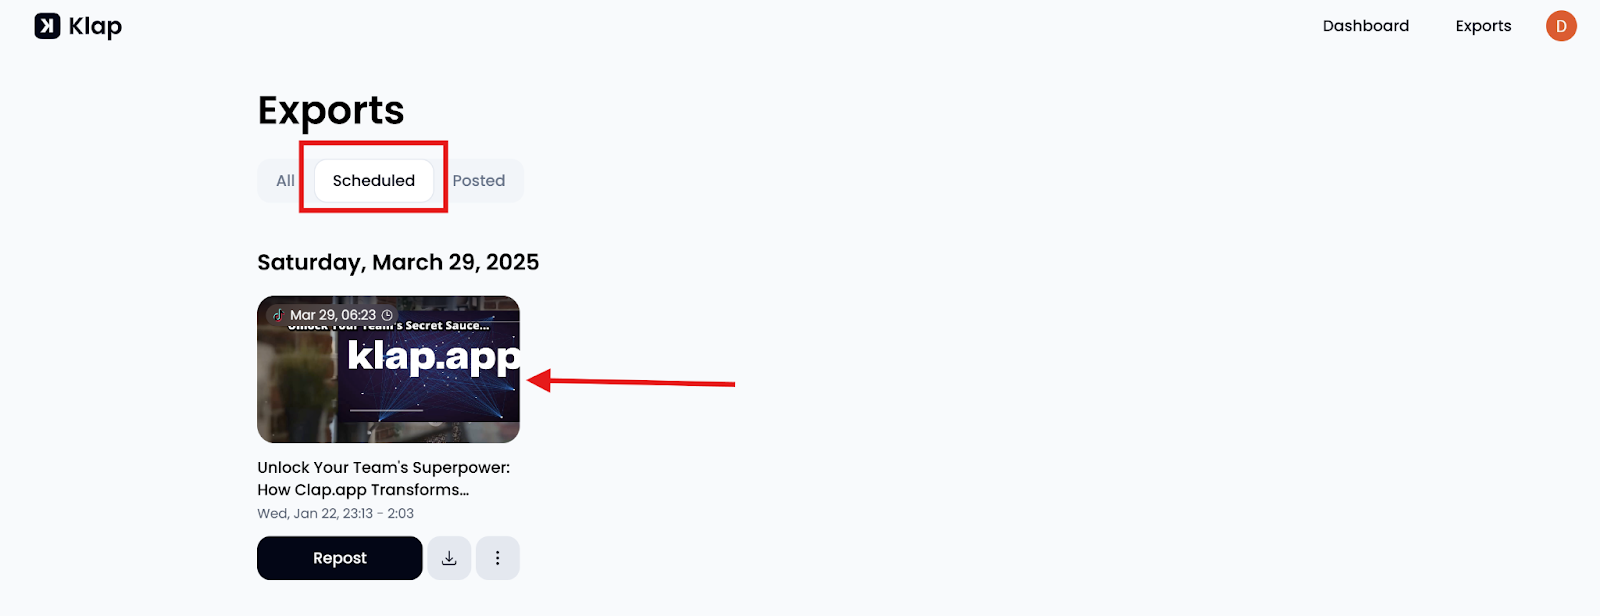
- While rendering goes on in the background, Klap prompts you to track the progress on the Exports page.
- Click the “Exports” in-text link in the popup to head to the Exports page.
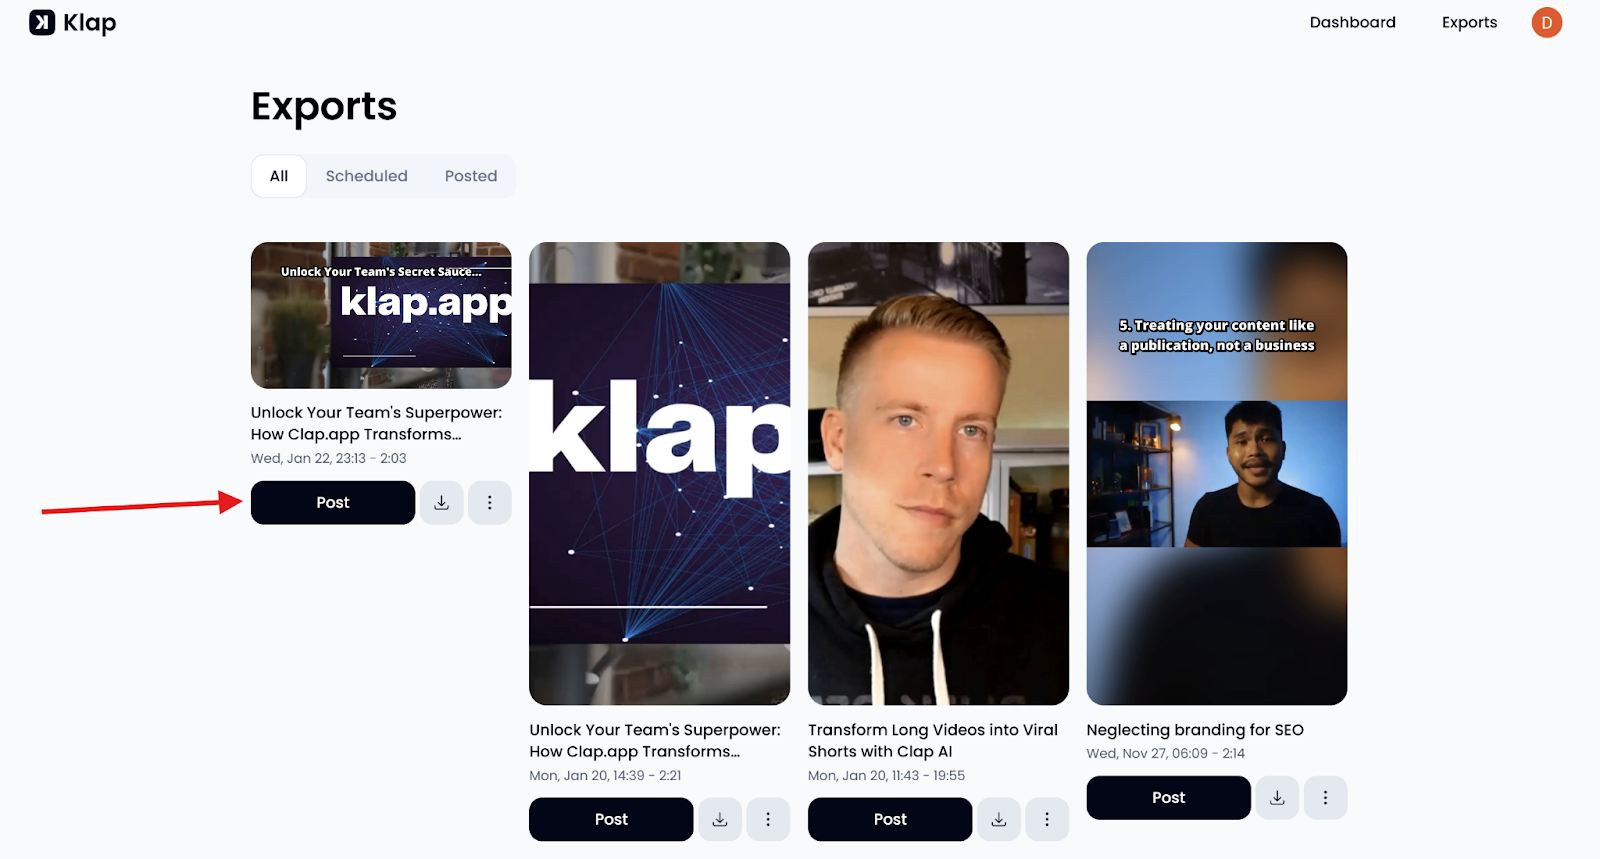
- On the Exports page, locate your newly rendered YouTube Shorts and click Post right under it.
- This takes you to the Publish page, where you can schedule your Shorts.
Step 7: Schedule Your YouTube Short
On the Publish page:
- Select the YouTube icon to connect your channel.
- Add a caption.
- Click “Schedule” to open the calendar interface.
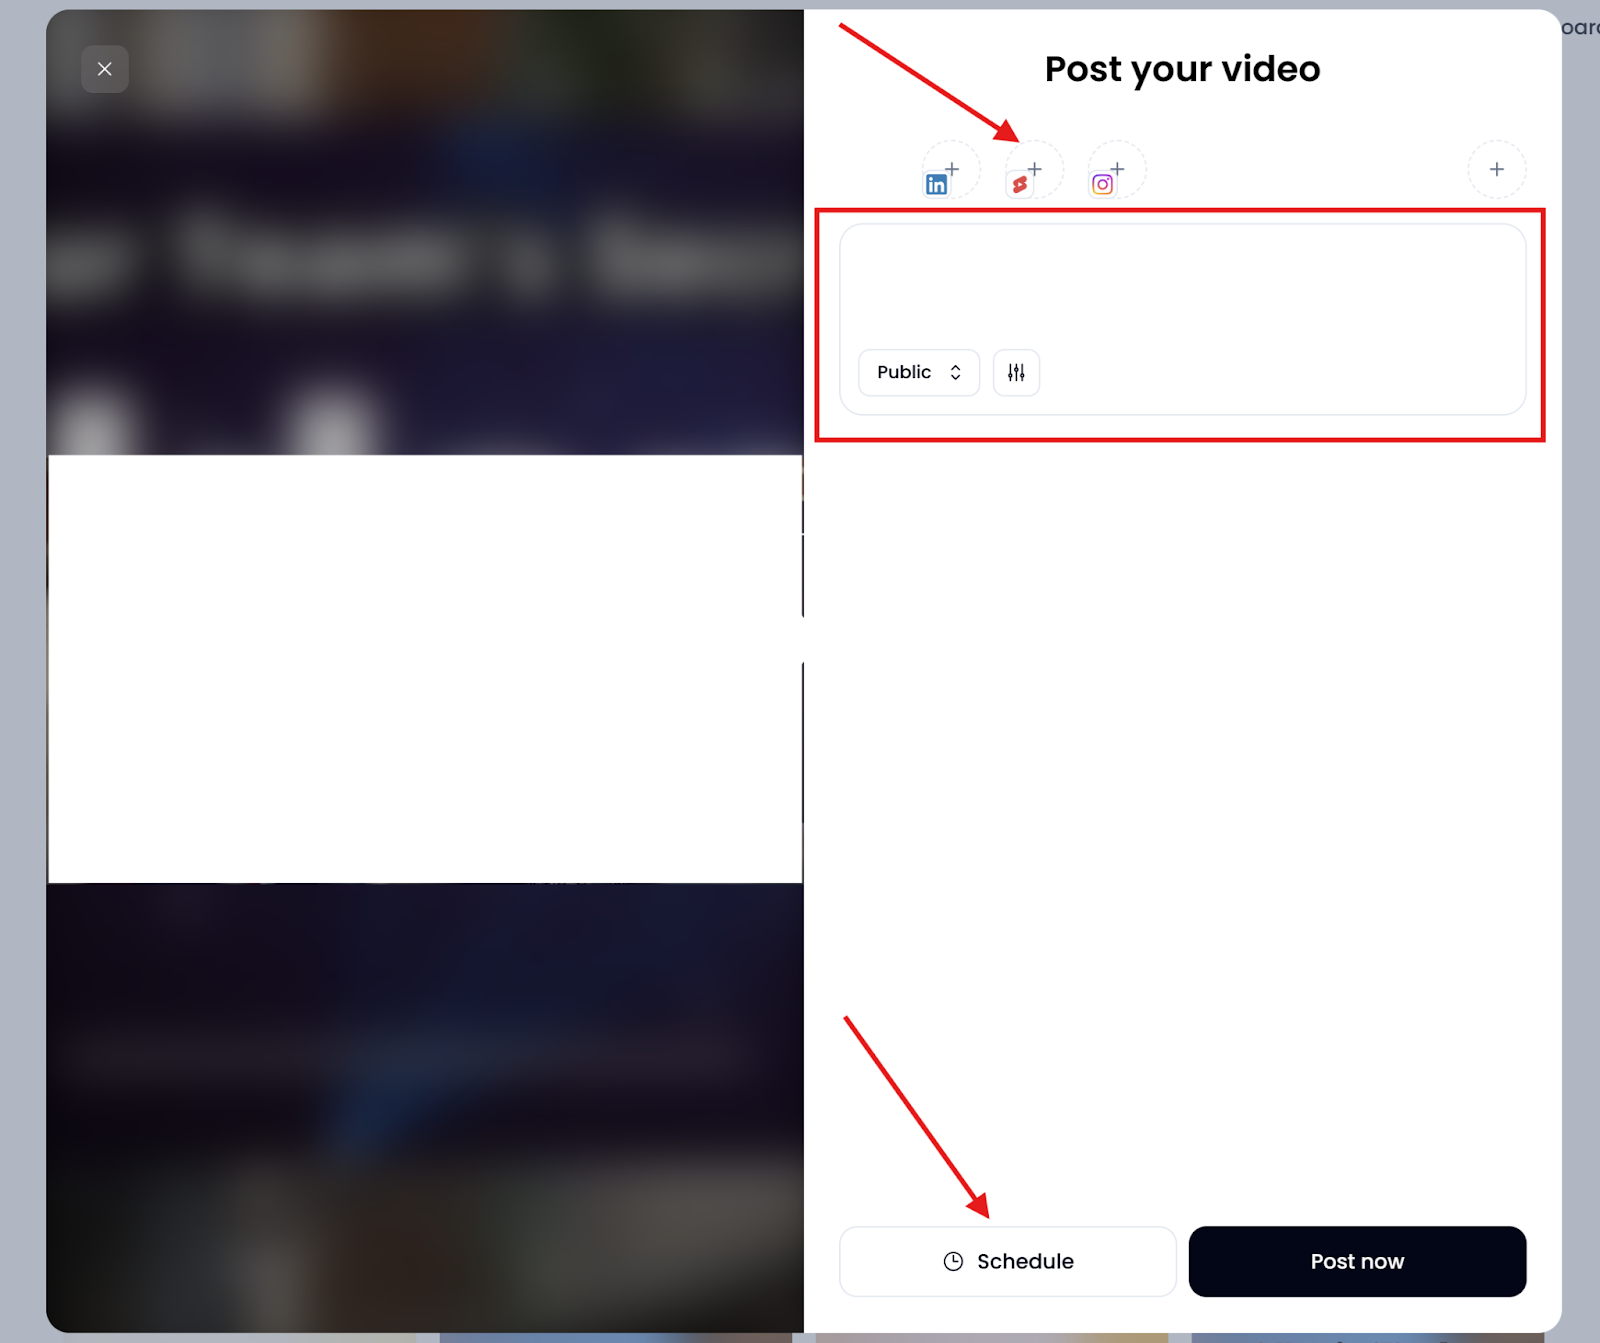
- Choose your preferred publish date and time, then click “Confirm.”
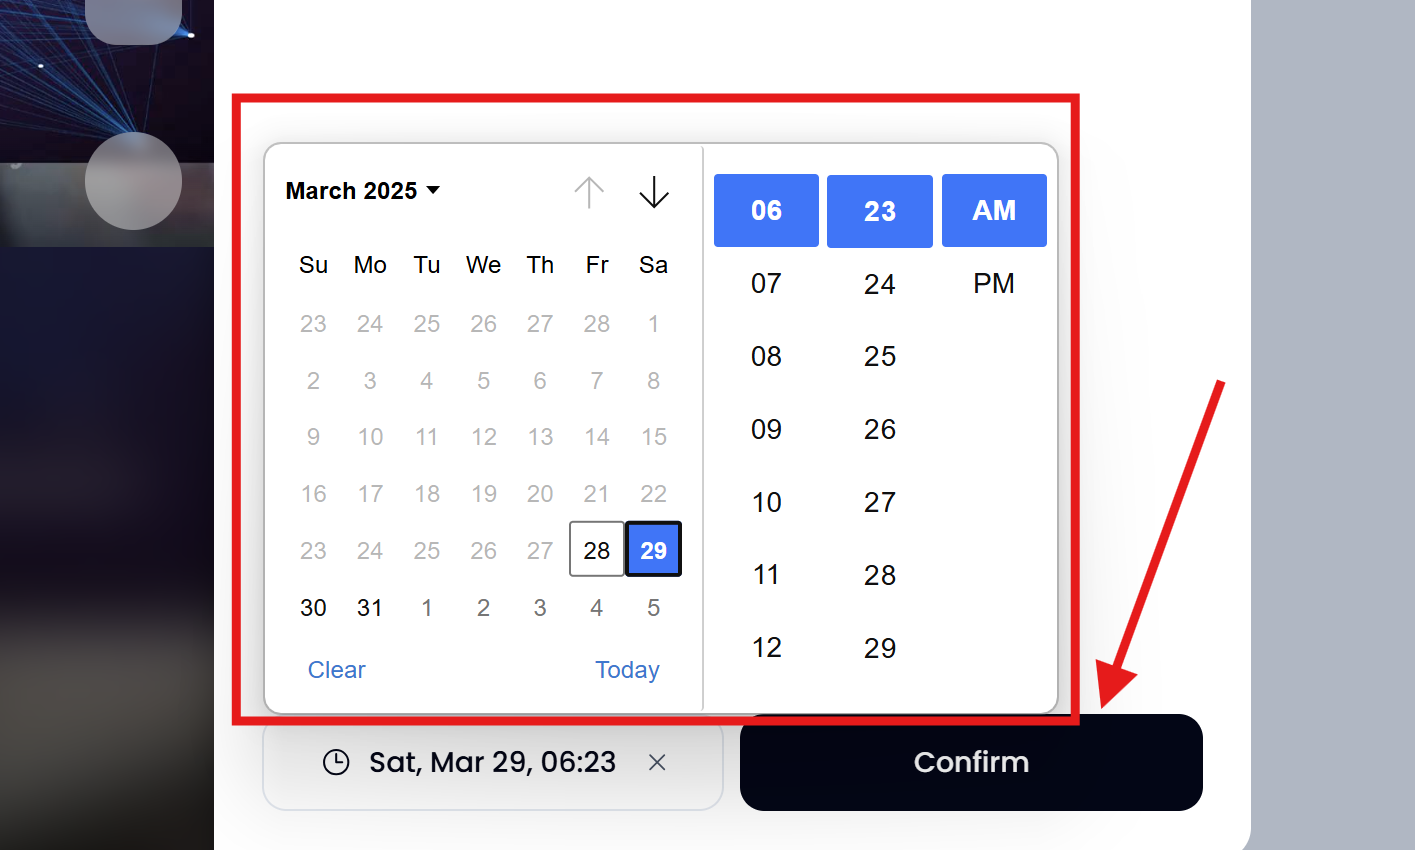
Your Short is now queued to go live on YouTube at the time you selected. You can view all scheduled content under the Scheduled tab on the Exports page.
Method 2: How to Schedule YouTube Shorts Using YouTube Studio
YouTube Studio lets you schedule Shorts directly from a desktop computer. This is ideal if you've already created your Short and just want to choose when it gets published. Here’s how it works.
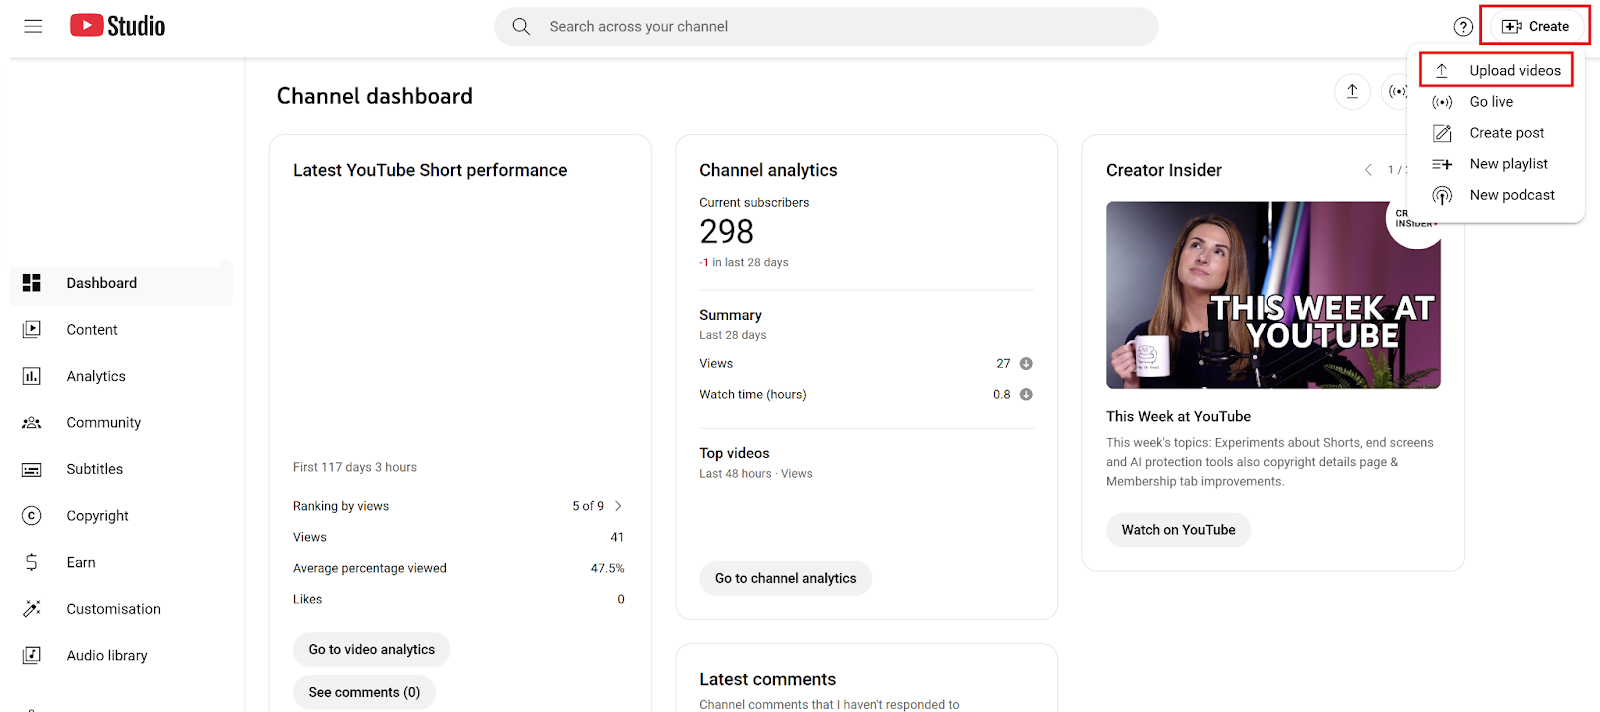
Step 1: Open YouTube Studio on Your Desktop
- Go to studio.youtube.com in your browser.
- Sign in to your YouTube account if you haven’t already done so.
- On the left sidebar, click “Create” (camera icon), then select “Upload videos.”
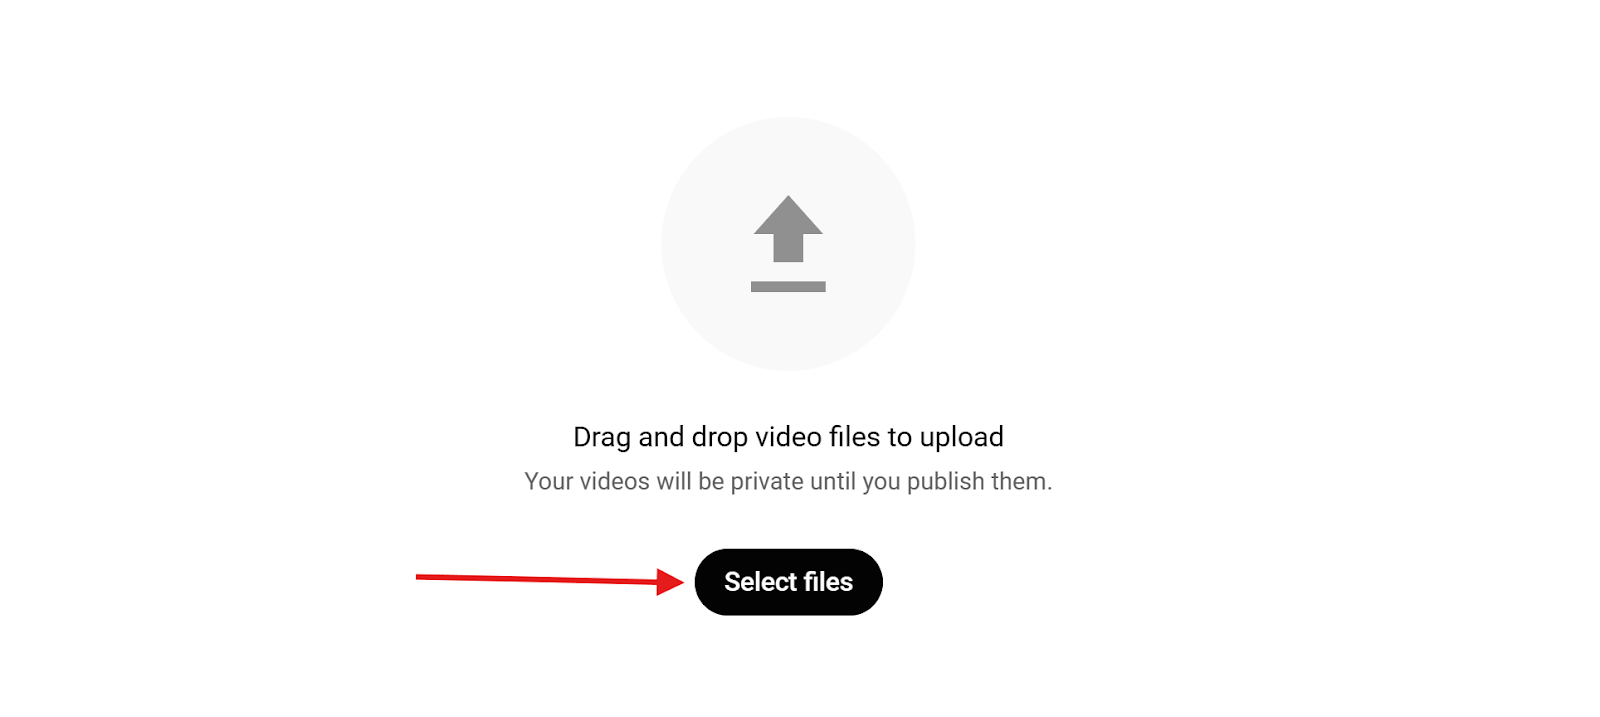
Step 2: Upload Your YouTube Short
- Click “Select Files” and choose your Short from your computer.
- To qualify as a Short, make sure:
- The video is less than 60 seconds long.
- The aspect ratio is vertical (9:16).
- YouTube will begin uploading the file while you move on to the next steps.
Step 3: Add Video Details
- Enter your video title and description.
- Optional settings:
- Upload a custom thumbnail (it may not always show in the Shorts feed).
- Add the video to a playlist if you want.
- Set the appropriate audience, e.g., mark it as "Made for kids" if required.
- Click “Next” to continue through the Checks and Video Elements tabs (you can skip or complete these as needed).
Step 4: Schedule the Short
- In the Visibility tab, set the visibility of your Shorts to Private, Unlisted, or Public.
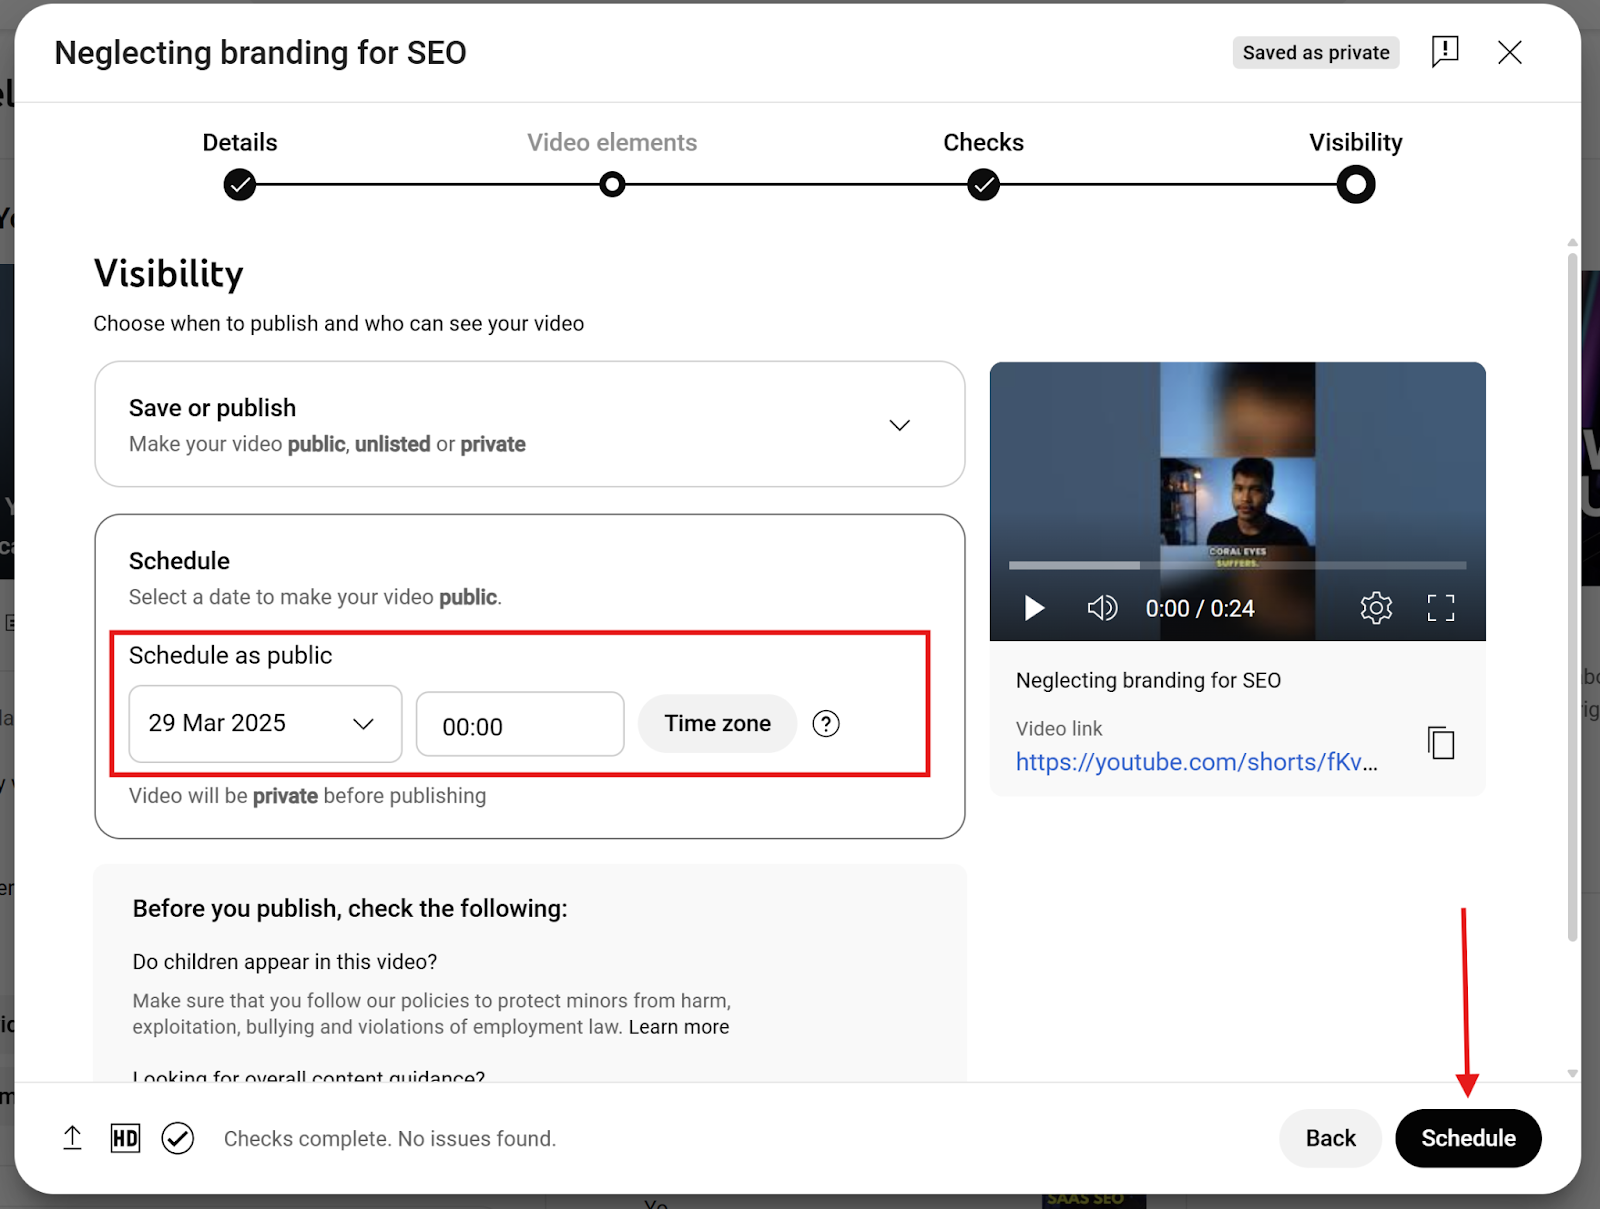
- Next, select “Schedule.”
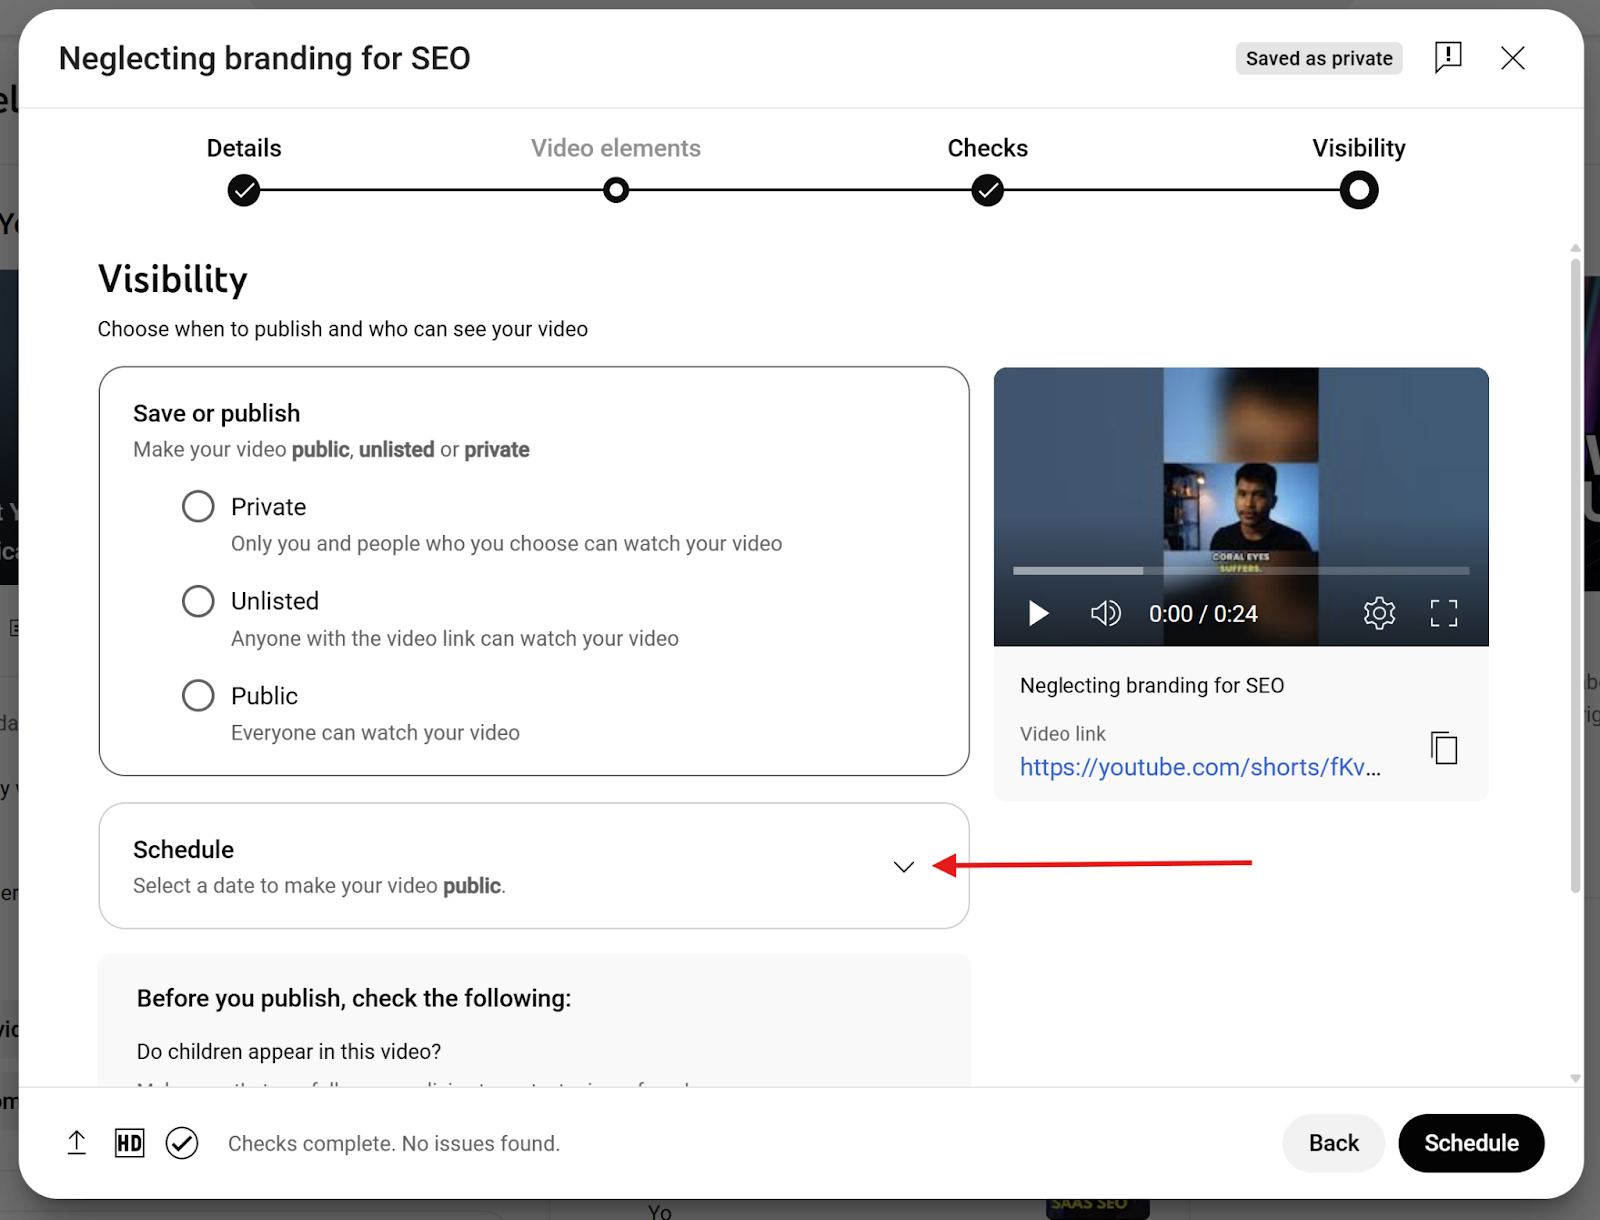
- Choose the date and time you want the Short to be published.
- (Optional) You can also enable “Set as Premiere,” though this is rarely used for Shorts.
Step 5: Finalize and Schedule
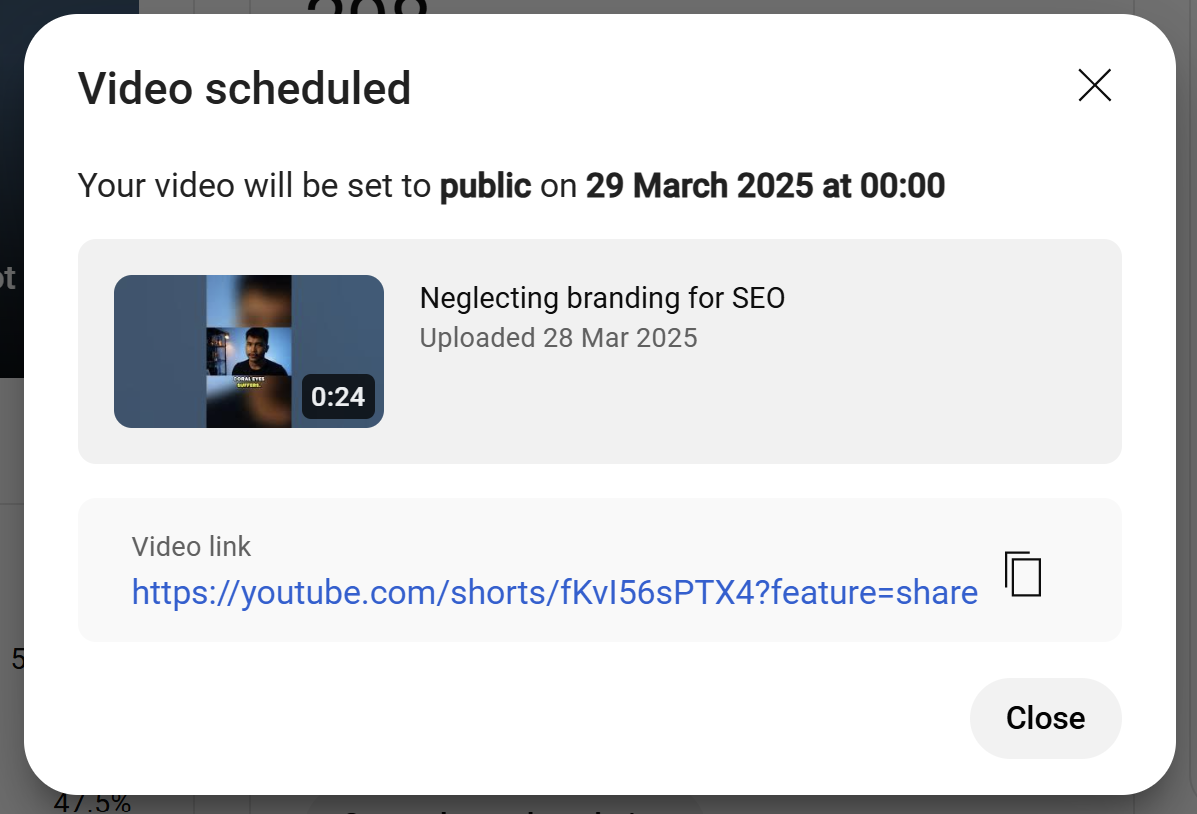
- Click the “Schedule” button to confirm.
- Your Short will now be automatically published at the scheduled time, and you will receive a confirmation popup like the one below.
Limitations of Using YouTube Studio to Schedule Shorts
Scheduling Shorts through YouTube Studio is convenient, but it has some trade-offs. Knowing these can help you plan better and avoid unexpected setbacks.
- Desktop-Only Access: Scheduling is only available through the desktop version of YouTube Studio. The mobile app does not support this feature.
- No Official Upload Limit, But Caps Exist: While not publicly documented, some creators report issues after uploading 7–8 Shorts in a single day.
- Strict Format Requirements: Shorts must be under 60 seconds and in a 9:16 vertical aspect ratio. Anything outside of that may not be recognized or promoted as a Short.
- Limited Scheduling Tools: YouTube Studio lacks features like bulk scheduling, optimal time suggestions, and cross-platform publishing.
- Subscriber Notification Limit: YouTube only sends up to three notifications per day. If you schedule more than three uploads, some may not notify your audience.
- No Scheduling for Repurposed Shorts: Shorts made using YouTube’s “Edit into a Short” tool must be published immediately and cannot be scheduled.
Why Use Klap to Schedule Your YouTube Shorts
Klap speeds up and simplifies the entire Shorts publishing process by removing many of YouTube Studio's limitations. It’s designed for creators who want more control, less friction, and better tools.
- All-in-One Editing and Publishing: No need to juggle separate tools for editing, uploading, and scheduling. Klap brings everything into one clean, simple workflow so you can edit and schedule without jumping between apps.
- Automatic Reframing: Unlike YouTube Studio, which only accepts videos already in a 9:16 vertical format, Klap lets you start with videos in any aspect ratio. It automatically reframes your content into the vertical format needed for Shorts.
- No Device Restrictions: You're not stuck using a desktop like with YouTube Studio. Klap works across devices, so whether you're on a laptop, tablet, or switching setups, you can schedule Shorts from wherever you're most productive.
- No Hidden Upload Limits: Post as many Shorts as your content calendar demands. With Klap, you won’t get hit with silent daily caps or upload restrictions, giving you the freedom to scale.
- Schedule Repurposed Content: Klap lets you schedule those too. Unlike YouTube’s “Edit into a Short” tool (which forces immediate publishing), Klap gives you complete control over when those repurposed clips go live.
- More than just Scheduling: Klap’s platform does more than just edit and schedule. You get AI tools that can auto-translate, subtitle, reframe, and transcribe. It’s like powerful video editing software, with all you need to produce ready-to-publish content for different platforms at your fingertips.
Best Practices for Scheduling YouTube Shorts
To get the most out of your Shorts, it's not just about uploading; it's about when and how you publish. Here are some best practices to follow when scheduling:
- Know Your Audience’s Active Hours: Use YouTube Analytics to identify when your viewers are most active, and schedule your Shorts to go live during those peak times.
- Maintain a Consistent Posting Schedule: Whether daily, every other day, or twice a week, consistency helps build anticipation and keeps your audience coming back.
- Plan Around Trends and Events: Keep an eye on trending topics or relevant events in your niche. Scheduling content around those can boost visibility and engagement.
- Batch Create and Schedule in Advance: Save time by producing multiple Shorts at once and scheduling them ahead. This helps you stay consistent without daily uploads.
- Include Relevant Hashtags and Titles: Optimized titles and hashtags improve discoverability. Schedule with intention, not just based on timing but also metadata.
- Monitor Performance and Adjust: After your Shorts go live, monitor analytics. Refine your schedule based on which videos perform best at specific times.
Scheduling YouTube Shorts With Klap Just Works Better
Scheduling YouTube Shorts helps you stay consistent without being tied to a screen every day. It gives you the freedom to create, knowing your content will go live exactly when you want. While YouTube Studio gets the job done, Klap takes it further by removing its limitations.
With Klap, you can edit, caption, reframe, and schedule your Shorts in one place. It’s built for creators who want speed, control, and less platform-hopping. Best of all, it works seamlessly on both mobile and desktop.
Ready to schedule smarter? Sign up on Klap today for free.
