What Is the Best Video Format for Creators in 2026
Other

Picking the best video format isn't about finding one single winner—it's about choosing the right tool for the job. If you’re posting on social media, MP4 (H.264) is your go-to format, thanks to its universal compatibility and smart balance between file size and quality. But if you're a pro videographer deep in an edit, a format like Apple ProRes is a far better choice because it preserves all the precious data you need for color grading and effects.
Finding the Best Video Format for Your Specific Goal

The "best" video format really just depends on what you're trying to do. Are you exporting a finished clip for YouTube, or are you archiving raw footage for a future project? The answer completely changes your needs.
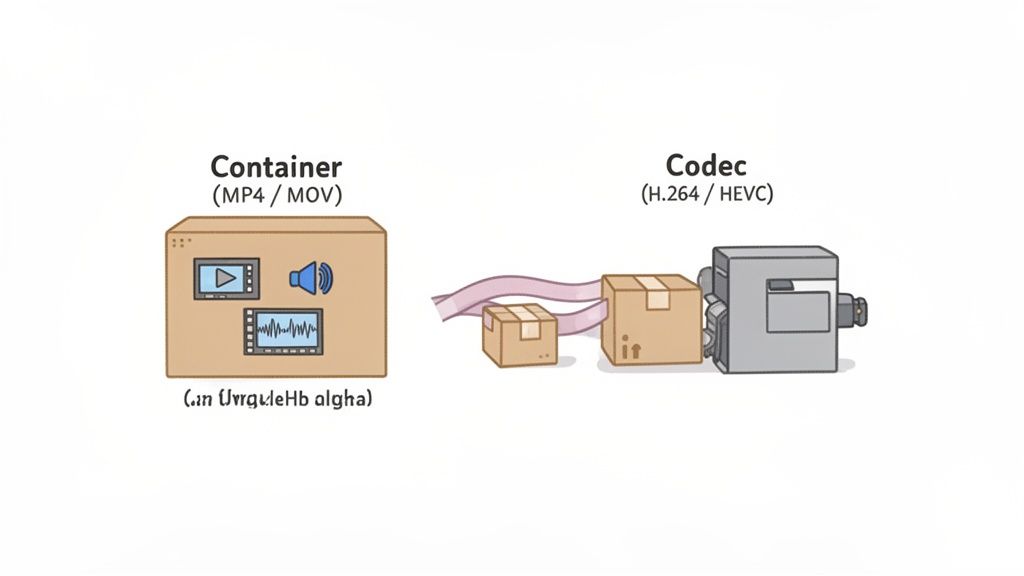
To make the right call, you need to understand that every video file has two main parts:
- The Container: Think of this as the box. It’s the file itself, with an extension like .mp4, .mov, or .mkv. It holds the video, audio, and other data like captions together.
- The Codec: This is the compression method used to shrink your video data down. The codec is what actually determines the final quality and file size.
Quick Guide to Video Formats and Their Primary Uses
Understanding how containers and codecs work together is the key to a smooth video workflow. For instance, an .mp4 file almost always uses the H.264 codec. This combination is popular because it works everywhere and looks great without eating up your storage. On the flip side, a professional might use an .mov container with a ProRes codec to keep every last drop of image data for editing.
Actionable Insight: Choosing the right format is a strategic move that affects everything from upload speeds and platform compatibility to how smoothly your editing software runs. There’s no one-size-fits-all answer; context is everything.
To simplify things, here's a quick guide to help you make an informed decision based on what you need to do right now. Knowing when to use which format is crucial, especially if you plan to repurpose your content with a long-to-short video converter, where the quality of your source file makes a huge difference.
Format (Codec)Primary Use CaseKey Benefit
MP4 (H.264)
Social media, web streaming, general sharing
Universal compatibility and great quality-to-size ratio.
MP4/MOV (HEVC/H.265)
4K streaming, modern devices, saving storage space
Up to 50% more efficient compression than H.264.
MOV (ProRes)
Professional video editing and color grading
Preserves maximum image detail for post-production flexibility.
Understanding How Video Containers and Codecs Work
To pick the best video format, you have to know what a video file actually is. It’s not just one thing—every video file has two parts working together: a container and a codec. Once you get how they interact, you gain full control over the quality and size of your final exports.
Think of the container as the box everything comes in. It’s the file extension you’re used to seeing, like .mp4, .mov, or .mkv. This container's job is to hold all the separate data streams—the video, the audio, any subtitles, and other metadata—together in one tidy package.
The container doesn't control the visual quality. Its main role is to make sure all those different elements stay organized and play back in perfect sync. Some containers, like .mp4, are almost universally supported, which is why they’re a safe bet for anything you put on the web.
The Role of the Codec
Tucked inside that container is the real workhorse: the codec. The term is short for coder-decoder, and it’s the technology that handles the heavy lifting of video compression. Without it, your files would be gigantic—a single minute of uncompressed 4K footage can easily top 30 GB.
Codecs use smart algorithms to shrink all that video data down to a practical size. This compression process is what ultimately defines both the final video quality and how much space it takes up on your hard drive.
There are two main ways a codec can compress your video:
- Lossy Compression: This method gets rid of data the human eye isn't likely to notice anyway. It’s incredibly efficient, often reducing file sizes by over 90%, which makes it perfect for streaming and sharing online. Most common codecs, like H.264 and HEVC, use lossy compression.
- Lossless Compression: This approach shrinks the file size without throwing away a single bit of the original data. While the files are much larger than lossy ones, it guarantees that every pixel is preserved, which is essential for professional editing, color grading, and long-term archiving.
To make these concepts even clearer, here’s a quick rundown of the most important terms you'll encounter when dealing with video formats.
Key Video Terminology Explained
TermWhat It IsWhy It Matters for Your Videos
Container
The file type that holds everything together (e.g., MP4, MOV). It's the wrapper for your video, audio, and metadata.
Determines where your video can play. MP4 is universally compatible, while formats like MKV are more specialized.
Codec
The "coder-decoder" that compresses and decompresses your video data to make the file size manageable.
Directly impacts video quality and file size. Choosing the right codec balances visual fidelity with storage and upload speed.
Bitrate
The amount of data used to encode one second of video, usually measured in Mbps (megabits per second).
Higher bitrates mean better quality and larger files. Lower bitrates mean smaller files but can introduce compression artifacts.
Resolution
The number of pixels that make up the image, like 1920x1080 (1080p) or 3840x2160 (4K).
Higher resolution means a sharper, more detailed image but requires more data (and a higher bitrate) to look good.
Frame Rate (FPS)
The number of individual frames displayed per second. Common rates are 24, 30, and 60 fps.
Determines the smoothness of motion. 24 fps is cinematic, 30 fps is standard for web, and 60 fps is great for fast action or slow-motion.
Color Depth
The number of colors a video can display. Measured in bits, like 8-bit or 10-bit.
Higher bit depth (10-bit) provides smoother color gradients and more flexibility in color grading, preventing "banding."
Understanding these terms is the first step toward making intentional choices instead of just relying on default export settings.
Lossy vs. Lossless Compression in Practice
The difference between lossy and lossless compression has massive real-world consequences for creators. When you upload a video to a platform like YouTube or TikTok, it immediately gets re-compressed with their own powerful lossy codecs to make it stream-friendly.
Actionable Insight: If you upload a heavily compressed (lossy) file, the platform will compress it again, leading to a noticeable drop in quality, known as "generation loss." Starting with a high-quality source file gives the platform's algorithm more data to work with, resulting in a cleaner final video for your audience.
This is a critical concept for anyone trying to find the best video format for their workflow. For the final delivery to a social media platform, a lossy format like MP4 (H.264) is usually the perfect choice. But during the editing phase, a "visually lossless" codec like Apple ProRes is far better because it can handle multiple rounds of edits, effects, and re-renders without degrading.
Ultimately, picking the right container and codec isn't just a technical step; it’s a strategic one. It ensures your video looks sharp, plays everywhere without issues, and fits smoothly into your workflow, whether you’re editing, uploading, or just saving it for later.
A Practical Comparison of Popular Video Formats
Choosing the right video format isn't just a technical detail—it's a strategic decision that impacts everything from your editing workflow to how your audience sees your content. Forget the abstract theory. Let's compare these formats based on how you’ll actually use them every single day.
We'll break down the big four: the universal standard, the high-efficiency newcomer, the open-source web favorite, and the professional editing powerhouse. Knowing their strengths and weaknesses will help you pick the right tool for the job.
MP4 (H.264) The Universal Standard
If there's one format that just works everywhere, it's MP4 using the H.264 codec. Think of it as the JPEG of the video world. It’s the undisputed champion of compatibility, and you can be confident that almost any device, platform, or software from the last decade will play it without a fuss.
This universal acceptance is its superpower. When you export an MP4 (H.264), it will work whether you’re uploading to social media, emailing a client, or playing it on a smart TV. It strikes a fantastic balance between file size and visual quality, which is why platforms from YouTube to Instagram have built their entire infrastructure around it.
For creators, this means a reliable and straightforward workflow. H.264 is an older codec, so it isn't the most efficient, but it’s the dependable option you can always fall back on for final delivery. Because it's so common, you'll find plenty of tools for specialized tasks, like MP4 to MP3 format conversion, which shows just how versatile the container is.
HEVC (H.265) The High-Efficiency Successor
Next up is HEVC (High-Efficiency Video Coding), which you’ll also see called H.265. As the name implies, its main game is efficiency. HEVC can deliver the same visual quality as H.264 but at a file size that’s up to 50% smaller.
This makes it a fantastic choice for 4K and HDR content, where file sizes can quickly get out of control.
Actionable Insight: The trade-off for that slick compression is processing power. Encoding and decoding HEVC files takes more computational muscle, which can slow down older devices and lead to longer export times. If your target audience uses a wide range of tech, sticking with the more compatible H.264 might be a safer bet.
While modern devices like new iPhones and 4K TVs handle HEVC natively, its adoption isn't as universal as H.264 yet. Some web browsers and older computers might struggle, which is a key thing to remember.
WebM (VP9/AV1) The Open-Source Web Format
WebM is an open-source video format from Google, designed from the ground up for the web. Initially using the VP9 codec, it’s now transitioning to the even more efficient AV1 codec. Its entire purpose is to provide a high-quality, royalty-free option for streaming video directly in web browsers.
You’ve almost certainly watched a WebM video without realizing it. YouTube heavily relies on it (especially AV1 for popular videos) to stream high-resolution content efficiently to millions of users. The main benefits are excellent compression and smooth playback, even on slower connections.
The catch? WebM’s support outside of web browsers is pretty limited. Most professional video editing software offers minimal native support, so you wouldn't use it for archiving or general file sharing. It’s a specialized tool built for one job: efficient web delivery.
ProRes The Professional Editor’s Choice
Finally, there’s Apple ProRes. Unlike the others, ProRes isn't meant for your final upload. Instead, it's an intermediate codec, meaning it's built for the editing process itself. It uses very light, visually lossless compression that preserves nearly all of the original image data.
This gives editors two huge advantages:
- Quality Retention: You can edit, color grade, add effects, and re-export a ProRes file multiple times without seeing any noticeable drop in quality.
- Performance: Because the compression is less complex, your editing software can decode ProRes files with ease. This means smooth, real-time playback on your timeline, even with 4K or 8K footage.
The downside? The files are enormous. A single minute of 4K ProRes 422 footage is about 5.5 GB, compared to just 350 MB for a high-quality H.264 file. It’s totally impractical for streaming or sharing, but for pros who need maximum quality and performance during post-production, it's the industry standard.
Video Format Comparison MP4 vs HEVC vs WebM vs ProRes
To make the choice easier, here is a side-by-side comparison of these popular video formats. This table breaks down what you need to know to choose the right one based on compression, quality, and where your video is headed.
Format (Codec)Best ForCompression & File SizeQuality & EditingCompatibility
MP4 (H.264)
Final delivery, social media, web
Good compression, medium file size. The reliable baseline.
Good quality for viewing, but degrades with re-editing.
Universal. Plays on virtually all devices and platforms.
MP4/MOV (HEVC)
4K/8K delivery, saving storage space
Excellent compression, up to 50% smaller than H.264.
High quality for viewing. Better for editing than H.264 but still lossy.
Good, but not universal. Requires modern hardware for smooth playback.
WebM (VP9/AV1)
Web streaming (e.g., YouTube)
Superior compression, very small file sizes for web.
Optimized for streaming quality, not for editing.
Excellent in web browsers, but poor support in editing software.
MOV (ProRes)
Professional video editing, color grading
Low compression, very large files.
Visually lossless. Designed to withstand heavy editing.
Excellent in editing software, but not for final delivery or web use.
Ultimately, choosing the best video format is a strategic move. Use ProRes for editing, export to HEVC for high-resolution delivery when you can, and always count on the ever-dependable MP4 (H.264) as your universal standard for sharing with the world.
Matching Your Video Format to the Right Platform
Choosing the right video format isn't a one-size-fits-all game. It's a strategic decision that changes with every platform. A format perfect for a professional editing timeline might get completely rejected by your favorite social media app.
The secret is to match your export settings to the platform's unique compression and delivery system. When you give a platform the ideal source file, you ensure your video stays as clear as possible after it gets re-compressed, giving your audience a much better viewing experience.
Best Video Format for YouTube
YouTube is all about quality. Its compression algorithm is incredibly powerful, so your goal is to feed it as much high-quality video data as you can. While a standard MP4 (H.264) file works just fine, you can often achieve noticeably better results by uploading a higher-quality master file.
Actionable Insight: Think of it like giving a chef premium ingredients. For your most important videos, export in a high-bitrate format like ProRes or even a high-bitrate HEVC (H.265). While the files are huge, giving YouTube’s encoders a nearly lossless source results in a cleaner final video with fewer compression artifacts, especially in dark scenes or complex color gradients.
This overview breaks down the most common formats and where they shine.

As you can see, it's a series of trade-offs: MP4 gives you universal compatibility, HEVC focuses on smaller file sizes, and ProRes is all about preserving maximum quality for editing.
Best Video Format for TikTok, Reels, and Shorts
In the fast-paced world of vertical video, speed and compatibility are everything. Platforms like TikTok, Instagram Reels, and YouTube Shorts are designed for mobile-first viewing, and their technical requirements show it. Here, the undisputed king is MP4 (H.264).
There’s absolutely no need for massive ProRes files here. These platforms are built for fast uploads and flawless playback on billions of different devices. An MP4 file with an H.264 codec is the gold standard, guaranteeing your video will process quickly and play without a hitch. The right format can make a huge difference in performance, directly affecting engagement and even showing you how to make a video go viral.
For these platforms, just stick to these simple guidelines:
- Container: MP4
- Codec: H.264
- Audio Codec: AAC
- Frame Rate: 30 or 60 fps for that smooth motion
Trying to get fancy and deviating from this can lead to upload errors, frustrating processing delays, or weird visual glitches. Since these platforms are so competitive, it pays to know what makes each one tick. You can dive deeper into these differences in our detailed comparison of TikTok vs YouTube Shorts.
Best Video Format for Professional Workflows
When your video is headed for professional post-production—think extensive color grading, visual effects, or long-term archiving—your priorities shift from delivery to data preservation. In this arena, consumer-level formats like H.264 just don't cut it.
The industry standards here are what we call intermediate codecs, which are designed to be edited, not just watched. The main players are:
- Apple ProRes: A favorite in the macOS world, especially for Final Cut Pro users. It comes in different flavors like ProRes 422 HQ, which offers incredible quality for demanding post-production work.
- Avid DNxHD/DNxHR: This is the equivalent standard in the Avid Media Composer universe, used widely in professional film and broadcast television.
These formats use visually lossless compression, which means they hold onto all the critical image data you need for precise adjustments. The files are enormous—often 10-20 times larger than a comparable H.264 file—but that's the price you pay for flexibility. They ensure smooth playback in your editing software and can survive being re-rendered multiple times without degrading. Using these formats is how you future-proof your most important creative work.
How to Optimize Your Export Settings for Maximum Quality

Choosing the best video format is a huge step, but it’s the export settings that truly define your video’s final look. Get them right, and your video is crisp, professional, and looks exactly how you intended. Get them wrong, and you’re left with a pixelated mess or a file so huge it’s impossible to upload.
Mastering bitrate, resolution, and frame rate gives you full control. Let’s break down exactly what these settings do and how to dial them in perfectly.
Mastering Bitrate for Web Content
Think of bitrate as the single most important dial for quality. It measures the amount of data packed into each second of your video, usually in megabits per second (Mbps). More data equals higher quality—and a bigger file.
When you export, you'll see two main options for how that data is applied:
- Constant Bitrate (CBR): This is the blunt instrument. CBR locks in one bitrate and applies it evenly across your entire video. It’s fast but incredibly inefficient, wasting data on simple scenes (like a talking head) and often short-changing complex, high-motion moments.
- Variable Bitrate (VBR): This is the smarter, more surgical approach. VBR analyzes your video and allocates more data where it's needed—for action sequences or detailed shots—and less for static scenes. The result is a much better balance of quality and file size.
Actionable Insight: For almost all web content, 2-pass VBR is the gold standard. The software does a full pass to analyze the video first, then uses a second pass to apply the compression intelligently. It takes longer to export, but it's worth the wait for the superior quality-to-size ratio.
Choosing the Right Resolution and Frame Rate
Resolution and frame rate are fundamentals. Your goal here is simple: match what you shot.
Resolution is just the pixel dimensions of your video, like 1920x1080 for 1080p HD. Exporting at a lower resolution than your source footage will obviously crush the quality. Exporting at a higher one won't add any detail—it just makes the file bigger for no reason. If you need to change your video's dimensions, use a proper tool to resize videos instead of just stretching it on export.
Frame Rate, measured in frames per second (fps), dictates how smooth the motion looks. You’ll typically see 24 fps for a cinematic feel, 30 fps for standard web video, and 60 fps for gaming, sports, or buttery-smooth slow motion.
Actionable Insight: Mismatching your export frame rate from your source footage is one of the most common mistakes out there. It can introduce a weird stuttering effect called "judder." Always export at the same frame rate you recorded in, unless you’re intentionally creating a slow-motion effect.
Practical Export Settings for YouTube
Let’s cut through the noise. If you’re uploading a 1080p video to YouTube and want to give its compression algorithm the best possible file to work with, aim for these settings.
- Codec: H.264 (or HEVC for 4K)
- Bitrate Method: 2-Pass VBR
- Target Bitrate: 15-30 Mbps for SDR video, or 35-65 Mbps if you shot in HDR
- Frame Rate: Match your source footage (e.g., 24, 30, or 60 fps)
- Audio Codec: AAC at 320 kbps
Finally, a quick note on color space. Most video lives in the standard Rec. 709 space. But if you shot in HDR (High Dynamic Range), you must export in a wider color space like Rec. 2020 to keep all those vibrant highlights and deep shadows intact. Pay attention to these details, and you’ll ensure your video looks exactly as you intended, everywhere it’s seen.
Future-Proofing Your Videos with Emerging Formats
The video world doesn't stand still. The formats we rely on today are already making way for smarter, more efficient technology. If you want your creative work to stay relevant and high-quality for years, you need to know what's coming next.
Staying ahead of these trends isn't just about being tech-savvy; it's about making sure your content remains accessible and looks great no matter where or when it's watched.
One of the biggest shifts is the rise of AV1, an open-source and royalty-free codec. It’s backed by a powerhouse alliance of companies like Google, Netflix, and Amazon, who are all pushing for it to replace H.264 and HEVC. The main draw? Superior compression.
AV1 delivers the same visual quality as HEVC but is up to 30% more efficient. That means smaller files and faster streams, a total game-changer for 4K and 8K video. Better yet, its royalty-free model gets rid of the complicated and costly licensing that holds HEVC back, paving the way for much faster adoption.
Embracing Higher-Fidelity Visuals
Beyond compression, the future of video is all about richer, more vibrant images. This is happening thanks to two key technologies: 10-bit color and High Dynamic Range (HDR).
Standard 8-bit video gives you about 16.7 million colors. That sounds like a lot, but you’ve probably seen its limits in the blocky, banded colors of a sunset gradient. By contrast, 10-bit video displays over 1 billion colors, creating dramatically smoother and more lifelike visuals.
HDR takes this even further. It expands the range between the darkest shadows and the brightest highlights, creating an image with incredible depth and realism. Modern codecs like HEVC (H.265) and AV1 were designed from the ground up to handle all this extra data far more effectively than old guards like H.264.
To make sure your work is ready for the future, here are a few practical steps to take now:
- Archive in 10-bit: Whenever you can, shoot and save your master files in a 10-bit format. Something like ProRes or a high-quality HEVC file is perfect for preserving all that color information for later.
- Deliver with modern codecs: When exporting for a platform that supports it, use HEVC or AV1 for any HDR content. This is the only way to maintain the visual pop you worked so hard to create.
- Monitor adoption: Keep an eye on which platforms and devices add native AV1 support. As it spreads, it will quickly become the go-to format for top-tier video delivery.
By building these forward-thinking habits into your workflow, you’re not just making content for today. You’re building a high-quality library that will stand the test of time and protect your creative investment.
Frequently Asked Questions About Video Formats
Even after you nail down the basics, you’ll inevitably run into some real-world headaches with video files. This section cuts through the noise to answer the most common questions creators face, giving you clear, actionable answers so you can pick the right format every time.
Is MOV or MP4 Better for Quality?
This is a classic question, but neither MOV nor MP4 is inherently better for quality. They're just containers—think of them as different boxes. The real quality comes from what's inside: the codec (like H.264 or ProRes) and the bitrate you choose at export.
A high-bitrate ProRes file inside a MOV container will always look miles better than a low-bitrate H.264 file in an MP4. The key is to match the format to the job. For final delivery, MP4 is more universally compatible across almost any device or platform. For editing, especially on a Mac in Final Cut Pro, MOV is often the default and works seamlessly.
What Should I Do If a Platform Rejects My Video File?
If a platform won't accept your video, don't panic. It's almost always a simple compatibility issue with the format, codec, or one of your export settings. The fastest fix is to re-export the video using the most bulletproof settings out there.
Actionable Insight: Your go-to solution is re-exporting as an MP4 file using the H.264 codec. This combo is the gold standard for compatibility. While you're at it, double-check the platform's specific upload guidelines for resolution, frame rate, and bitrate to make sure your file ticks all their boxes.
How Can I Check the Codec of My Video File?
Knowing how to check a video's codec is a crucial troubleshooting skill, and thankfully, it's easy to do with free tools you probably already have.
Here are two quick ways to find it:
- On a Mac: Open your video file in QuickTime Player. Just hit Command+I to bring up the "Movie Inspector" window. It will clearly show you the container, video codec, and audio codec.
- On Windows: The free VLC Media Player is your best friend here. Open your video in VLC, then go to Tools > Codec Information. You'll get a full technical breakdown of your file.
Ready to turn your long-form videos into a library of engaging social clips? Klap uses AI to find the best moments in your content, automatically reframing and captioning them into viral-ready shorts for TikTok, Reels, and more. Try it now and see how easy it is to repurpose your content.
