Your 2026 Guide to Uploading to Instagram Like a Pro
Other

Uploading to Instagram isn't just about hitting "Share." It's a calculated move designed to get your content seen. To truly succeed, you need to master the unique formats for Reels, Feed posts, and Stories. Each one has its own playbook, and tailoring your content is the only way to win over the algorithm and capture your audience's attention.
Why Your Instagram Upload Strategy Matters More Than Ever

In 2026, simply being on Instagram isn’t enough. The platform has evolved into a global stage where creators and brands are all vying for a slice of the attention pie. The difference between getting noticed and getting buried in the feed often comes down to how you upload.
This isn't about posting on a whim. A deliberate upload strategy is your engine for growth because every single post is a chance to connect with a massive, highly engaged audience.
The Instagram Arena in 2026
The sheer scale of Instagram is staggering. Its growth has been explosive, turning it into a content juggernaut with over 3 billion monthly active users as of 2026. To put that in perspective, it’s now the fourth most-visited website on the planet.
That massive user base means you’re tapping into one of the world's largest digital communities, where people spend an average of 1 hour and 13 minutes scrolling every single day. Younger audiences practically live here, with 80% of U.S. adults aged 18-29 on the platform, making it an essential channel for reaching Gen Z and Millennials.
All this activity has made Instagram’s algorithm incredibly sophisticated. It knows what holds attention, and it prioritizes content that does exactly that. This means your upload process needs to be on point from start to finish.
A thoughtful upload is a signal to the algorithm that your content is high-quality and deserves a bigger audience. It's the first domino to fall in triggering the visibility you need to grow.
A solid Instagram upload plan is a non-negotiable part of any modern social media digital marketing strategies. It’s not just about looking good; it's about technical precision and understanding what your audience actually wants to see.
Why You Need to Sweat the Small Stuff
Thinking strategically about how you upload to Instagram gives you a serious competitive edge. It’s what ensures all your hard work translates into more reach and better engagement.
Here’s exactly why it’s so critical:
- Win Over the Algorithm: The algorithm favors content that fits its preferred specifications. Properly formatted videos and images look more professional and are far more likely to be pushed to new audiences.
- Give Users a Better Experience: Nobody wants to watch a blurry, poorly cropped video. High-quality, correctly formatted content is simply easier to watch, and a good viewing experience keeps people from scrolling away.
- Drive More Engagement: When your content looks sharp and is easy to consume, viewers are much more likely to watch, like, comment, and share. A clean upload is the foundation for strong performance metrics.
- Look Like a Pro: Every single post reflects on your brand. Consistently uploading crisp, well-framed content builds credibility and signals to your audience that you care about quality.
Ultimately, getting the hang of Instagram’s upload process is the first, and most important, step toward building a real, loyal following.
The Creator's Playbook for Uploading Instagram Reels
If Feed posts are the foundation of your account, Reels are the rocket fuel. They are undeniably the most powerful tool for discovery on Instagram right now. However, many creators make the mistake of just uploading a short video and hoping for the best—a surefire way to get zero traction.
Making Reels work for you requires a specific playbook.
The numbers don't lie. Reels have completely reshaped how people use the app, now capturing 50% of all global time spent on Instagram and driving a staggering 3.5 billion reshares daily as of 2026. While average reach has settled from a high of about 10,000 views in 2024 to 6,754 in 2025, Reels still offer incredible visibility. You can see more on these trends and what they mean for creators in recent Instagram Reels design updates.
This makes mastering the upload process non-negotiable. It's not just about what you post, but how you package it for maximum impact.
Grab Attention in the First Three Seconds
Your Reel's first three seconds are everything. You have a tiny window to stop the scroll, and that's where your hook comes in.
A strong hook creates instant curiosity. It can be a provocative question, a surprising visual, or a bold statement that makes someone think, "I have to see where this is going."
- Ask a Question: Start with something your target audience is dying to know. A fitness coach might open with, "Are you making this common mistake at the gym?"
- State a Problem: Hit on a specific pain point. A business consultant could say, "Your content gets zero engagement because you're missing this one step."
- Show the "After" First: Don't build up to the big reveal—show it immediately. This is golden for DIY, art, or transformation-based content.
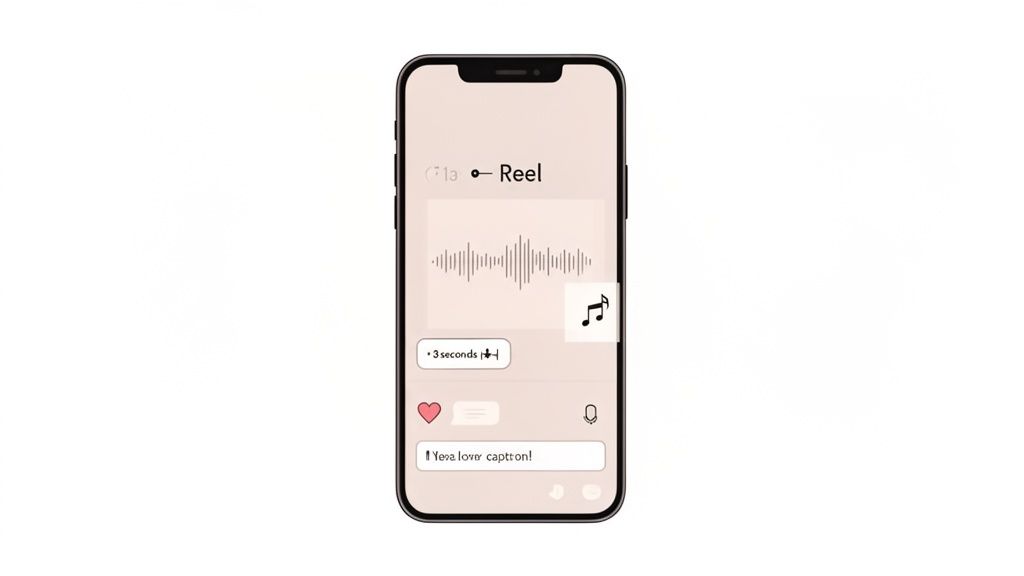
Choose Your Audio Wisely
The audio you pick is just as crucial as your video. Trending audio basically acts as a distribution channel, pushing your Reel to people who are already engaging with that sound.
When uploading, you can search for audio right inside Instagram. Look for the little arrow icon next to a song title, which signals that it's trending. This doesn't mean you have to do a dance challenge; just find a creative way to apply the sound to your own niche.
But don't rely only on trends. Original audio from your videos, especially with clear, valuable dialogue, can perform just as well. This is particularly true if you’re sharing educational or storytelling content. Many creators are finding huge success turning longer videos into engaging shorts, and you can learn how to make Reels with existing videos to make this process even smoother.
Write Captions That Drive Action
Reels captions aren't like your usual Feed post captions. They need to be short, punchy, and designed to do one of two things: add quick context or drive an immediate action.
Since the video is the star of the show, long captions often get ignored. Keep it brief and place your call to action (CTA) right at the beginning.
Pro Tip: The algorithm scans your Reel's description and any on-screen text for keywords. Including relevant terms helps Instagram understand your content and show it to the right audience, which can seriously boost your chances of landing on the Explore page.
Here’s a quick guide to writing Reels captions that actually work:
Caption GoalExample
Encourage Engagement
"Which of these 3 tips will you try first? Let me know 👇"
Drive Traffic
"Full tutorial is now on my YouTube channel. Link in bio!"
Build Community
"Tell me your favorite podcast right now. I'll go first..."
Add Context
"Here’s a behind-the-scenes look at how we make our products."
By treating every element—the hook, the audio, and the caption—as a strategic choice, you turn a simple upload into a powerful growth opportunity.
Uploading for Engagement with Feed Posts and Carousels

While everyone is obsessed with Reels, ignoring your main feed is a huge mistake. Reels are fantastic for reaching new people, but your static posts and carousels are where you build a real community, educate your audience, and drive meaningful engagement.
A strong Instagram strategy relies on more than just video. It’s about creating a cohesive feed where different formats work together to tell your brand's story. Let's break down how to get the most out of your feed posts and carousels.
Own the Screen with Vertical Posts
When you’re uploading a single image or video to your feed, your goal is to command as much attention as possible. The more screen space you take up, the less likely someone is to just scroll right past you.
Forget the classic 1:1 square. Your new best friend is the 4:5 vertical portrait orientation (1080 x 1350 pixels). This taller format dominates the screen on mobile, making your content feel more immersive and professional than a square or, even worse, a landscape post.
Whether you're a coach sharing a motivational quote or a brand showing off a new product, a 4:5 frame makes a much bigger impact. It’s a simple change that instantly makes your feed look more polished.
Why Carousels Are an Engagement Powerhouse
If a single image is a statement, a carousel is a conversation. These posts, which let you share up to 10 photos or videos at once, are an absolute goldmine for engagement. Why? Because they get people to stop and swipe.
That extra "dwell time" signals to the Instagram algorithm that your content is valuable, which often leads to better reach. In today's crowded feed, that’s critical. According to a deep dive by Metricool's recent Instagram report, average organic reach for all posts plummeted by 31% from 2024 to 2025.
But here's the good news: carousel posts achieved a top business engagement rate of 3.55%, making them one of the most effective formats you can use to connect with your audience.
Carousels turn passive viewers into active participants. The simple act of swiping creates a micro-commitment that keeps them invested in your content from the first slide to the last.
To make carousels work for you, treat them like a mini-story:
- Hook them fast: Your first slide must be compelling enough to make someone curious. Use a bold title, ask an intriguing question, or show a stunning visual.
- Create a narrative: Guide your audience through a sequence. Break down a tutorial, share a list of tips, or reveal a before-and-after transformation.
- End with a clear CTA: Don't leave them hanging. Your last slide is your chance to drive action. Ask a question, prompt them to save the post, or direct them to your link in bio. A simple "Swipe to see the final result!" can make a huge difference.
Writing Captions That Actually Connect
For feed posts and carousels, your caption is where you can go deeper. Unlike the short, punchy text on Reels, here you have room to provide real value, share your perspective, and spark a dialogue.
A great caption does more than describe what’s in the picture. It adds context, tells a story, and gives people a reason to comment. And if you're including video clips in your posts, don't forget to add subtitles to make them accessible and engaging, even with the sound off.
If you’re pulling clips from longer videos, a subtitle generator tool can be a lifesaver, ensuring your content is ready for the feed in just a few clicks.
Tired of the Instagram content hamster wheel? The constant pressure to create and upload fresh videos just to stay relevant is exhausting. We've all been there—spending hours filming and editing a new video from scratch, only to have to do it all over again the next day. It’s the fastest way for creators to burn out.
But what if you could ditch the daily grind? Instead of starting from zero, imagine turning one single long-form video—like a podcast, a YouTube deep-dive, or a webinar—into a full week's worth of killer Instagram clips. This isn’t about working harder. It’s about building a smarter, sustainable system that makes your existing content work for you.
Let AI Do the Heavy Lifting
The biggest time-suck in video creation has always been the editing. Manually scrubbing through a long recording to find the best moments, cropping it for a vertical screen, and then adding engaging captions can easily eat up an entire afternoon. This is where an AI tool like Klap completely changes the equation.
The whole process is surprisingly simple. You just drop in a YouTube link or upload your video file, and the AI gets to work. It analyzes your entire video, automatically identifying the most engaging and "hook-worthy" moments.
In just a few minutes, you get a curated selection of short clips, ready for you to review. This turns a tedious, multi-hour task into something you can knock out in a coffee break, freeing you up to think about strategy instead of getting lost in the weeds of editing. If you're curious about how to turn your video library into a goldmine of new posts, you can learn more about how a long-to-short video converter makes it happen.
From Horizontal to Vertical, Instantly
One of the most annoying parts of repurposing video is wrestling with aspect ratios. A video filmed for YouTube in 16:9 just looks awful when you dump it straight into Instagram Reels (9:16). You’re left with ugly black bars or, even worse, the main subject gets awkwardly cropped out.
A smart repurposing tool fixes this for you on autopilot. Klap's AI doesn't just find the best clips; it handles the technical details that are crucial for making your videos look great on Instagram:
- Auto-Reframing: The AI intelligently reframes horizontal video to vertical, making sure the speaker or the main action stays perfectly centered. No more wonky framing.
- Dynamic Captions: It generates animated, easy-to-read captions on the fly. Since so many people watch videos with the sound off, this is non-negotiable for grabbing and holding their attention.
- Brand Customization: You can quickly adjust the fonts, colors, and caption styles to make sure every clip looks and feels like it came from your brand.
Here's a look at how Klap breaks down a long video into several ready-to-use short clips, complete with captions and suggested titles.
What you’re seeing here is the end of manual clip-hunting. The tool gives you a bunch of options, so you can just pick the best moments without having to re-watch hours of footage.
Your Final Review and Polish
AI does the heavy lifting and gets you 90% of the way there, but that last 10% is where your creative eye comes in. Before you hit "upload," a quick review is all it takes to make sure every clip is perfect.
An AI-generated clip is your first draft, not your final product. Take a few moments to refine the start and end points, tweak a caption for clarity, and confirm the framing is exactly how you want it. This human touch is what makes the content feel authentic to your brand.
Think of this final check as your quality control step. It’s what separates a good clip from a great one. Once you're happy, you can export your polished videos and have a full queue of content ready to go. This workflow transforms the daily grind into a simple, scalable process that you can actually stick with.
And it doesn't just stop at Instagram. Many creators use their repurposed clips as hooks to draw their audience toward a thriving subscription platform for creators, opening up another powerful stream of income. Your short-form content becomes the perfect entry point into your entire content ecosystem.
Solving Common Instagram Uploading Problems
There’s nothing more soul-crushing than a failed upload. You spend hours getting a video just right, only to have Instagram hit you with an error message or turn your sharp 4K footage into a pixelated mess. When you're trying to stick to a schedule, these common upload problems can throw a wrench in everything—but they’re almost always fixable.
This guide will walk you through the most common headaches, from the dreaded "video not posting" error to frustrating quality issues and out-of-sync audio.
Why Is My Video Blurry After Uploading?
This is probably the biggest complaint I hear from creators: you upload a crystal-clear video, but it looks soft and blurry on your feed. This isn't your fault—it's Instagram's aggressive compression. The platform has to shrink every video file to save server space and make sure videos play smoothly, even on bad connections.
The trick to fighting back is to give Instagram a file that’s already as close to its ideal specs as possible. If the platform doesn’t have to work hard to re-encode and crush your file, more of the original quality makes it through.
Think of it like this: If you give Instagram a perfectly sized package, it can deliver it as-is. If you give it an oversized box, it will crush it down to fit, and your video quality gets crushed along with it.
To get the best results, make sure you export your videos with these settings before you even think about uploading:
- Codec: H.264
- Resolution: 1080p width (so, 1080x1920 for Reels or 1080x1350 for feed posts)
- Frame Rate: 30 FPS (Frames Per Second)
- Bitrate: Use a variable bitrate (VBR) between 3 and 6 Mbps.
That last one is crucial. Uploading a file with a crazy-high bitrate is one of the main reasons for bad compression. Instagram is just going to squash it anyway, so you get a much cleaner result by controlling the bitrate from the start.
Fixing Failed Uploads and 'Video Not Posting' Errors
Ah, the "Video Not Posting" error. It’s maddening, but it’s usually caused by just a handful of things. Before you throw your phone across the room, run through this quick checklist.
A simple workflow like this one keeps you efficient. You start with a link, let the AI handle the tough editing, and get your clips ready to post in minutes.
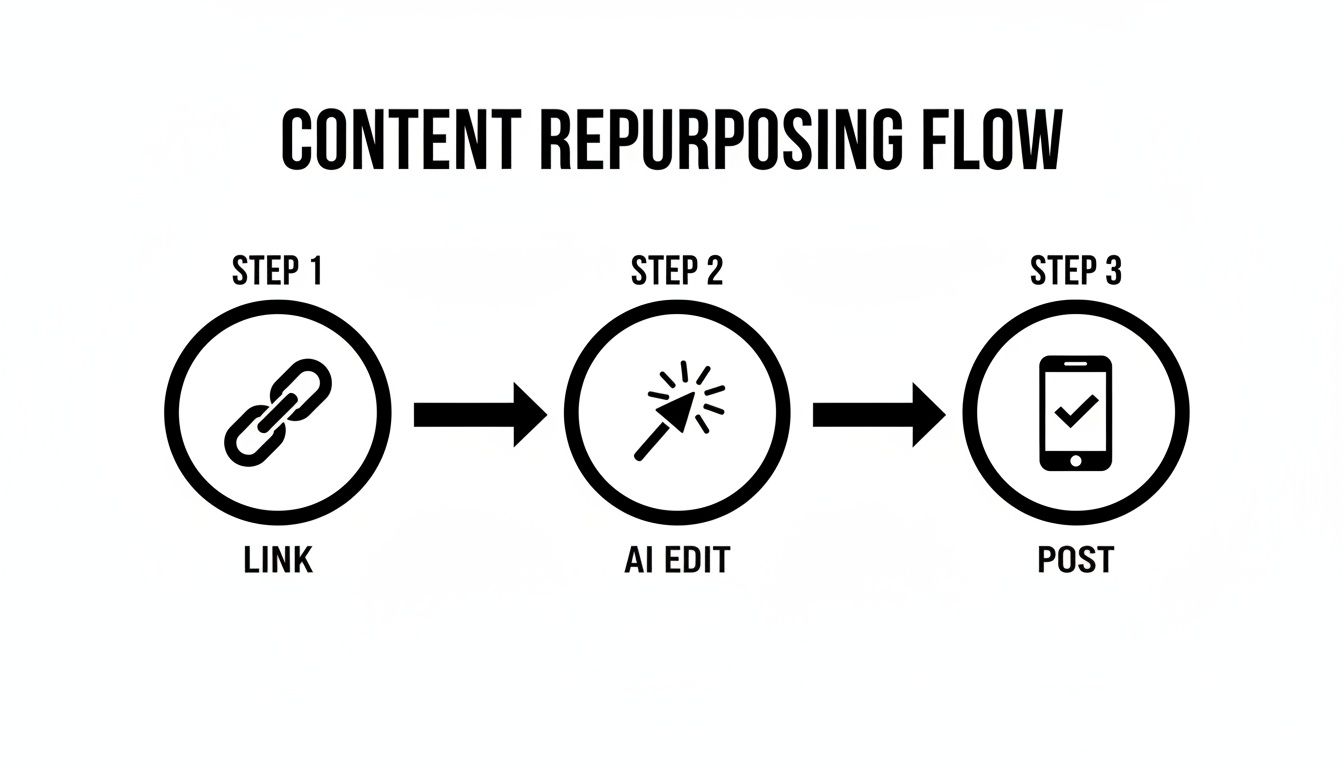 This process shows how you can go from a single link to a polished, ready-to-share social media post with AI doing the heavy lifting.
- Check Your Internet Connection: It sounds obvious, but this is the number one culprit. A spotty Wi-Fi or cellular signal will kill an upload. Try toggling between Wi-Fi and your phone's data to see if that helps.
- Verify Your File Format: Instagram wants MP4 files. Simple as that. If you're trying to upload a .MOV, .AVI, or something else, it's probably going to fail. Convert your video to MP4 in your editor or use a free online tool before trying again.
- Clear the App Cache: Sometimes, the app just gets bogged down. On an Android phone, you can go to
Settings > Apps > Instagram > Storageand hit Clear Cache. For iPhone users, the easiest fix is to offload the app (this keeps your data) or delete and reinstall it. - Update the Instagram App: You'd be surprised how many bugs are fixed in app updates. If you're running an old version, it might be causing upload issues. Head to your app store and make sure you're on the latest version.
Avoiding Awkward Cropping and Audio Sync Issues
When you're repurposing content—say, from a horizontal YouTube video to a vertical Reel—you run into two big problems: awkward framing and audio that’s out of sync.
Awkward cropping is a dead giveaway that you've just dropped a 16:9 video into a 9:16 frame. The action is happening off-screen, or the speaker's face is cut in half. Manually reframing every shot is a massive pain, but tools like Klap use AI to automatically track the subject and keep them centered, solving this problem instantly.
Audio sync issues often pop up during file conversion or compression, too. If you notice the audio doesn't line up with the video, go back and check your original file. If it’s fine there, the problem happened during your export. Try exporting again with the recommended settings from earlier—this usually ensures the audio and video tracks stay perfectly locked together when Instagram processes them.
Uploading from Your Desktop for Maximum Quality
While uploading from your phone is fine in a pinch, every serious creator knows the secret to top-tier quality: upload from your desktop. It's the single best way to avoid Instagram’s brutal compression and make your content workflow a whole lot smoother.
Think about it. When you Airdrop or transfer a finished video to your phone, it often gets compressed before you even open the Instagram app. Uploading directly from a computer cuts out that middle step, creating a clean pipeline from your editing software to Instagram’s servers. This is your best defense against the compression that turns a crisp 4K clip into a blurry mess.
Using Meta Business Suite for Scheduling
For anyone managing an account professionally, Meta Business Suite is non-negotiable. It’s a free, powerful command center that lets you upload, schedule, and analyze content for both Instagram and Facebook from a single dashboard.
This is where you shift from being a reactive poster to a strategic planner. Instead of scrambling to post in real-time, you can batch-create your videos, upload them all in one go, and schedule them to post for the coming days or weeks.
The platform supports every format you need:
- Feed Posts: Schedule your single images, carousels, and standard videos.
- Reels: Plan your short-form videos to drop at peak engagement times.
- Stories: Even your 24-hour content can be scheduled to keep your presence consistent.
Using Business Suite turns posting from a daily chore into a focused task you can knock out once a week.
Quick Uploads with Instagram.com
Sometimes you don't need a full scheduling setup—you just need to get a finished post live, fast. For those moments, uploading directly on Instagram.com is your best bet.
Just log into your account on a desktop browser, hit the “+” create icon in the side menu, and drag and drop your file. It’s perfect for those spontaneous posts when you have a polished video or image ready to go and don't want to fumble with your phone.
While Instagram.com is great for quick, one-off posts, Meta Business Suite gives you far more power with its content calendar and deep analytics. For any serious content strategy, the Business Suite is the clear winner.
Both of these desktop methods give your content a major advantage by protecting its original quality. When you prepare your files to the right specs and upload directly, you're handing the algorithm a clean, high-resolution asset to work with. This simple change in your workflow can make a huge difference in how your content looks and performs.
Frequently Asked Questions About Uploading to Instagram
Even after you've nailed down your workflow, a few nagging questions always seem to pop up about uploading to Instagram. Getting these small details right can be the difference between a post that flies and one that flops.
Here are the direct answers to the most common questions we see from creators.
What Is the Best Time to Upload to Instagram in 2026?
There are endless articles promising to have the magic time to post, but the truth is much simpler: the best time to upload is whenever your audience is most active. Generic advice can be a decent starting point, but your own data is where the gold is.
To find your unique posting times, head to your Instagram Insights, tap on the 'Total followers' section, and scroll down to 'Most Active Times.' This dashboard gives you the exact days and hours your community is online and scrolling. While midday on weekdays (11 AM - 2 PM) and early evenings (7 PM - 9 PM) are often popular, let your own analytics call the shots.
Does Uploading from Desktop Improve Quality?
Yes, uploading from a desktop usually gives you noticeably better video quality. Think about it: when you send a high-res video to your phone via AirDrop, a cloud drive, or even a messaging app, it often gets compressed before it even touches the Instagram app. That initial compression degrades your video from the start.
By uploading directly from your computer using Meta Business Suite or Instagram.com, you’re giving the platform a much cleaner file. This lets you hand over a video that already fits Instagram’s preferred specs, which means Instagram doesn't have to compress it as aggressively. The result is almost always a sharper, cleaner-looking post.
How Many Hashtags Should I Use When Uploading?
Instagram lets you use up to 30 hashtags, but the old "more is better" strategy is dead. The algorithm today is all about semantic relevance—it reads the keywords in your caption and analyzes your video to figure out what it's about.
A handful of highly relevant, niche hashtags will serve you far better than a long list of generic ones. The goal is to tell the algorithm exactly who should see your post, not to cast the widest, most unfocused net possible.
Stick to 3 to 5 hyper-relevant hashtags for each post. For example, if you're a baker sharing a sourdough tutorial, #SourdoughBaking or #ArtisanBreadTips will be way more effective than just #food or #baking.
Can I Edit My Caption After Uploading a Post?
Absolutely. You can edit your caption, location, alt text, and tagged accounts on any existing Feed post or Reel. Just tap the three-dot menu on the top-right corner of your post and hit 'Edit.'
A word of caution, though: try to get it right the first time. The algorithm gives your content its biggest push in the first few hours. Making big changes to your caption or hashtags later can sometimes disrupt that initial momentum.
Can I Post a Super-Wide Image on Instagram?
You’ve probably seen those trendy, super-wide cinematic images that look like thin strips in the feed. This is an unusual format, often using a 5120x1080 pixel dimension, that tricks Instagram’s display. While you can upload them, it’s not a standard feature and you’ll need to use specific export settings.
These posts force users to pinch-and-zoom to see the full picture. It’s a neat creative trick, but it's not a practical strategy for engagement since it makes the content almost impossible to see at a glance while scrolling.
Ready to stop spending hours hunting for clips and get back to creating? Klap uses AI to instantly turn your long-form videos into a library of social-ready shorts, complete with dynamic captions and smart reframing.
