How to Compress an MOV File Without Losing Quality in 2026
Other

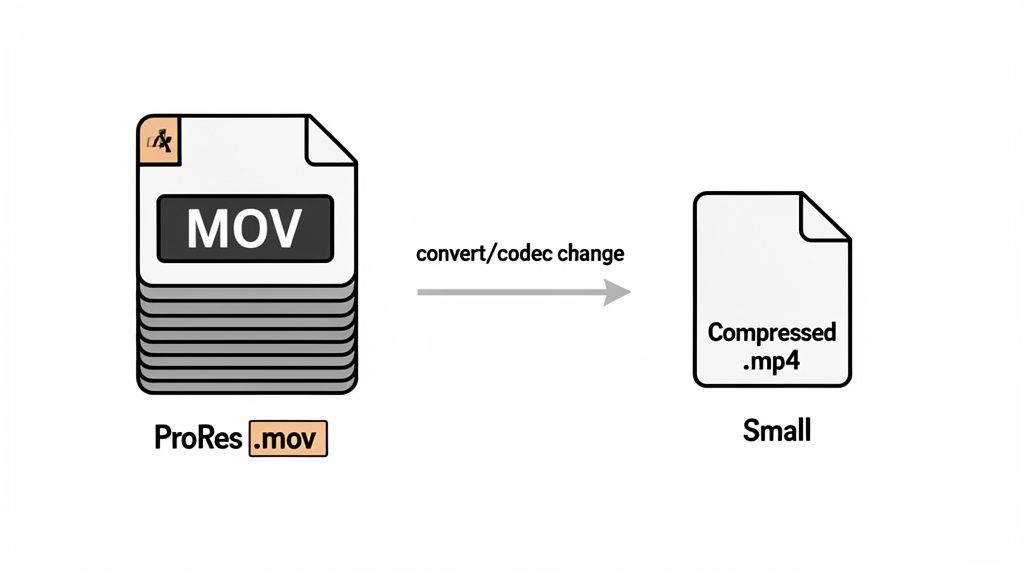
Let's be real: your MOV files are massive. They're often packed with professional-grade codecs like Apple ProRes, which are fantastic for preserving every last drop of quality during editing but are a total nightmare for sharing or storage.
Compressing a MOV file is all about re-encoding it with a smarter, more efficient codec—like the industry-standard H.264 or the newer HEVC (H.265). By tweaking settings like bitrate and resolution, you can dramatically shrink the file without anyone noticing a difference in quality.
Why Your MOV Files Are So Big (And How to Fix It)
If you've ever shot video on a pro camera or even an iPhone using certain high-quality modes, you’ve seen it happen. A short, five-minute 4K clip suddenly takes up several gigabytes. Good luck trying to upload that.
The culprit is the codec inside the MOV container. Think of a codec as the language used to store video data. Pro workflows love codecs like Apple ProRes because they use very light compression to keep every detail intact for editing. This is what's known as lossless or near-lossless compression, and while it's a lifesaver in post-production, it's terrible for final delivery.
It's All About the Trade-Off
When you compress a video, you're essentially translating it from a highly detailed language (like ProRes) to a much more efficient one (like H.264). This process always involves a trade-off between file size and visual quality.
The goal isn't just to make the file smaller. It's to find that perfect sweet spot where the file is a fraction of its original size, but the quality drop is so minimal that no one will ever notice. For almost anything you post online, this trade-off is well worth it.
The core idea isn't just to make the file smaller; it's to make it smarter. A well-compressed video is optimized for its destination, whether that's a fast-loading website, a crisp Instagram Reel, or a quick upload to an AI tool like Klap.
By choosing the right settings, you can see some serious size reductions. It's not uncommon to take a 10GB ProRes MOV file and convert it into an H.264 MP4 that’s 90% smaller and still looks razor-sharp on a phone or computer. This is a game-changer for creators who need to upload long videos for repurposing into short-form content.
Quick Compression Settings for Popular Platforms
Use this cheat sheet to get the right settings for your video's destination, balancing quality with file size.
Use CaseRecommended CodecTarget ResolutionEstimated Size Reduction
YouTube & Vimeo
H.264
1080p or 4K
80-90%
Instagram & TikTok
H.264 or HEVC
1080p (Vertical)
85-95%
Email & Messaging
H.264
720p or 480p
90-98%
Web & Landing Pages
H.264
1080p
85-95%
Personal Archive
HEVC (H.265)
Original Resolution
50-70%
These settings are a great starting point. Your final file size will still depend on factors like video length and motion complexity, but this gives you a solid foundation to work from.
Of course, before you even think about compressing, it’s a good idea to trim any unwanted footage first. Why waste time compressing parts of the video you're just going to cut out anyway? You can do this quickly with our free online video trimmer tool.
Choosing Your Codec: HEVC vs. H.264
Diving into video compression for your MOV files can feel like you're drowning in alphabet soup, but it really comes down to one big choice: H.264 or HEVC (H.265)? Think of a codec as the language your video speaks—some are just way more efficient than others.
H.264 is the reliable, universal standard. It’s the seasoned veteran of video compression, compatible with virtually any device or platform you can imagine. If your main goal is to make sure your video plays everywhere without a single hiccup, H.264 is your safest bet.
The Case for H.264: Universal Compatibility
Choosing H.264 means you're picking reach and reliability above all else. It's been the industry standard for over two decades, so almost every piece of modern hardware has built-in decoders for it. This means smooth playback for your audience without them needing the latest tech.
It’s the perfect choice for broad distribution, like putting a video on your website or sending it to a large group of people with all sorts of different devices. Plus, its encoding process is usually faster and less demanding on your computer's CPU, a nice bonus if you're not working on a brand-new machine.
HEVC: The Modern High-Efficiency Option
On the other hand, HEVC (High-Efficiency Video Coding), or H.265, is the newer, more advanced kid on the block. Its main claim to fame is its incredible efficiency. HEVC can deliver the same visual quality as H.264 but in a file that's drastically smaller. For creators wrestling with massive video files, this is a total game-changer.
The only real trade-off is that HEVC is more demanding to create. Encoding can take longer and needs more processing power. And while most modern devices handle HEVC playback just fine, some older hardware might struggle, which could mean choppy video for a small number of your viewers.
Today, switching to the H.265 (HEVC) codec is a go-to strategy for compressing MOV files without sacrificing that crisp quality. Benchmarks show HEVC provides 25% to 50% better compression than H.264 at the same visual fidelity. This can turn a huge 10GB MOV file into a sleek 5GB version that looks identical to the naked eye. To learn more about how it achieves this, you can check out these detailed compression insights from Compresto.
This size reduction has huge real-world benefits. If you're uploading a long podcast to an AI tool like Klap, choosing HEVC means faster uploads and quicker analysis, getting you to your final short clips in a fraction of the time. It's also perfect for archiving high-resolution footage without burning through your storage space.
When to Choose Which Codec
So, how do you actually decide? Here’s a simple breakdown for your next project:
- Choose H.264 if:
- Your top priority is maximum compatibility across all devices, old and new.
- You need to get the video encoded as quickly as possible.
- The video is for a broad, general audience online.
- Choose HEVC (H.265) if:
- Your primary goal is the smallest possible file size with the best quality.
- You're working with 4K or high-resolution footage.
- You're uploading to a platform that will re-process the video anyway (like Klap or YouTube).
- You're archiving video and want to save on storage costs.
For most creators in 2026, HEVC is becoming the smarter choice, especially as more and more devices support it. The file size savings are simply too big to ignore.
Compressing MOV Files with Free Desktop Tools
When you’re ready to get hands-on and start shrinking those massive MOV files, you don’t need to drop a dime on fancy software. Two of the most powerful and respected tools in the video world are completely free and give you incredible control: HandBrake and FFmpeg.
HandBrake is my go-to recommendation for anyone who wants a visual, user-friendly experience. It’s perfect for beginners but has enough depth for pros. On the other end of the spectrum is FFmpeg, a command-line tool that offers surgical precision. It’s a favorite among developers and technical creators for a reason.
Using HandBrake for Easy Compression
For most people, HandBrake is the perfect starting point. Its interface is clean and gets rid of the guesswork. You can just drag and drop your MOV file, pick a preset, and hit the start button.
For online video, the built-in presets like "Fast 1080p30" or "Web -> Vimeo YouTube HQ 1080p60" are fantastic. They do all the heavy lifting, automatically configuring the resolution, frame rate, and bitrate for a great balance of quality and size. But the real magic happens when you dive into the settings yourself.
The most important controls are waiting for you in the "Video" tab. This is where you’ll fine-tune the compression to get the exact result you want.
Here’s where to focus your attention:
- Video Codec: You'll see options for H.264 and H.265 (HEVC). H.264 is the safe, universally compatible choice that will play on just about any device. H.265 is more modern and delivers smaller files at the same quality, but it's not as widely supported yet.
- Quality Slider (RF): Instead of picking a specific bitrate, HandBrake uses a "Constant Quality" slider measured in RF (Rate Factor). For H.264, a value between 20-23 is the sweet spot for high-quality web video. Remember, lower numbers mean higher quality and bigger files.
- Encoder Preset: This slider balances how fast the compression happens against the final file size. A "slower" preset takes more time but does a better job, resulting in a smaller file. The default setting is usually a good compromise.
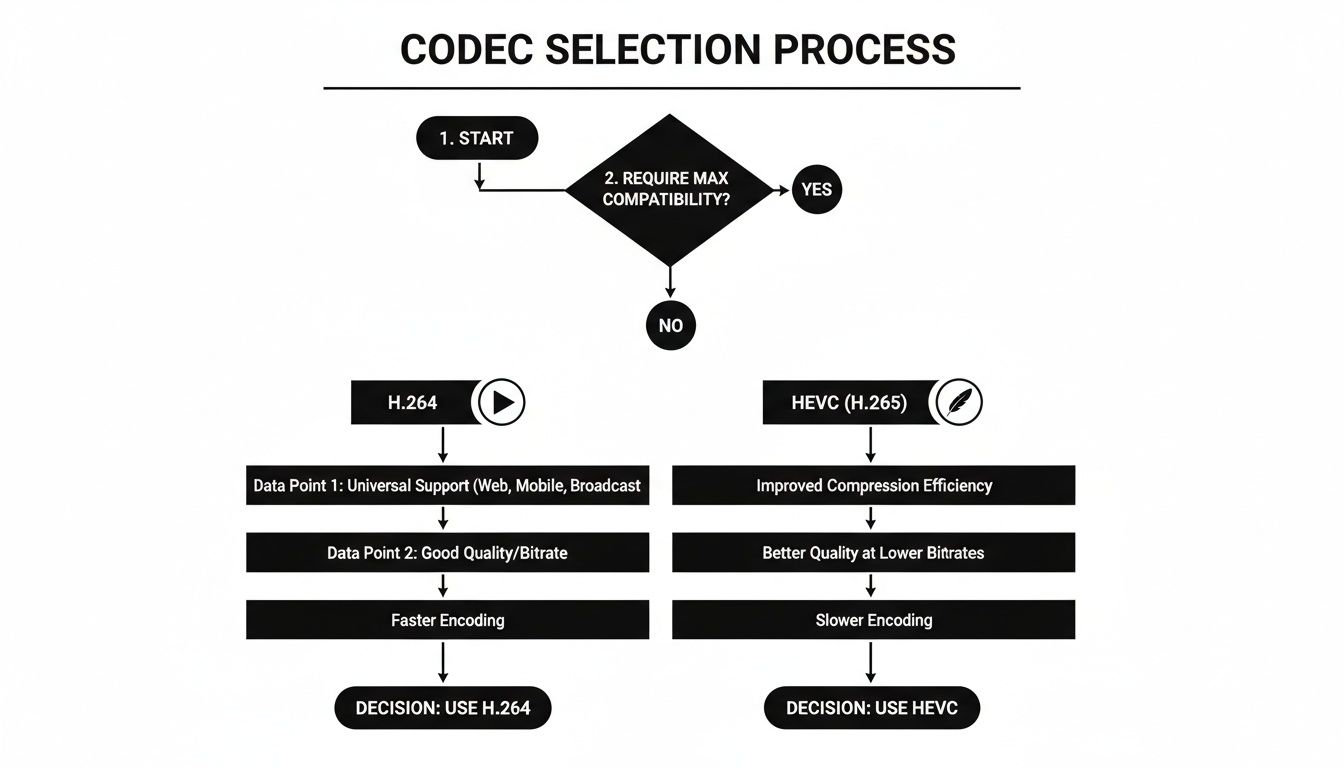
This flowchart helps visualize the decision. If you need your video to play everywhere, stick with H.264. If your priority is the absolute smallest file size and you know your audience has modern devices, HEVC (H.265) is the way to go.
Advanced Control with FFmpeg
For those who want to get under the hood, FFmpeg is the ultimate tool. It’s a command-line utility, which means you’ll be typing commands directly into a terminal or command prompt. While that might sound a bit intimidating, it gives you a level of control that visual editors just can't match.
It’s especially handy for automating compression tasks or building it into a larger workflow. You can get the same results as HandBrake, but with a single, repeatable line of code.
FFmpeg is the engine that powers many of the video apps you already use, including HandBrake and VLC. By learning a few basic commands, you’re tapping directly into the same professional-grade technology without any interface getting in the way.
Here’s a practical, copy-paste-ready command I use all the time. It converts a huge ProRes MOV file into a web-friendly H.264 MP4.
ffmpeg -i input.mov -c:v libx264 -crf 23 -c:a aac -b:a 128k output.mp4
Let's quickly break down what this command is doing. It tells FFmpeg to take your input.mov, re-encode the video using the libx264 (H.264) codec with a quality level of 23 (CRF), convert the audio to AAC at 128kbps, and save it all as output.mp4. The CRF value works just like HandBrake's RF slider—a higher number means more compression. This one-liner is an incredibly powerful and consistent way to handle your MOV files.
Mastering Bitrate, Resolution, and Frame Rate
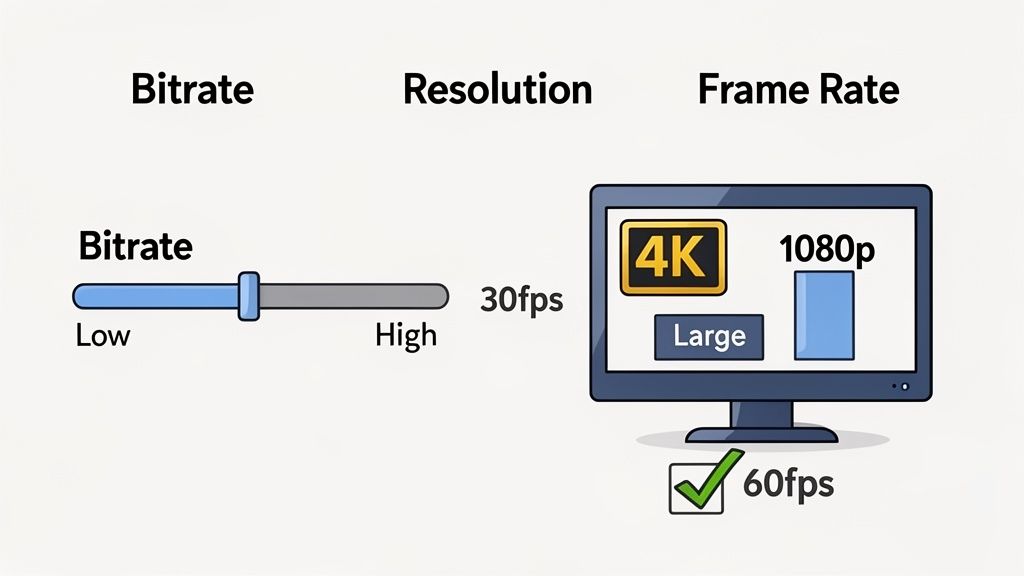
Picking the right codec is a great start, but the real magic in shrinking your .MOV files happens when you get a handle on three specific settings: bitrate, resolution, and frame rate. Think of these as the dials you can turn to find that perfect balance between sharp quality and a manageable file size.
Out of the three, bitrate has the single biggest impact on your file size. It’s simply the amount of data used to create one second of video. A higher bitrate means more data, which gives you better quality but a much larger file.
But don't just crank it up. The trick is to match the bitrate to what’s happening on screen. A fast-paced action scene needs more data to stay clean than a static talking-head shot. Dropping the bitrate is the fastest way to compress a .MOV file, but if you go too low, you’ll start seeing those ugly, blocky compression artifacts.
Choosing the Right Resolution
Next on the list is resolution—the number of pixels in your video frame, like 1920x1080 for 1080p. It’s tempting to export everything in glorious 4K (3840x2160) just in case, but that’s often overkill and a primary cause of bloated file sizes.
Always ask yourself: where will this video actually be watched? If it’s for a TikTok or Instagram feed, almost everyone will see it on a small phone screen. In that context, dropping a file from 4K to 1080p will slash the file size with virtually no noticeable loss in quality.
For instance, taking a 1-hour 4K webinar saved as a MOV file and converting it to a 1080p H.264 file can result in a file size reduction of over 90%. This is a perfect example of making an informed choice that drastically improves file portability.
This is especially true for creators who repurpose long-form content. MOV files are fantastic for editing, but their minimal compression leads to enormous files—often 5-10 times larger than their MP4 counterparts. For Klap creators turning podcasts into clips, downscaling a ProRes MOV to 720p H.264 can achieve an 85-95% size reduction, which is perfect for shareable previews.
Frame Rate and When to Lower It
Finally, we have frame rate (fps), which is just the number of images displayed every second. While 60fps delivers that ultra-smooth motion for gaming or sports footage, most content simply doesn't need it.
For the majority of web videos—like webinars, interviews, and vlogs—30fps is perfectly fine. You could even go down to 24fps for a more cinematic look. Cutting the frame rate from 60fps to 30fps can nearly slice the file size in half, since you’re asking the codec to process half the number of frames.
Here are a few practical starting points for your settings:
- For Social Media (TikTok/Reels):
- Resolution: 1080x1920 (Vertical)
- Frame Rate: 30fps
- Bitrate: 4-6 Mbps (for H.264)
- For YouTube (Standard HD):
- Resolution: 1920x1080
- Frame Rate: 30fps
- Bitrate: 8-10 Mbps (for H.264)
By fine-tuning these three settings, you can move beyond generic presets and gain true control over your video compression. You can also use our dedicated tool to resize videos for any platform for an even faster workflow.
A Smarter Workflow for Repurposing Large Videos
If you're a busy creator, you know the grind. Manually compressing, editing, and repurposing huge MOV files can eat up your entire day. The old-school process is a slog: compress a giant file, spend hours scrubbing timelines to find a few good moments, and then painstakingly edit those clips for social media.
But what if you could skip all that and get straight to the good stuff? Modern AI-powered platforms are completely changing how we repurpose content, turning a clunky, linear process into something far more efficient.
Flipping the Script on Content Repurposing
The new approach flips the traditional workflow on its head. Instead of compressing first, you start by uploading your original, high-quality MOV file directly to a platform like Klap. No pre-compression or manual trimming needed.
From there, the platform's AI gets to work. It doesn't just shrink your file; it analyzes the content to pinpoint the most engaging, viral-worthy segments. This is a massive leap from manually hunting for highlights yourself. After all, studies show viewers retain 95% of a message when they watch it in a video, compared to just 10% when reading it in text. Automatically finding the best parts of your video is a huge advantage.
This automated workflow transforms a complex, multi-hour task into a few simple clicks. It's the difference between manually assembling a piece of furniture and having it arrive pre-built and ready to use.
Once the AI identifies the best moments, it handles all the tedious technical work for you. This includes:
- Automatic Compression: The platform compresses each short clip to the perfect size for its destination platform.
- Smart Formatting: It reframes the video to the correct aspect ratio for TikTok, Instagram Reels, and YouTube Shorts.
- AI-Generated Captions: Dynamic, engaging captions are added automatically to boost viewer retention.
This streamlined process frees up countless hours. Instead of playing the role of a video editor, you become a curator, simply reviewing and approving the high-quality clips the AI serves up. For creators who need to turn long-form content into social media gold quickly, a long-to-short video converter is no longer a nice-to-have—it's essential.
After you’ve optimized your MOV files into shareable clips, the next step is often getting them onto your own website. For WordPress users, knowing how to embed a video in WordPress is a crucial final step to complete a smarter content workflow and put your videos right in front of your audience.
Common Questions on Compressing MOV Files, Answered
Working with video compression always brings up a few common hurdles. Let's tackle some of the questions we see pop up time and again from creators trying to shrink a .MOV file without pulling their hair out.
What Are the Best Free Tools for Large MOV Files?
You don't need to spend a dime to compress even massive MOV files. The best tools are powerful, free, and run right on your desktop.
For most people, HandBrake is the go-to. It’s incredibly user-friendly, with simple presets and quality sliders that take the guesswork out of compression. If you're more of a power user and want granular control, FFmpeg is your best bet. It’s a command-line tool, which means you can script precise, repeatable compressions.
So, what about those online tools? While they seem convenient for a quick, tiny file, most of them choke on anything substantial. You'll often hit upload limits under 500MB and snail-like speeds, making desktop software the only reliable option for high-quality MOV files.
Will Compressing My MOV File Ruin the Quality?
Yes, technically, compressing a MOV file reduces its quality. That's because it relies on lossy compression, a smart process that throws out visual data your eyes are least likely to miss.
But the goal isn't to avoid quality loss—it's to manage it. When you use a modern codec like H.264 or HEVC with the right bitrate, you can slash the file size by 80-95% while keeping the video looking virtually identical to the original, especially on the web or a phone screen.
What’s the Best Format to Compress a MOV File Into?
For the perfect trifecta of quality, small file size, and universal playback, MP4 is the clear winner. You can’t go wrong converting your MOV to an MP4.
- MP4 with the H.264 codec: This is the gold standard. It’s supported by every browser, device, and social platform on the planet. For wide distribution, this is your safest and most reliable choice.
- MP4 with the HEVC (H.265) codec: This is the newer, more efficient option. It delivers even smaller files than H.264 at the same level of quality, making it ideal for 4K video or creating an archive. Its compatibility is growing fast.
At the end of the day, an MP4 container is your ticket to a video that just works, everywhere.
Instead of getting lost in manual settings, you can let AI handle all the heavy lifting. Klap takes your original, high-quality MOV videos and automatically turns them into perfectly compressed, captioned, and reframed clips for all your social channels. Give it a try and see how quickly you can turn long-form content into viral shorts. Find out more at https://klap.app.
