The Ultimate Format for YouTube Guide: Maximize Your Video Quality
Other
If you want your videos to look crisp and professional on YouTube, the magic starts before you even hit “upload.” The best format for YouTube is an MP4 file with H.264 video and AAC audio. In simple terms, this combo is the gold standard. It gives you a fantastic balance of high quality and manageable file size, which helps your videos process faster and look sharp on any device.
Your Essential YouTube Video Format Blueprint for 2026
Uploading to YouTube can feel like a guessing game, but it doesn't have to be. Nailing your export settings is your first real step toward creating content that not only looks amazing but actually performs well. When you feed YouTube a high-quality file in a format it prefers, you sidestep those ugly compression artifacts and agonizingly slow processing times.
Think of it like this: you're giving a package to a delivery service. If it’s wrapped perfectly and labeled clearly (like an MP4 file with H.264/AAC), it gets to its destination fast and in one piece. But if you hand over a weirdly shaped box with a scribbled address, the service has to repackage it, and something might get damaged in the process.
The Cheat Sheet for Perfect Uploads
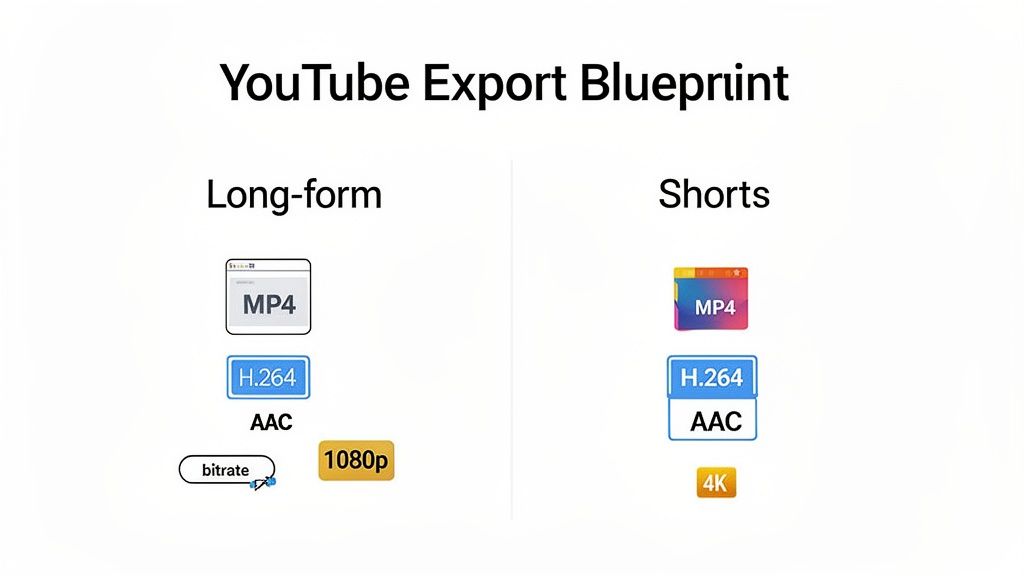
This blueprint is your go-to guide for getting your YouTube format right every single time. It breaks down the essentials for both traditional long-form videos and the vertical, fast-paced world of YouTube Shorts.
Getting these technical details right allows YouTube’s algorithm to showcase your work in the best possible light. Your goal is to give YouTube a file that needs as little re-processing as possible. The closer you are to its ideal specs, the better the final video will look to your viewers. While you’re optimizing, check out our other creator tools to streamline the rest of your workflow.
A great video format ensures your creative vision is preserved. It's the technical bridge between your editing timeline and your viewer's screen, directly impacting their experience and your channel's perceived professionalism.
To make things even easier, we’ve put together a quick-glance table with the most critical settings. Use this as your starting point for all YouTube exports.
Quick Guide to Recommended YouTube Upload Settings (2026)
This table summarizes the key specifications you need for both standard 16:9 videos and vertical 9:16 Shorts.
SpecificationRecommended for Standard Video (16:9)Recommended for YouTube Shorts (9:16)
Container
MP4
MP4
Video Codec
H.264 (AVC)
H.264 (AVC)
Audio Codec
AAC-LC
AAC-LC
Resolution
1920x1080 (1080p) or 3840x2160 (4K)
1920x1080
Frame Rate
24, 30, or 60 FPS
24, 30, or 60 FPS
Bitrate (1080p)
8-15 Mbps (SDR), 10-20 Mbps (HDR)
8-15 Mbps (SDR)
Bitrate (4K)
35-68 Mbps (SDR), 44-85 Mbps (HDR)
N/A
Bookmark this page or save this table. By sticking to these guidelines, you’ll give your content the best shot at looking flawless from the moment it goes live.
Understanding the Building Blocks: Container, Codec, and Resolution
Before you can master the best format for your YouTube videos, you need to get a handle on three core parts of any video file: the container, the codec, and the resolution. These might sound technical, but the ideas behind them are surprisingly simple. Getting them right is the foundation for a high-quality upload.
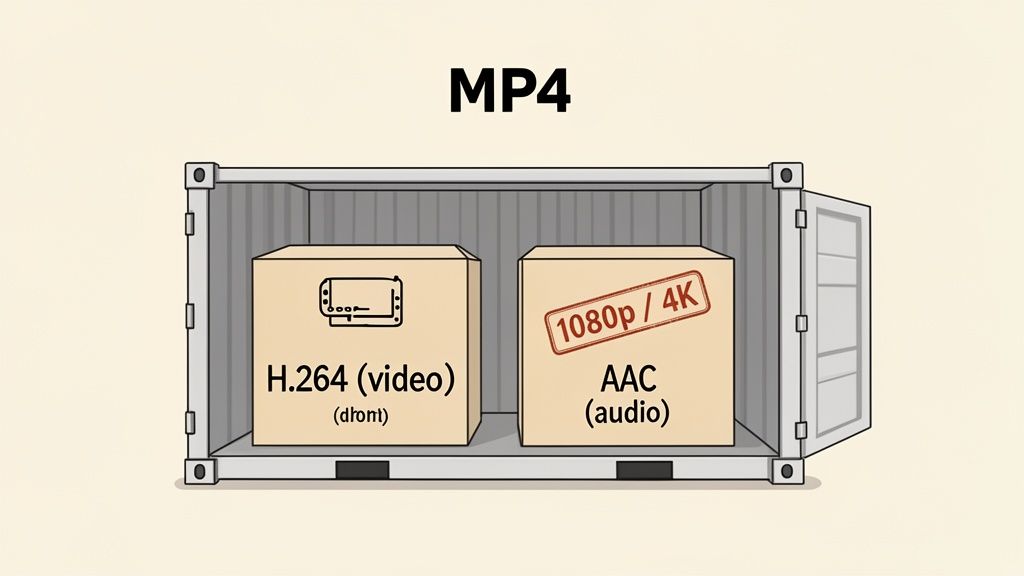
Think of your video file like a shipping box. That box is the container, and its job is to hold everything together in one neat package. For YouTube, the best and most recommended container is MP4. It’s a universal standard that works flawlessly on web browsers, phones, and smart TVs, which is exactly why YouTube loves it.
Inside that MP4 box are the items you're shipping: your video and your audio. The problem is, raw video and audio files are massive. They have to be compressed to be small enough for streaming online. That compression job is handled by a codec (which is just shorthand for coder-decoder).
The Best Codecs for Quality and Compatibility
When it comes to your video, the undisputed king is the H.264 codec, sometimes called AVC. For over a decade, it's provided the perfect balance between great video quality and a manageable file size. This ensures your video looks sharp without taking ages to upload or making your viewers wait for it to buffer.
For your audio, the go-to codec is AAC (Advanced Audio Coding). Just like H.264 does for video, AAC delivers excellent sound quality without bloating your file size. When you put these three pieces together, you have the winning formula for YouTube.
- Container: MP4
- Video Codec: H.264
- Audio Codec: AAC
This trio is YouTube's official recommendation because it's efficient, reliable, and gives viewers a great experience. While other formats technically work, sticking to this combination will save you from nearly all potential upload errors and quality headaches.
Understanding Resolution and Why It Matters
Now that you have your container and codecs sorted, the final piece of the puzzle is resolution. This is just a term for the number of pixels that make up your video's width and height, which directly impacts how clear and detailed it looks. The two most common resolutions you'll see on YouTube are:
- 1080p (Full HD): This is 1920 pixels wide by 1080 pixels tall. It's the long-standing benchmark for high-definition content, and a 2023 study found that 89% of viewers still watch at this resolution.
- 4K (Ultra HD): This measures 3840 pixels wide by 2160 pixels tall. With four times the pixels of 1080p, it delivers incredibly crisp and detailed footage.
Even if most of your audience doesn't own a 4K screen, there's a huge hidden advantage to uploading in 4K if you can. YouTube compresses every video that gets uploaded, but it gives special treatment to higher-resolution files.
When you upload a 4K video, YouTube processes it using a more advanced codec called VP9. This results in a higher-quality file with a better bitrate, even when a viewer watches it at 1080p.
Actionable Insight: A 4K upload watched at 1080p will look noticeably better than a video that was uploaded at 1080p to begin with. It's a pro-level trick that makes your standard HD playback pop.
So, should you always upload in 4K? If your camera can shoot it and your computer can handle editing and exporting it without grinding to a halt, the answer is a definite yes. The boost in visual quality future-proofs your content, gives your audience a better experience, and is a major advantage that makes your work look more professional.
Beyond the file type, three settings are what really give your video its signature look and feel: aspect ratio, frame rate, and bitrate.
Getting these right is the difference between a polished, professional video and one that just feels… off. Think of them as your creative controls. They tell YouTube what kind of video you’ve made and exactly how it should be displayed, whether it’s a cinematic travel vlog or a high-octane gaming montage.
Choosing the Right Aspect Ratio
Aspect ratio is simply the shape of your video—the relationship between its width and its height. On YouTube, two shapes rule them all, and the platform treats them as completely different types of content.
- 16:9 (Widescreen): This is your standard, horizontal format for traditional videos. It’s the familiar cinematic shape you see on TVs and computer monitors, perfect for vlogs, tutorials, documentaries, and just about any long-form content.
- 9:16 (Vertical): This is the tall, skinny format made exclusively for YouTube Shorts. Any video you upload in this shape automatically gets flagged as a Short, making it eligible for the powerful Shorts discovery feed.
Actionable Insight: Getting the aspect ratio right isn't just a suggestion; it's a must. A 16:9 video will never make it into the Shorts feed. And if you upload a 9:16 video as a standard piece of content, it will look amateurish, squished between huge black bars on either side of the screen. While these two are the most common, exploring other dimensions like the difference between 21:9 vs 16:9 aspect ratios can help you make more informed creative choices.
The Feel of Your Video: Frame Rate
Frame rate, measured in frames per second (FPS), dictates how smooth the motion in your video appears. It’s essentially how many still images are flashed on the screen every second to create the illusion of movement. This is an artistic choice that defines your video's vibe.
- 24 FPS: This is the classic cinematic standard. It creates a subtle, natural motion blur that our brains associate with movies. It’s the go-to for narrative content, vlogs, and anything where you want a storytelling, film-like feel.
- 30 FPS: This is the default for most online content and broadcast TV. It offers a clean, crisp look that feels professional and is a reliable choice for general-purpose videos like tutorials or product reviews.
- 60 FPS: This high frame rate captures double the visual data per second, resulting in exceptionally smooth motion. It’s the best choice for fast-paced content like sports, video game recordings, or for creating slick slow-motion shots.
There's no single "best" frame rate, only the right one for what you’re trying to achieve. A moody travel film shines at 24 FPS, but a Call of Duty highlight reel demands the buttery-smooth motion of 60 FPS.
Actionable Insight: Always make sure your export frame rate matches your recording frame rate. Trying to export a 24 FPS clip at 60 FPS won’t magically make it smoother—it just bloats the file size by duplicating frames and can introduce visual stutter.
Controlling Quality with Bitrate
If resolution is about a video's sharpness, bitrate is all about its quality. Think of bitrate as the "data budget" for your video, measured in megabits per second (Mbps). It determines how much information is used to render each second of footage.
A higher bitrate means more data, which gives you a cleaner image with fewer distracting digital artifacts. The trade-off? A much larger file size.
YouTube has its own recommended target bitrates for different resolutions and frame rates. Sticking to these guidelines is your best bet for ensuring your video looks great even after YouTube runs its own compression on it.
Here are the most common targets:
ResolutionFrame RateSDR Bitrate (Mbps)HDR Bitrate (Mbps)
1080p
24, 25, 30
8–15
10–20
1080p
48, 50, 60
12–22
15–30
4K (2160p)
24, 25, 30
35–68
44–85
4K (2160p)
48, 50, 60
53–85
66–108
Actionable Insight: For a simple talking-head video with little movement, a lower bitrate (like 8 Mbps for 1080p) is perfectly fine. But for a high-action scene with lots of detail, you’ll want to push it toward the higher end of the range (like 15 Mbps) to avoid those ugly, blocky compression artifacts.
By mastering these three elements, you gain precise control over your video's final look, ensuring you're delivering the best possible version to your audience every single time.
The Unsung Heroes: Audio, Color, and Captions
Everyone obsesses over resolution and frame rates, but what really separates amateur videos from polished content? It often comes down to three things many creators overlook: audio, color, and captions.
Getting these right is what makes your videos feel complete. Bad audio is an instant turn-off, weird colors look cheap, and no captions means you’re leaving views on the table.
Why Your Audio Mix Matters
Have you ever noticed how some YouTube videos are painfully loud while others are barely audible? YouTube noticed too, which is why they automatically adjust the volume of every video on the platform.
YouTube normalizes all audio to a target of -14 LUFS (Loudness Units Full Scale). Think of LUFS as a smarter way to measure perceived loudness, not just peak volume. If your video is much louder than -14 LUFS, YouTube will crush it down. If it’s too quiet, YouTube might boost it, which can amplify any background hiss.
Actionable Insight: Aiming for a final mix around -14 LUFS gives you control. It stops YouTube's algorithm from messing with your sound, ensuring your audience gets a clean, consistent listening experience just as you intended.
To make sure your audio uploads without a hitch, stick to YouTube’s preferred settings. It's simple, but it makes a world of difference for compatibility.
- Audio Codec: Use AAC-LC. This is the standard audio format for web video and works perfectly with the H.264 video codec.
- Sample Rate: Stick to 48kHz. It’s the industry standard for video. Anything higher is overkill and won't improve the final sound on YouTube.
Painting with Light: Getting Your Color Right
Just like audio, video color has its own set of rules. The "color space" defines the palette of colors your video can display. For the longest time, the undisputed king has been BT.709. It’s the standard for everything from HD television to pretty much all web video, and it’s what YouTube will assume your video is using.
But there’s a new player in town: High Dynamic Range (HDR). HDR video uses a much wider color space, like BT.2020, which allows for unbelievably vibrant colors, brighter highlights, and deeper, more detailed shadows. It's the difference between a standard photo and one that feels like you're looking through a window.
Uploading in HDR can make your video look stunning, with colors that pop right off the screen. The catch? Your entire setup—camera, editing software, and monitor—needs to be HDR-compatible. If you have the gear, it's a surefire way to stand out.
This infographic can help you decide which settings best align with the feel you want for your video.
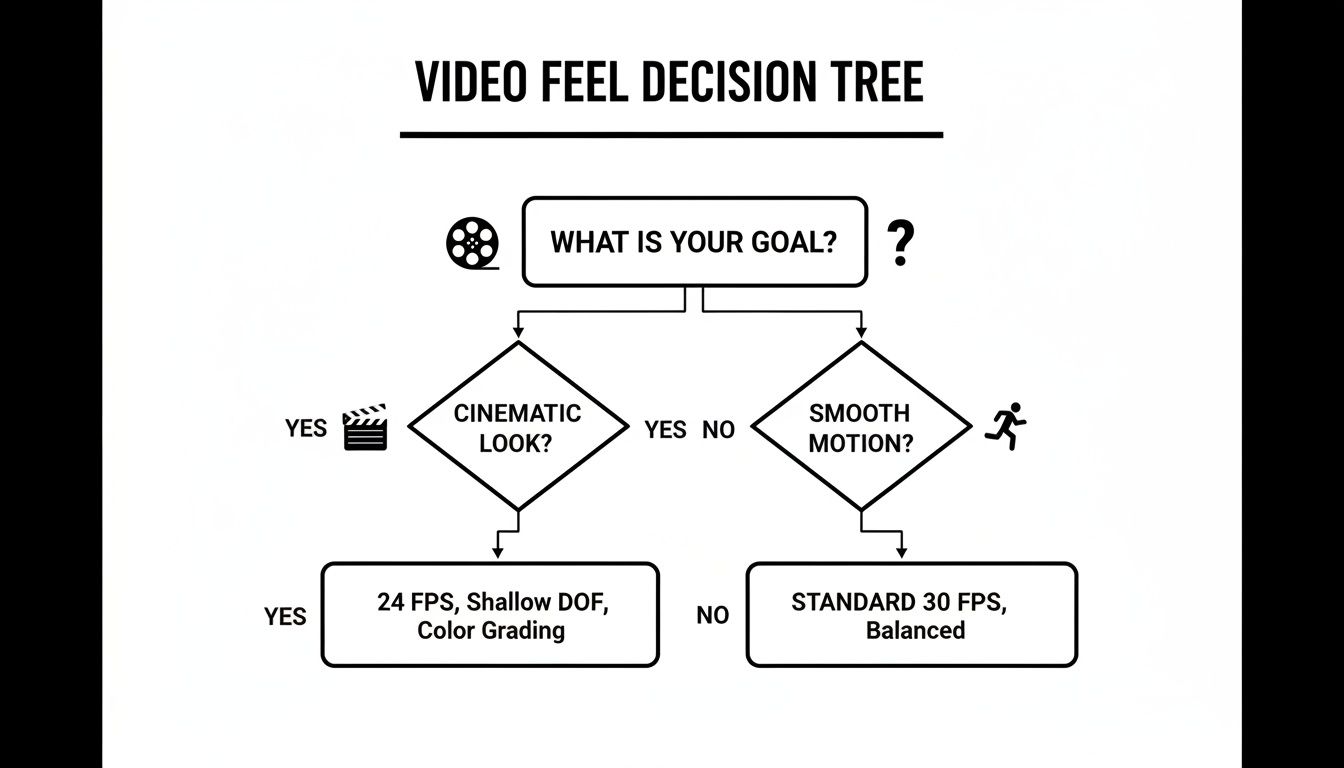 This decision tree shows how your goal, whether a cinematic look or smooth motion, should guide your technical choices.
The Power of Captions and Subtitles
Finally, let’s talk about captions. With Wyzowl reporting that 91% of viewers watch videos with the sound off, captions have become non-negotiable.
YouTube plays nice with a few caption formats, but the gold standard is the .SRT (SubRip Subtitle) file. It’s just a simple text file with your dialogue and timestamps, telling the player what to show and when.
But captions do way more than just help people watching without sound. Here’s why they’re a must-have:
- Better Viewer Retention: Studies consistently show that videos with captions have significantly higher watch times. Viewers can follow along anywhere, anytime.
- An SEO Goldmine: YouTube's algorithm can read your caption file. This gives it a word-for-word transcript, helping it understand your video and rank it for relevant searches.
- Wider Audience Reach: Captions open your content to the entire world. You can easily translate your .SRT file into different languages, instantly making your video accessible to a global audience.
Actionable Insight: While YouTube's auto-captions are improving, they're still notoriously full of errors. For a professional touch, always upload your own accurate .SRT file. If you want to get this done fast, a dedicated subtitle generator tool can create a perfect file for you in minutes. It’s these finishing touches that take your content from good to great.
Repurposing for Virality: How to Format Shorts with Klap
You put a ton of work into your long-form videos. Hours of shooting, editing, and fine-tuning. After all that, the idea of starting over just to make a few short clips feels exhausting.
But what if your best Shorts are already hiding inside the videos you just finished?
This is where a smart content repurposing workflow comes in. Instead of manually digging through hours of footage, AI-powered tools like Klap can find the gold for you. It turns your existing content library into a spring of high-engagement vertical videos you can create in minutes.
The way people watch videos has completely changed. Short-form video is dominating YouTube, with some analytics predicting that clips under a minute could make up 75-77% of global views by 2026. And with Shorts pulling in over 70 billion daily views, bite-sized content is no longer a "nice-to-have"—it's a must for growing your channel. You can check out more stats on this trend over at Vidpros.com.
How Klap Turns Your Long-Form Videos into Shorts
Tools like Klap are built to solve the two biggest headaches for creators making Shorts: finding the best moments and automatically reformatting them for a 9:16 vertical screen. The AI scans your video's transcript and visuals to pinpoint viral-worthy hooks and killer segments that grab a viewer's attention and don't let go.
The whole process is designed to be incredibly efficient, turning what used to be a time-suck into just a few simple steps.
- Import Your Video: First thing's first—give Klap your content. You can drop in a YouTube link or just upload a video file straight from your computer.
- Let the AI Do the Heavy Lifting: Once your video is in, Klap’s AI gets to work. It transcribes the audio, analyzes the content for juicy topics and potential hooks, and spits out a bunch of ready-to-go short clips.
- Fine-Tune and Customize: The AI gives you a fantastic starting point, but you’re always in the driver's seat. You can easily trim the beginning or end of a clip, tweak the auto-generated captions, and pick from different styles to keep everything on-brand.
- Export Your Social-Ready Short: With a couple of clicks, you can export your finished short in the perfect format. The video is already in the right 9:16 aspect ratio and includes dynamic captions optimized for mobile.
This screenshot shows Klap's clean interface, where the AI has pulled multiple clip suggestions from just one long-form video.
Each clip comes with a title, duration, and a "virality score" to help you decide which moments have the most potential.
A Practical Step-by-Step Workflow
Let's say you just dropped a one-hour podcast episode on YouTube. Finding and editing 10-15 shareable moments by hand would take forever. With an AI tool, it’s a whole different ballgame.
First, you paste your YouTube link into Klap. The AI scans the entire conversation, finds the best questions, strongest statements, and funniest bits, and serves up a dozen clips. It automatically reframes the shot to keep the speaker centered and slaps on dynamic captions to keep viewers hooked.
By automating the tedious parts of editing, you can shift your focus from manual labor to creative strategy. Instead of asking "How can I possibly edit all this?" you start asking, "Which of these great clips should I post first?"
From there, you can hop into the simple editor for some quick tweaks. Maybe you want to change the caption style to match your brand colors or trim a clip to make the hook even punchier. In less than 30 minutes, you’ve turned a single one-hour video into a full week’s worth of high-quality Shorts, perfectly formatted and ready to post.
If you want to go even deeper, check out our full guide on how to create YouTube Shorts from existing videos. This is the workflow that connects the value of your long-form content with the virality of Shorts.
Step-by-Step Export Presets for Popular Editing Software
Knowing the right settings is one thing. Actually using them is what separates the pros from the amateurs. Building custom export presets in your editing software is a massive time-saver, ensuring every single video you kick out meets the perfect format for YouTube.
This simple step removes all the guesswork and locks in consistency. Whether you're a one-person show or managing a whole creative team, having presets for specific needs—like a crisp 4K upload or a vertical YouTube Short—streamlines your entire workflow. Instead of fiddling with dozens of settings every time, you get it right with a single click.
Adobe Premiere Pro Export Presets
Premiere Pro is an industry workhorse, and thankfully, creating a YouTube preset is a piece of cake. Once your edit is locked and you're ready to export (File > Export > Media), you can build your go-to template from the ground up.
For a High-Quality 4K (16:9) Upload:
- Format: First things first, select H.264.
- Preset: Choose “Match Source - High bitrate” as your starting point. We'll tweak it from here.
- Video Tab: Head down to "Basic Video Settings." Set the Resolution to 3840x2160. Make sure the Frame Rate perfectly matches your timeline (e.g., 23.976, 29.97, or 59.94).
- Bitrate Settings: This is where the magic happens. Select VBR, 2 pass. Set your Target Bitrate to 45 Mbps and the Maximum Bitrate to 68 Mbps. Yes, two-pass encoding takes longer, but the cleaner result is absolutely worth the wait.
- Save Preset: Click the "Save Preset" icon up top, give it a clear name like "YouTube 4K Upload," and you're good to go for every future project.
DaVinci Resolve and Final Cut Pro
The logic is the same in other pro-level editors. In DaVinci Resolve's "Deliver" page, you'll find pre-made "YouTube" presets that you can easily customize. For Final Cut Pro users, you'll create "Destinations" under the Share menu.
No matter the software, the goal is identical: plug in the specific container, codec, resolution, and bitrate settings we’ve covered. Of course, before you get lost in export settings, it's crucial to have a solid grasp of your editing workflow. For a deep dive on how to master real estate video editing, which shares a ton of foundational principles with all kinds of video work, this resource is a great place to start.
Creating and sharing these presets across a team ensures that every piece of content, regardless of who edits it, adheres to the same high-quality standard. It removes human error and makes the final output predictable and professional.
Getting your format right is your ticket to tapping into YouTube's colossal audience. As of early 2026, the platform attracts over 2.70 billion monthly active users—a number that proves it’s still the king of content distribution. With 82% of those users coming for entertainment, delivering a technically perfect video is your first and most important handshake. You can dig into more user trends and discover why YouTube remains a top platform for creators.
By setting up solid export presets, you're making sure your content shows up to the global stage perfectly dressed for the occasion, every single time.
Still Have Questions About YouTube Video Formats?
Got your video edited and ready to go, but a few nagging questions are holding you back from hitting "upload"? You're not the only one. Even experienced creators wrestle with the finer points of YouTube's formatting quirks.
Let's clear up some of the most common points of confusion so you can export and publish with total confidence.
Why Does YouTube Ruin My High-Quality Video With Compression?
You spent hours exporting a beautiful, high-bitrate file, only to see it look a little... softer on YouTube. What gives? It all comes down to one thing: efficiency. YouTube has to serve video to billions of users on every device and internet connection imaginable.
To make that happen, it takes your high-quality upload and creates multiple copies at different quality levels through a process called transcoding. This ensures someone on a spotty mobile connection gets a smooth stream, while a viewer with a 4K TV and fiber internet gets the best possible picture. Your pristine file acts as the "master copy" for all these other versions, so uploading high quality still matters.
Should I Upload in 4K if I Only Shot in 1080p?
This is a popular "hack" you might see online, but the short answer is no. Upscaling 1080p footage to 4K before you export doesn't magically add detail that wasn't captured in the first place. It just makes your file bigger and your upload time longer.
The real benefit comes from uploading a video that was natively shot and edited in 4K. When YouTube gets a native 4K file, it uses its more efficient VP9 codec. This results in a noticeably crisper 1080p playback for viewers compared to a video that was uploaded at 1080p from the start.
Does Audio Bitrate Matter as Much as Video Bitrate?
While video quality gets all the attention, bad audio will make viewers click away faster than anything else. But that doesn't mean you need to go overboard with the bitrate.
For the AAC audio codec that YouTube prefers, a bitrate of 384 kbps for stereo is the sweet spot. It delivers a clean, rich sound without bloating your file size. Anything higher just gets compressed down by YouTube anyway, so focus on a clean recording first, and let that 384 kbps bitrate handle the rest.
Ready to turn your perfectly formatted videos into a stream of viral content? With Klap, you can transform your long-form videos into engaging, social-ready short clips in minutes, not hours. Let our AI find the best moments so you can focus on growing your audience. Start creating for free at https://klap.app.
