How to Add Subtitles to a Video Easily and Effectively (Step-by-Step Guide)
Content Creation

Quick Summary
This article shows you how to add subtitles to a video quickly using Klap’s AI subtitle generator and an alternative method with VEED. You’ll learn how to upload your video, generate accurate captions, edit timing and text, and export a polished subtitled video for YouTube, social media, webinars, and more. For more video editing tips and workflow guides, explore our blog.
Struggling to Add Subtitles to Your Video Without Wasting Hours?
You’ve got your video ready. It looks good, the message is clear, and now you need subtitles. Then comes the question: do you type everything manually, use auto-captions, or find a tool that actually works without extra effort?
Manually adding subtitles sounds simple, but it easily gets time-consuming. Typing out dialogue, syncing text to speech, and fixing timing issues can take longer than editing the video itself. It’s also easy to make mistakes, especially with longer videos.
There’s a faster way to do this without sacrificing accuracy or quality.
In this Klap article, we’ll walk through how to add subtitles to a video using different methods, tools, and workflows so you can choose the fastest and most effective approach.
Why Listen to Us?
At Klap, we build AI tools that help creators turn long videos into short, captioned clips quickly. Our platform is used by over 2.2M creators and teams, giving us real insight into what works in video workflows. That experience helps us share practical ways to add subtitles faster and more efficiently.
What Does It Mean to Add Subtitles to a Video?
Adding subtitles means displaying the spoken dialogue or narration as on-screen text that appears in sync with your video. These can be burned into the video or added as selectable captions, depending on how you publish it.
Subtitles help viewers follow along without sound, improve accessibility for people with hearing loss, and make your content easier to understand across different languages and contexts.
Why Should You Add Subtitles to Your Video?
- Improve Accessibility: Subtitles make your videos understandable for viewers with hearing impairments or those who prefer watching without sound, ensuring your content reaches a wider, more inclusive audience.
- Boost Engagement: Videos with captions keep viewers’ attention longer, as text reinforces the spoken message, reduces drop-offs, and makes content easier to follow, especially on mobile devices.
- Enhance Comprehension: Subtitles help viewers grasp complex information, technical terms, or foreign accents, ensuring your message is clearly understood without requiring repeated plays or extra effort.
- Expand Global Reach: Translating subtitles allows your video to reach international audiences, making content accessible in multiple languages and increasing engagement across regions and social platforms.
- SEO and Discoverability: Text-based subtitles improve search engine indexing, making your videos more discoverable online and helping attract organic traffic from searches related to your content.
How to Add Subtitles to Your Video
Method 1: Using Klap
Looking for a quick and easy way to add subtitles to your video? Klap makes it simple with a smooth step-by-step process. Here’s how to do it:
Step 1: Open Klap and Upload Your Video.
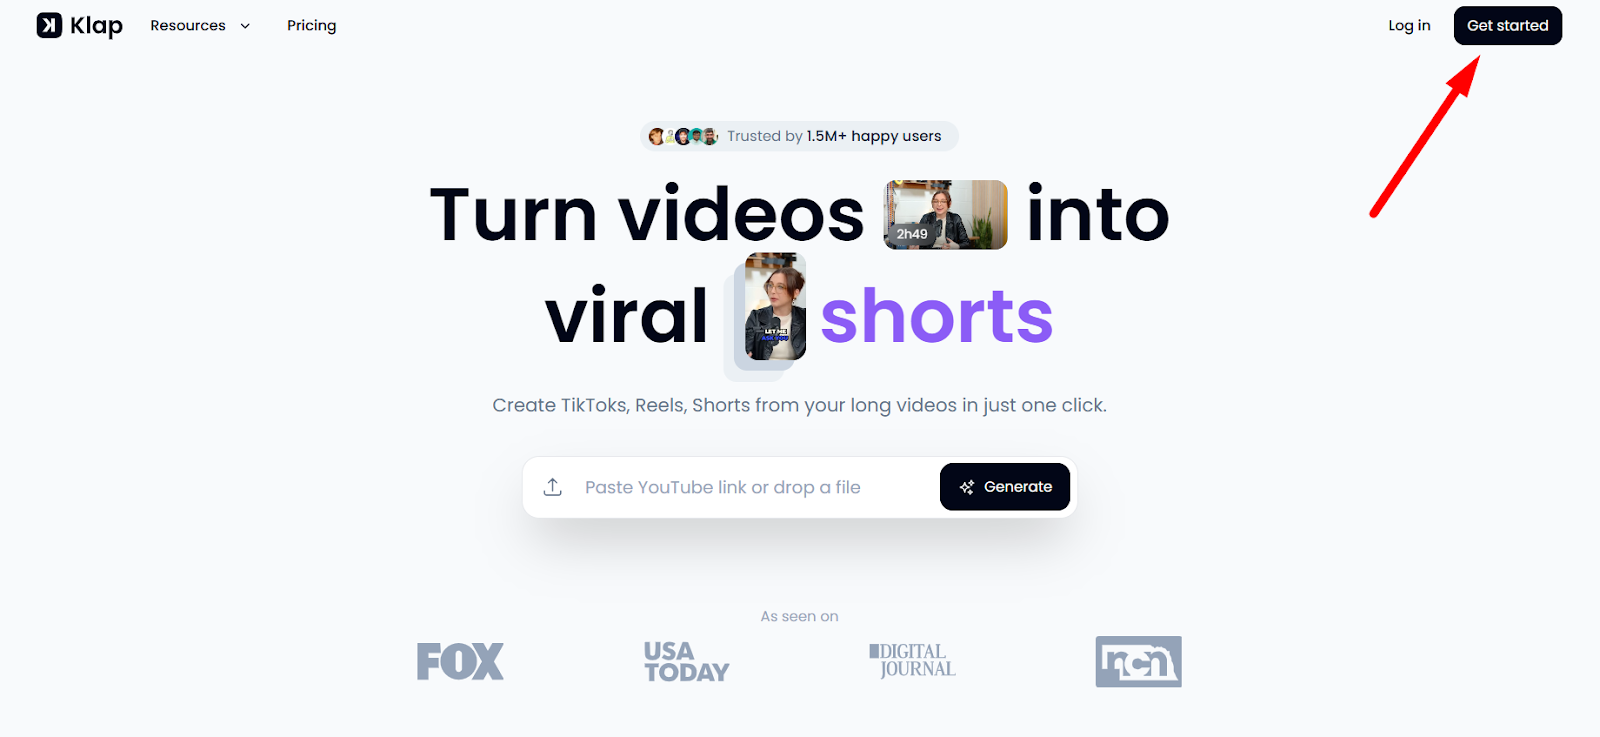
Click “Get started” to log into Klap and you’ll be taken to your dashboard. From here, you’ll be prompted to:
- Paste a YouTube link, or
- Upload a video file directly.
Once you’ve selected your preferred option, click "Generate" to get started.
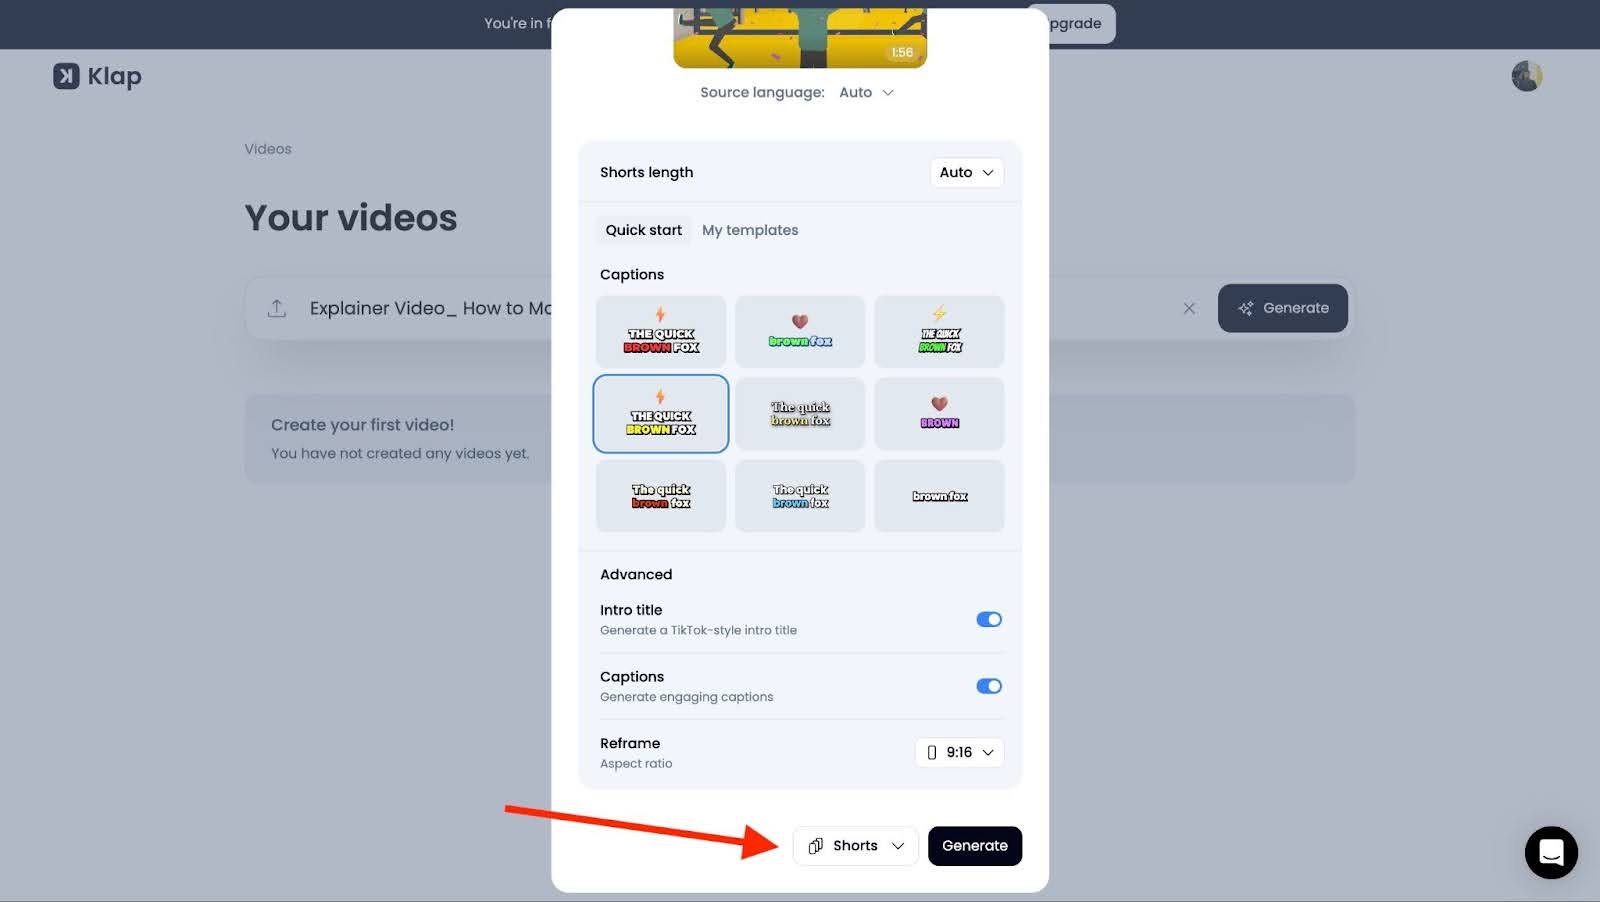
Step 2: Configure Subtitle Settings
After uploading your video, a modal titled “Create shorts” will appear. This is where you can set up your video for subtitles and other features.
- Intro Title: Turn this on to generate a TikTok-style intro slide with your video title for more engaging content.
- Captions: Toggle this to ON so Klap can generate subtitles automatically.
- Reframe: Use this option if you need the aspect ratio adjusted (otherwise, leave it as is).
You can also select whether you want to create Videos or Shorts, depending on whether you’re preparing a longer video or short clips.
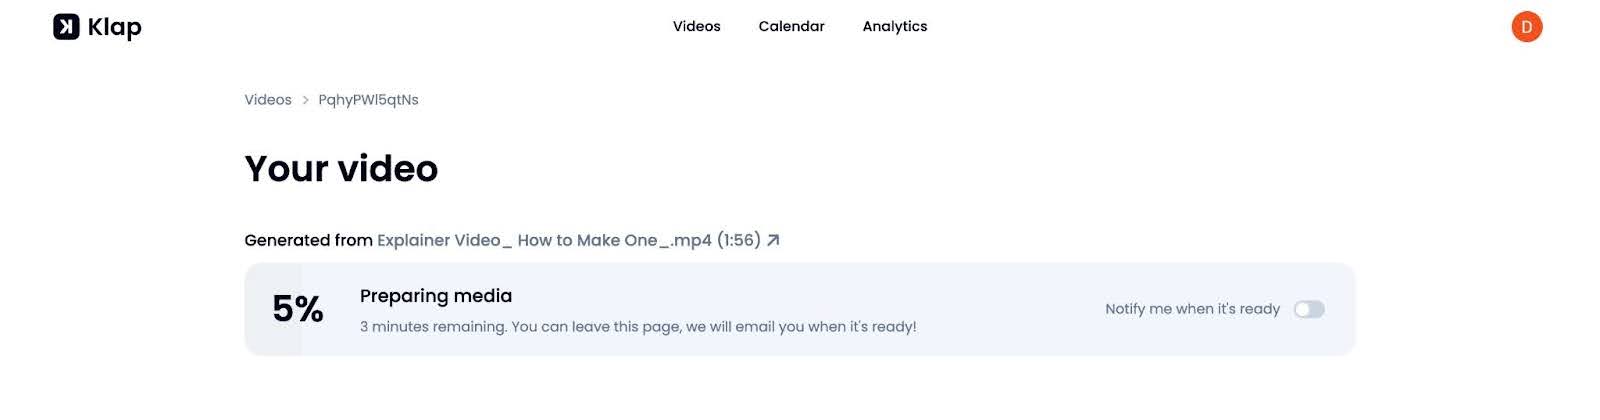
Step 3: Generate the Video
Once everything is set, click Generate and wait for Klap to process your video.
You’ll see a progress screen while your video is being prepared. You can enable notifications if you want to be alerted when it’s ready.
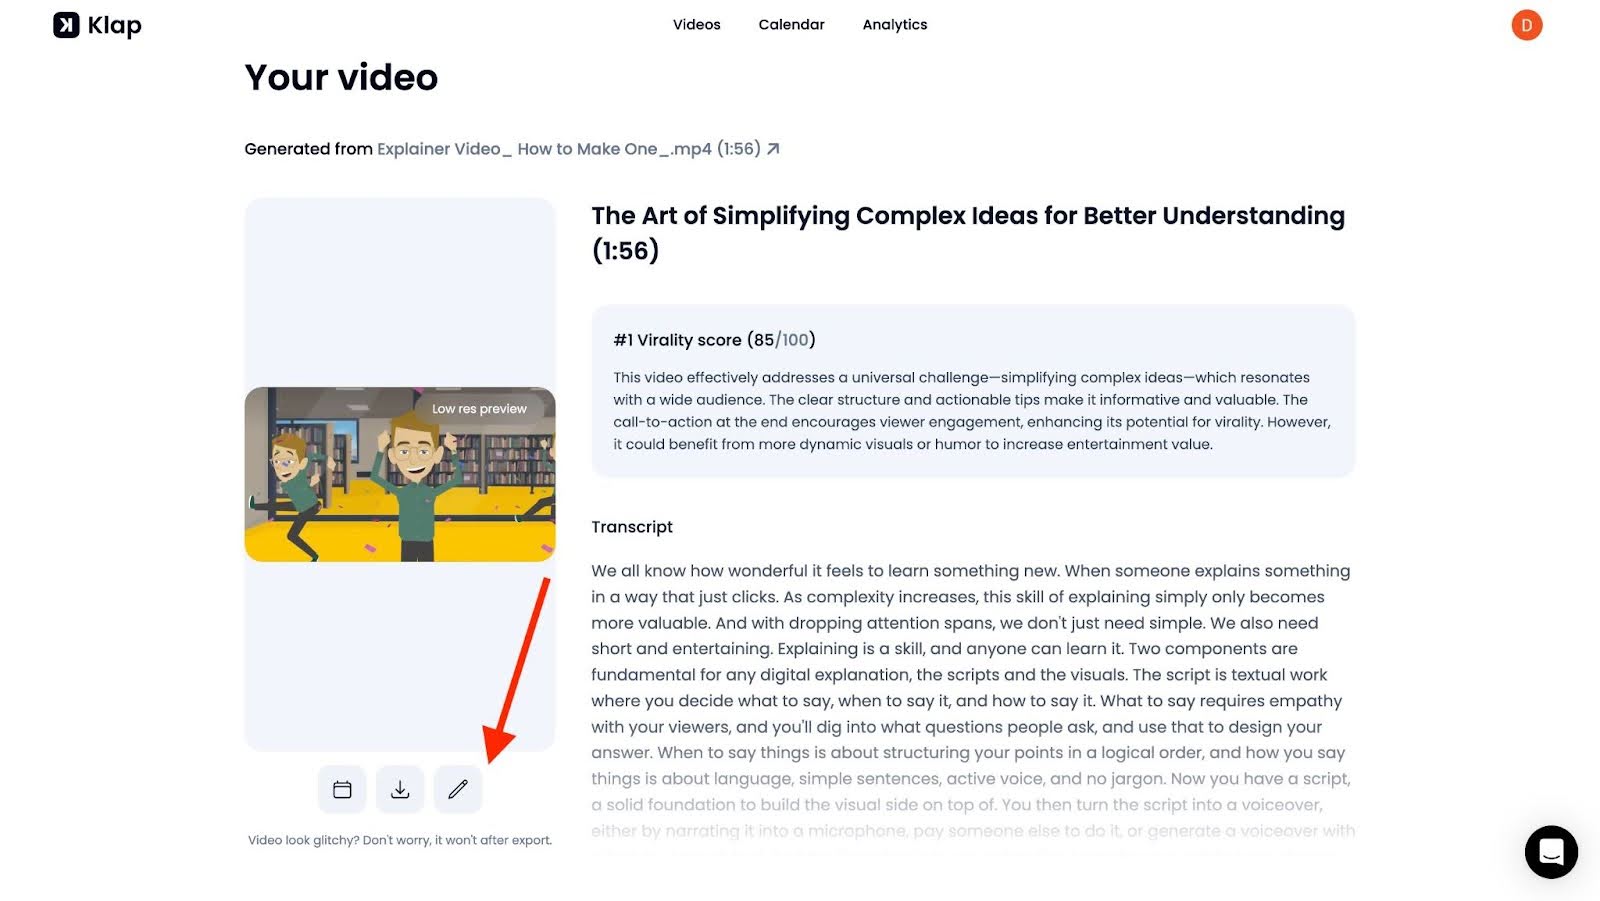
Step 4: Open the Video Editor
Once the processing is complete, you’ll see your video card with the following:
- A Virality Score (to show how likely your video is to perform well)
- A Video Preview
- The Transcript of your video
Click the pencil icon under the preview to open the video editor.
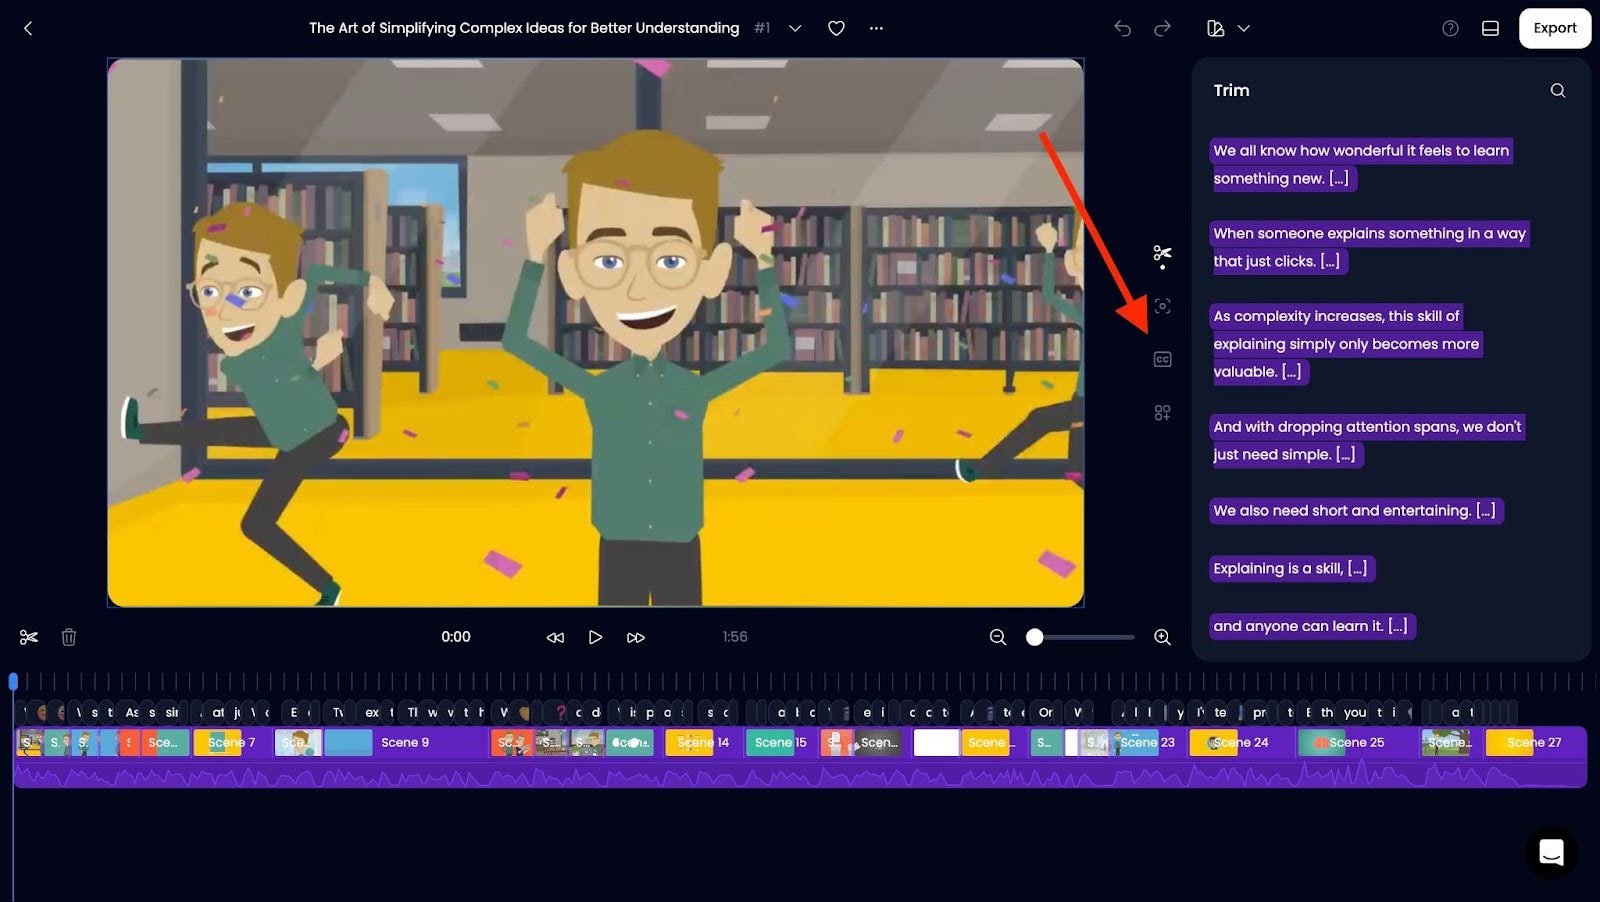
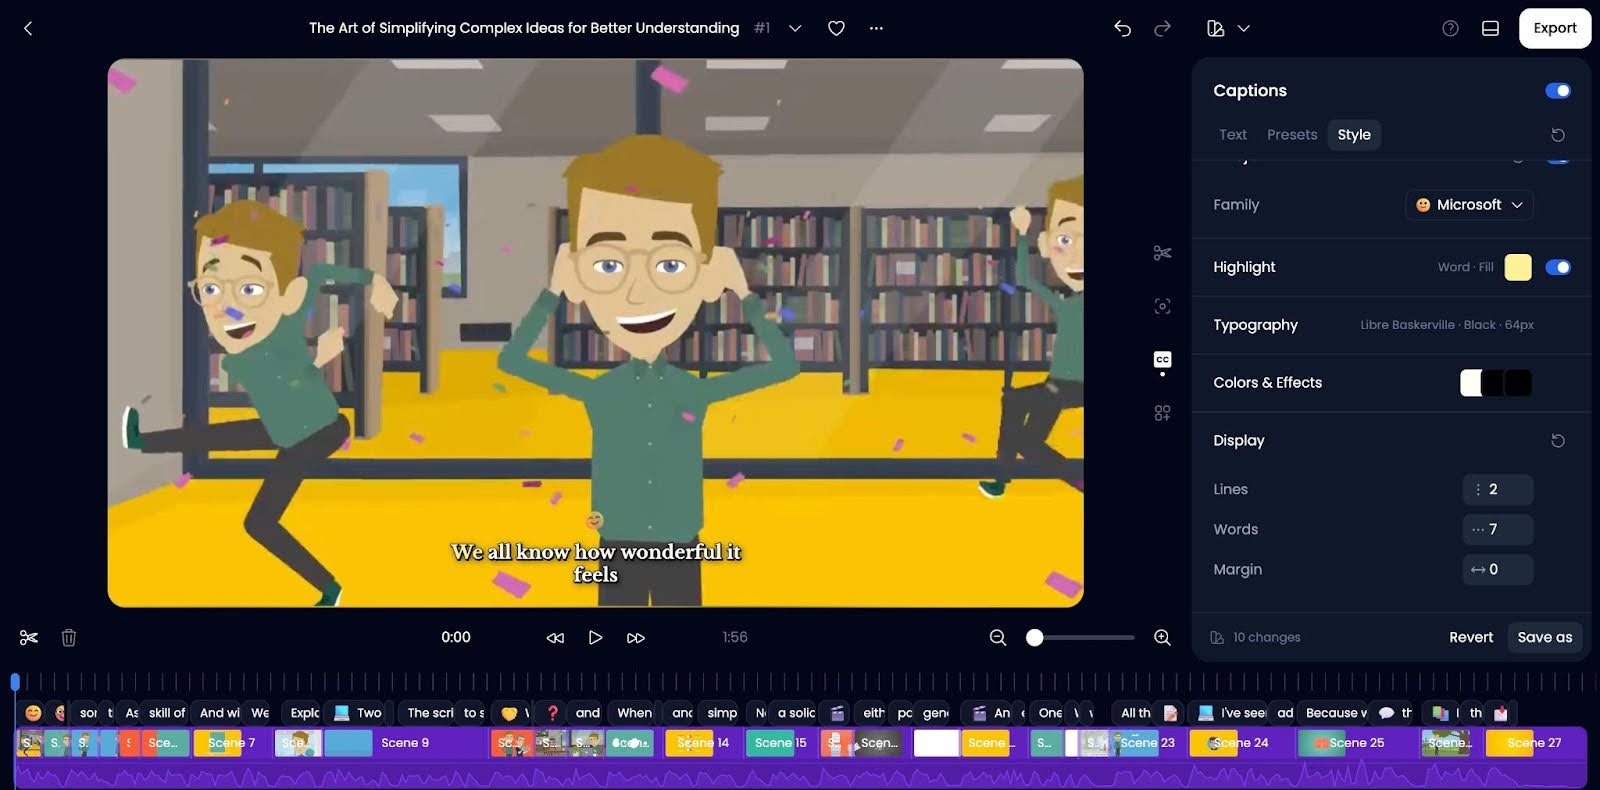
Step 5: Fine-Tune Your Subtitles
Now you’re in the editing interface. You'll see the video preview on the main screen, showing your video as it plays.
Below it, there’s a timeline with labeled segments for each scene in your video.
On the right side, the Transcript displays all the text generated from your video’s audio.
Click the “cc” icon to open the captions panel.
From here, you can adjust:
- Text: Edit any subtitles if there are mistakes. You can also add emojis or hide lines if needed.
- Presets: Klap provides ready-made caption styles, so pick one that matches your video’s tone.
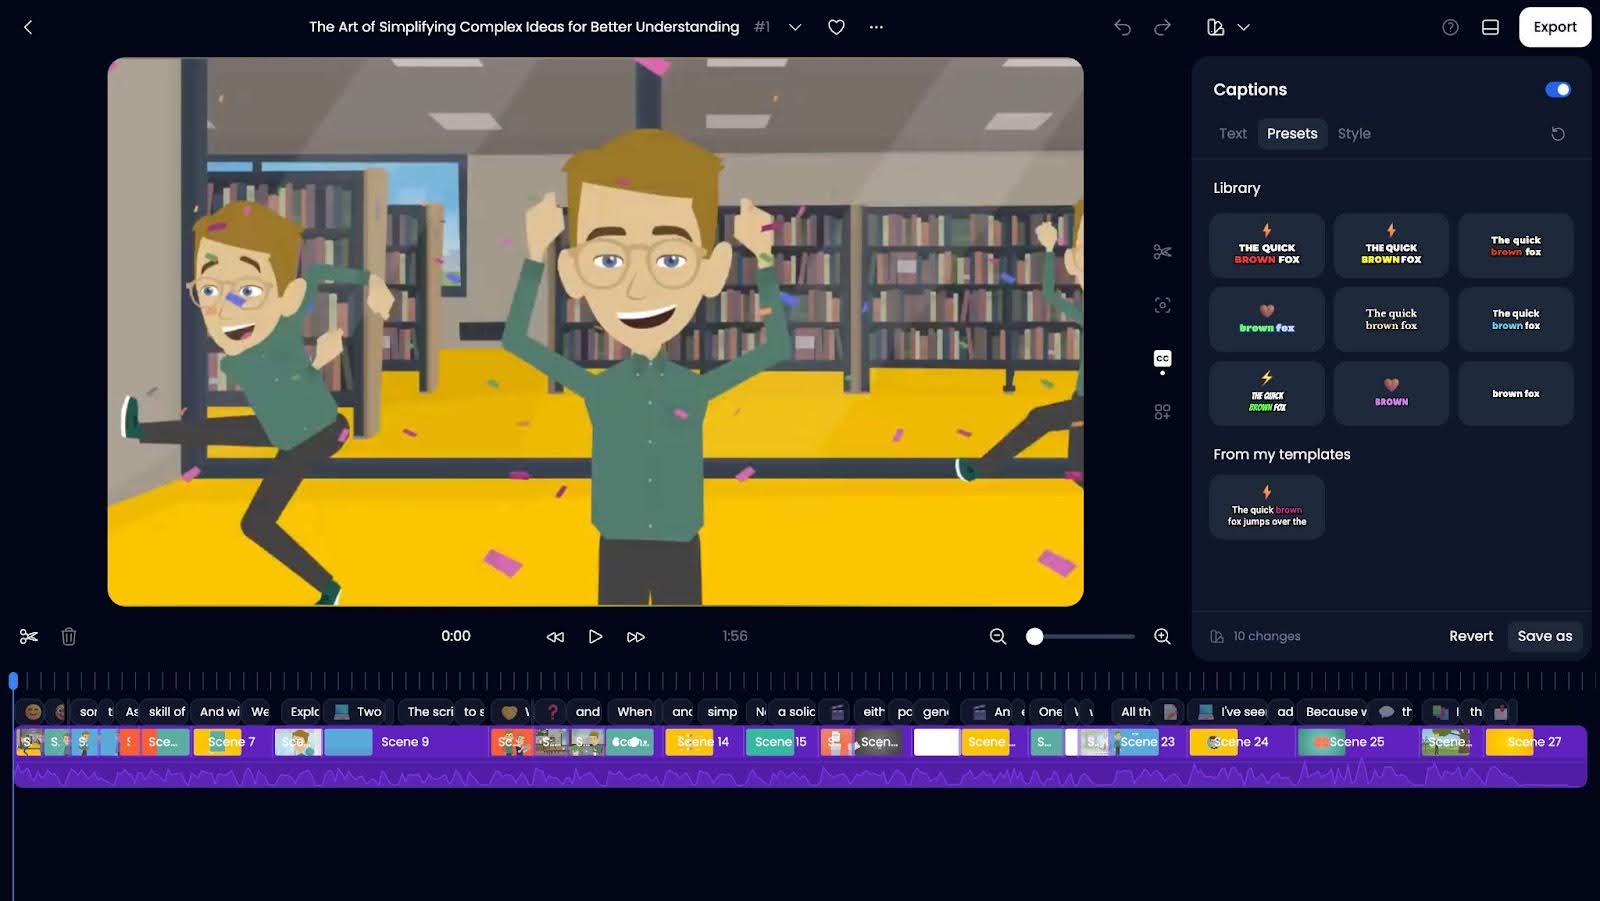
- Styles: Fine-tune how your subtitles appear on screen:
- Position: Drag the subtitle up or down. The higher the percentage, the lower they appear.
- Emojis: Choose from various emojis to add some fun to your subtitles.
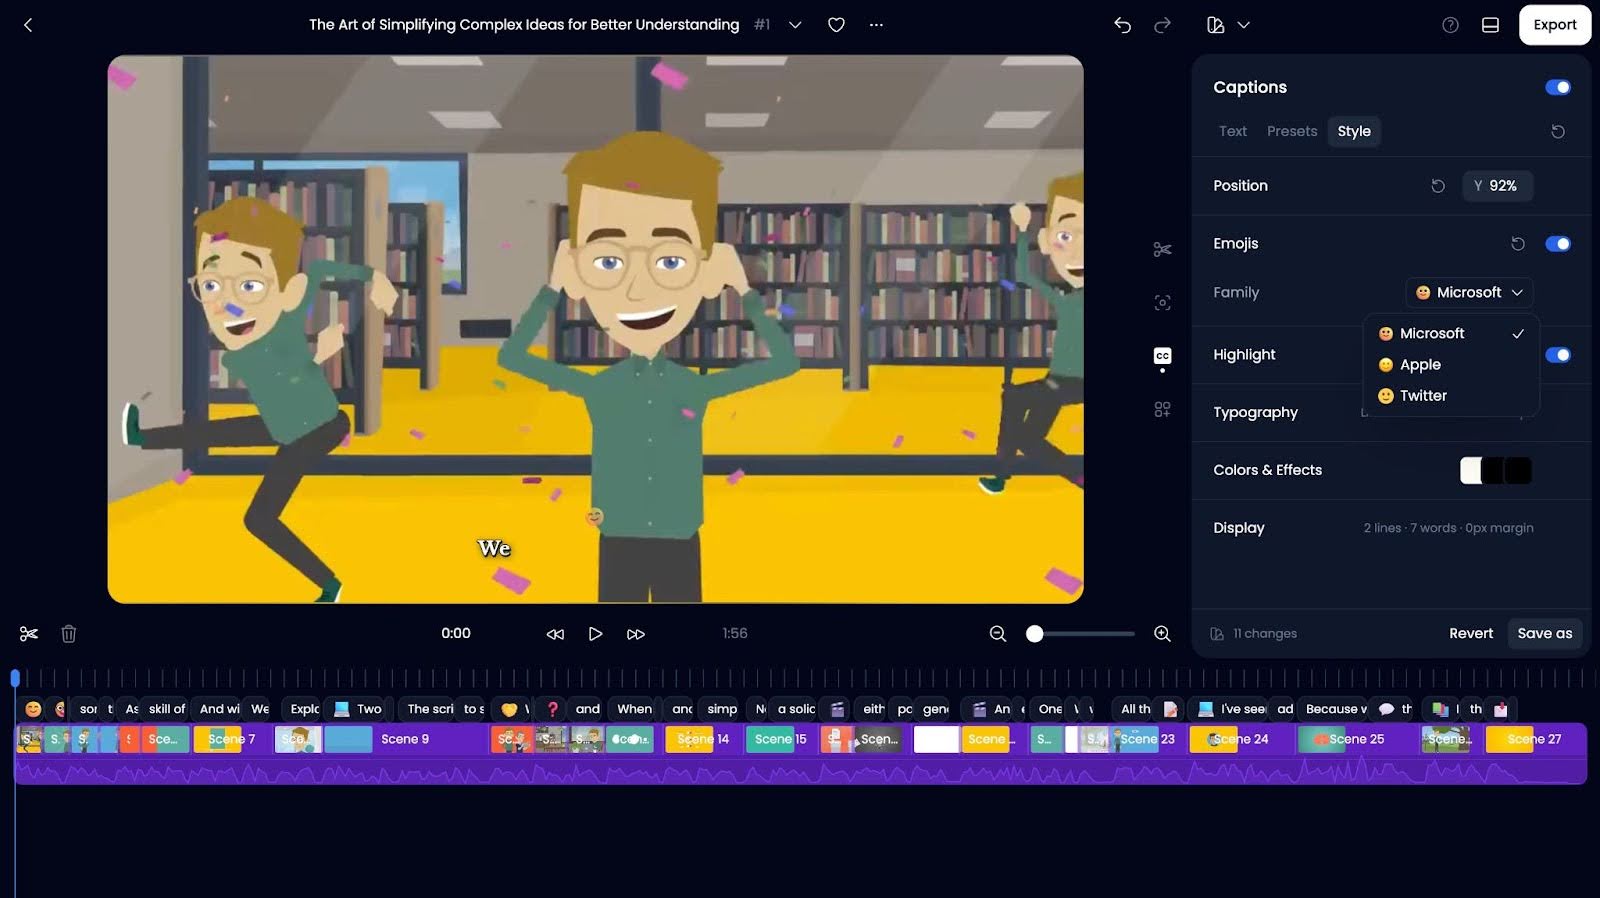
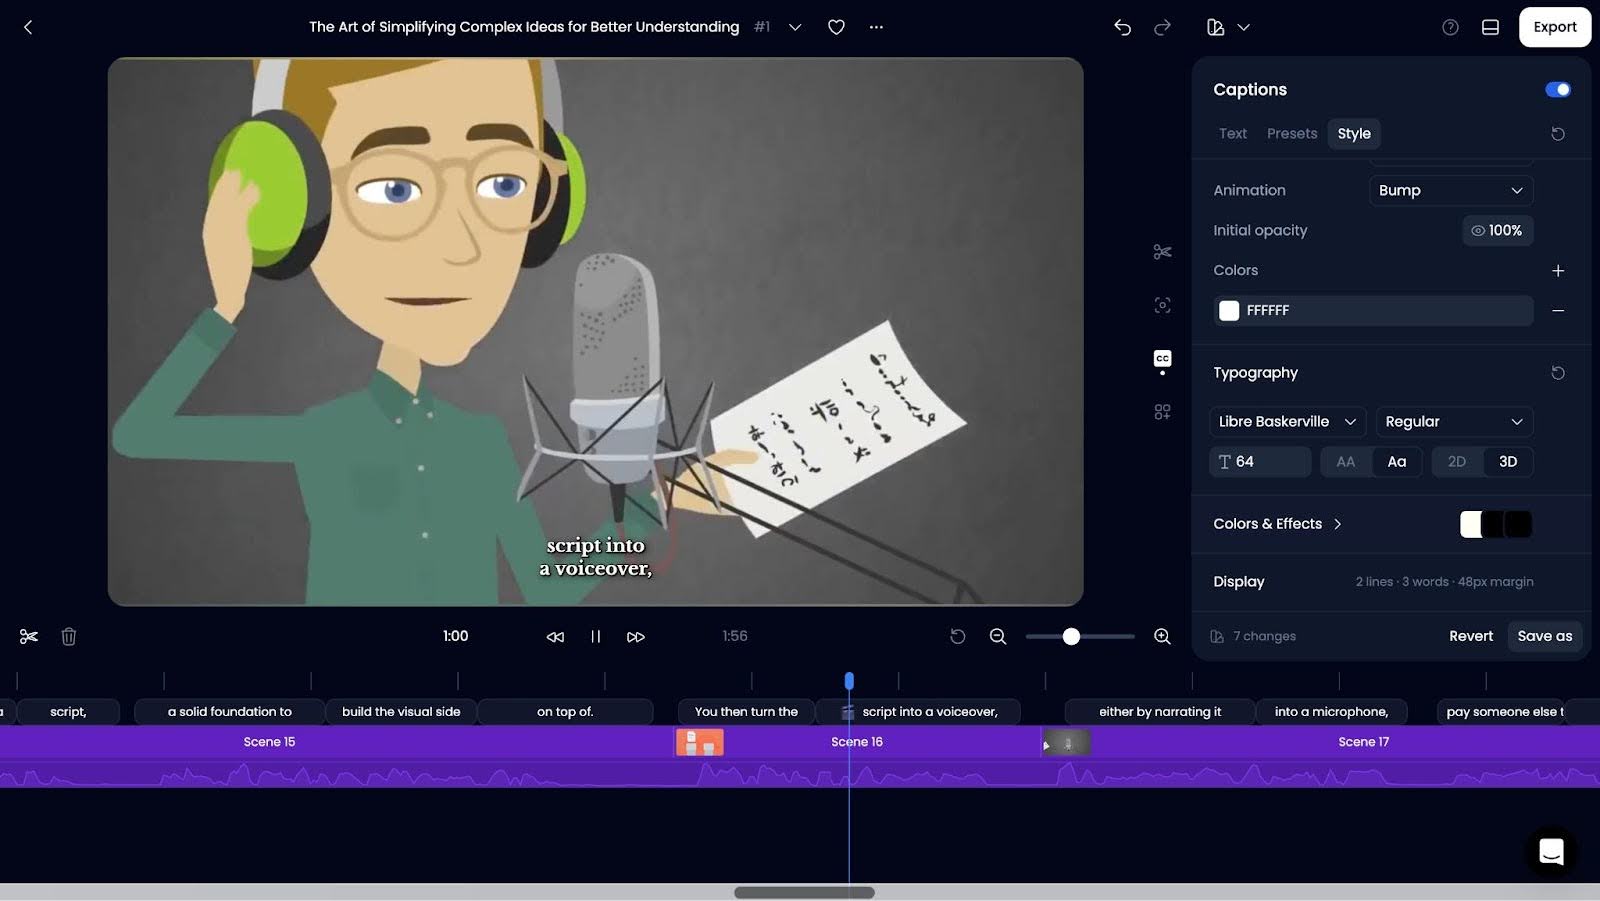
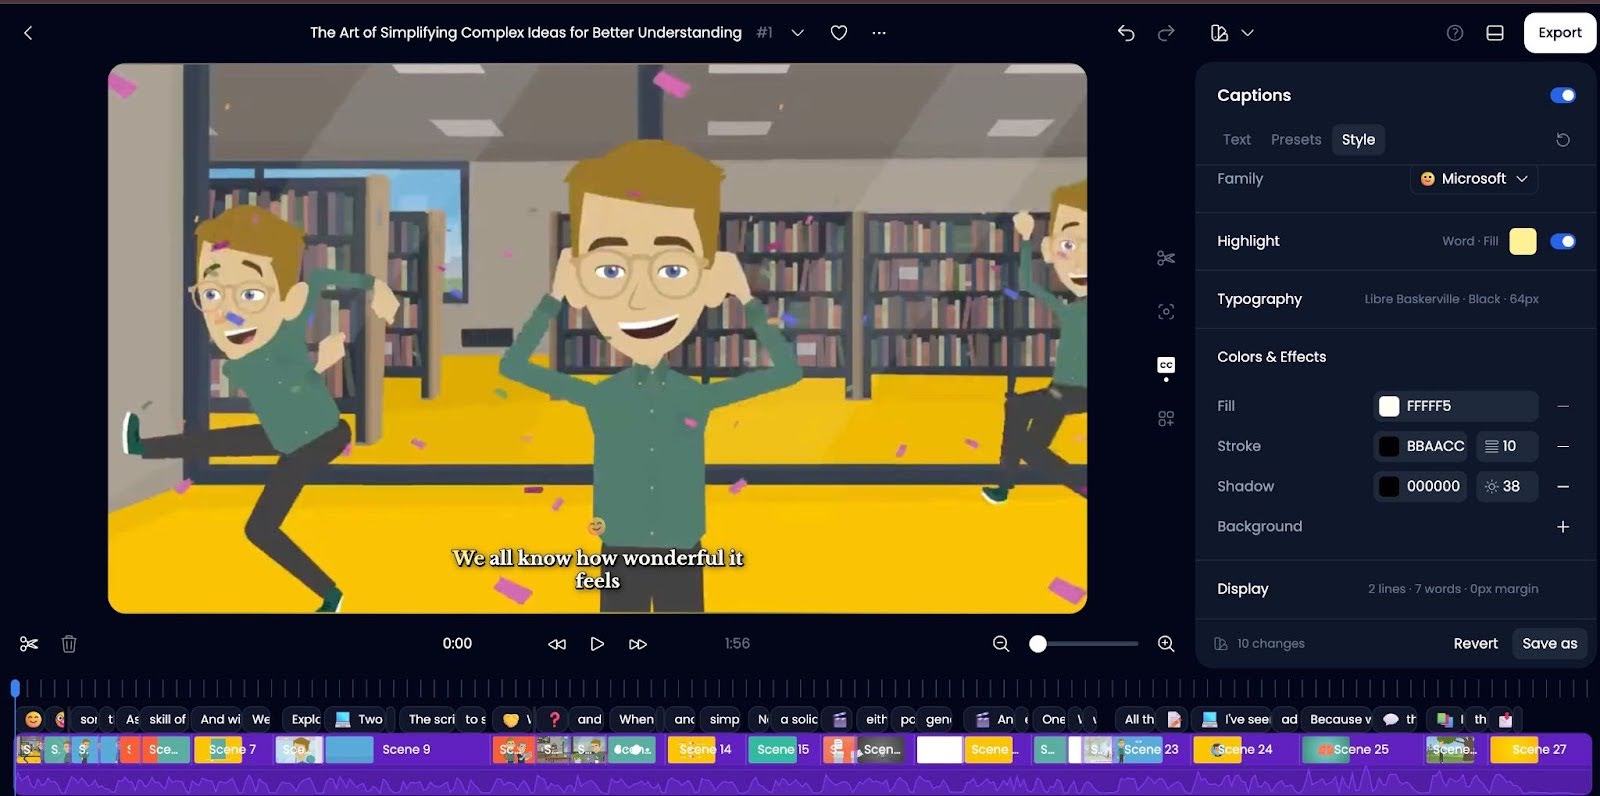
- Highlight: Customize how text is highlighted (mode, animation, opacity, and color).
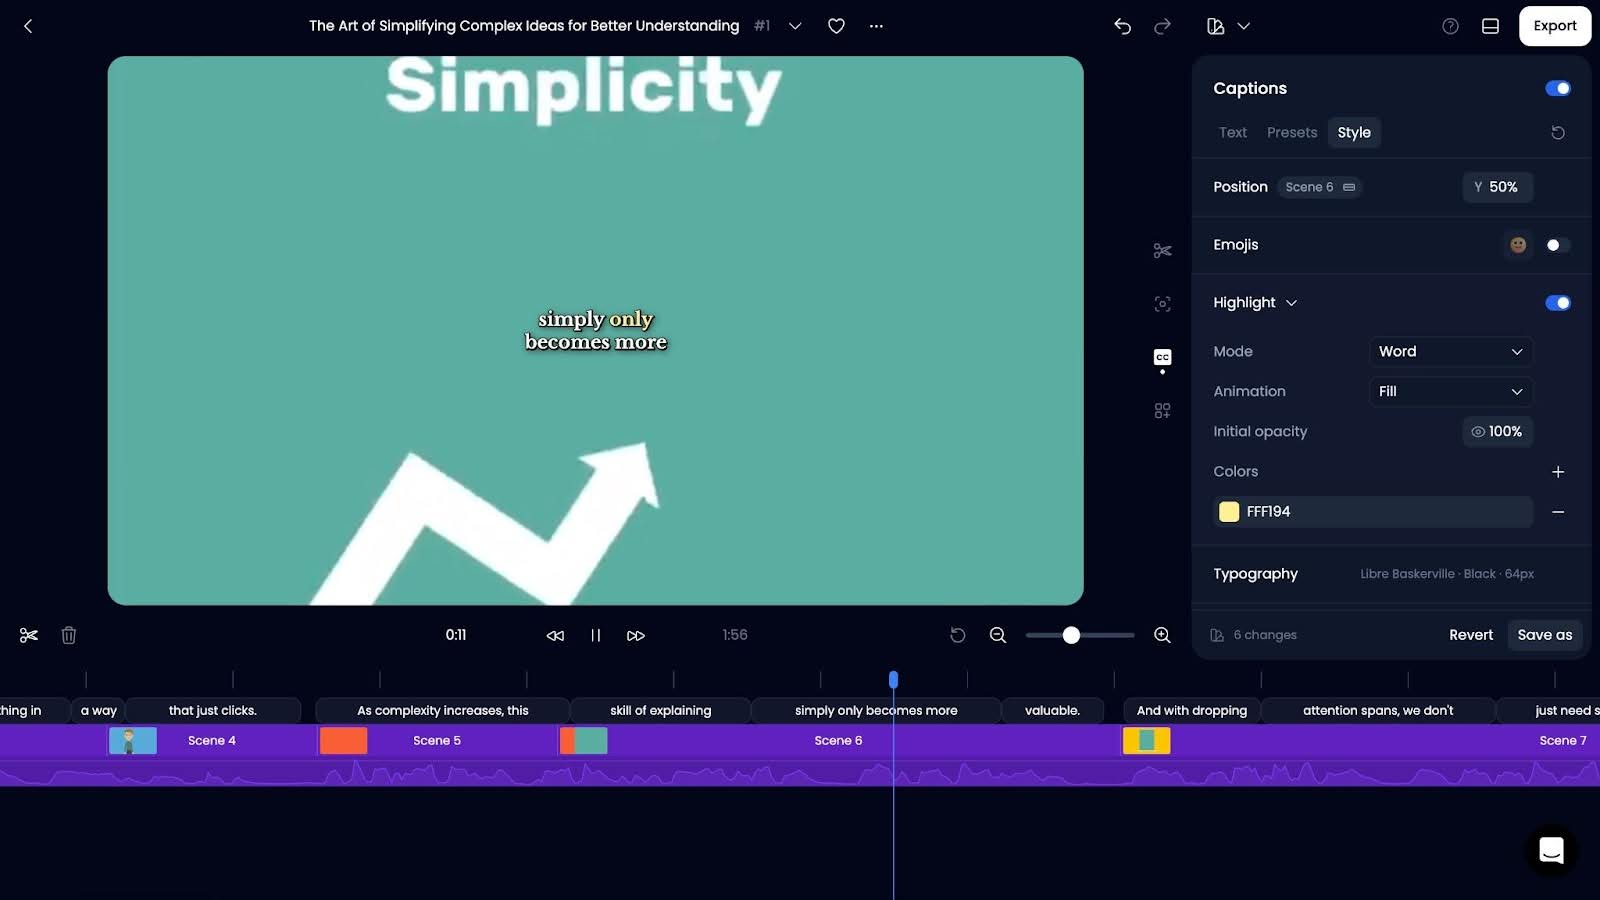
- Typography: Change the font size and style to fit your video.
- Colors & Effects: Pick the text color and effects (avoid choosing colors too similar to the background for readability).
- Display: Adjust how many lines or words appear at once.
Step 6: Preview the Final Result
Before finalizing, take a moment to preview your video.
- Check that subtitles are in sync with the audio.
- Ensure text remains legible throughout.
- Ensure that texts do not obscure any important visuals.
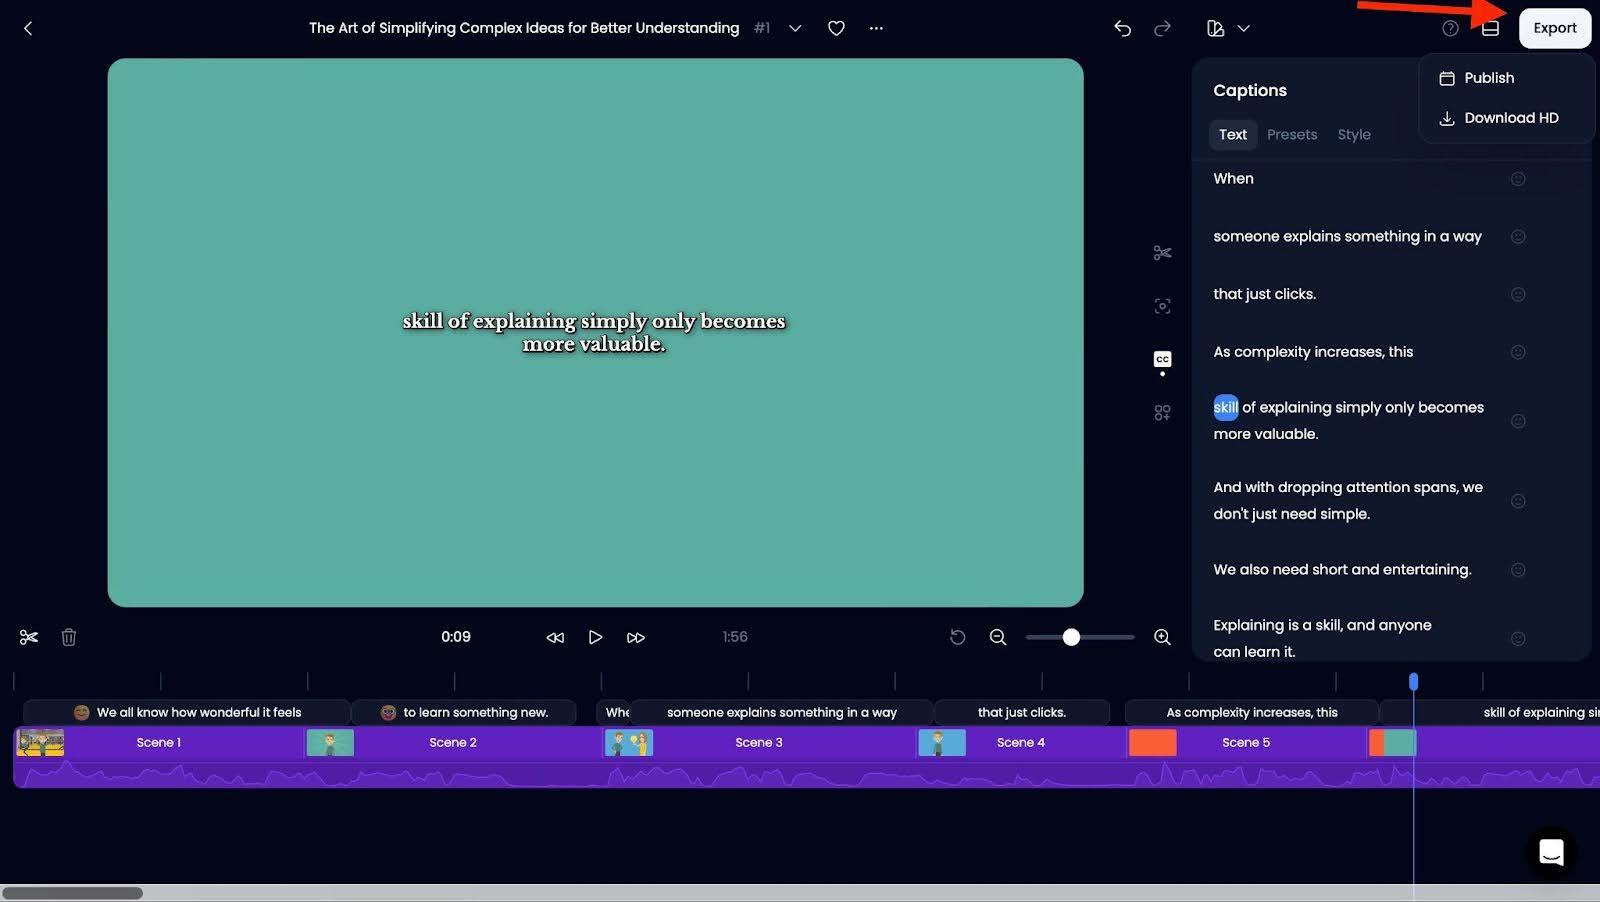
Step 7: Export or Download Your Video
Once you’re happy with the subtitles, click Save as if you want to keep your custom style for future use or hit Export to finalize.
- Choose Download HD or directly publish it.
- Save your video and get ready to share it!
That’s it! You now have a subtitled video ready to engage your audience.
Method 2: Using Veed.io
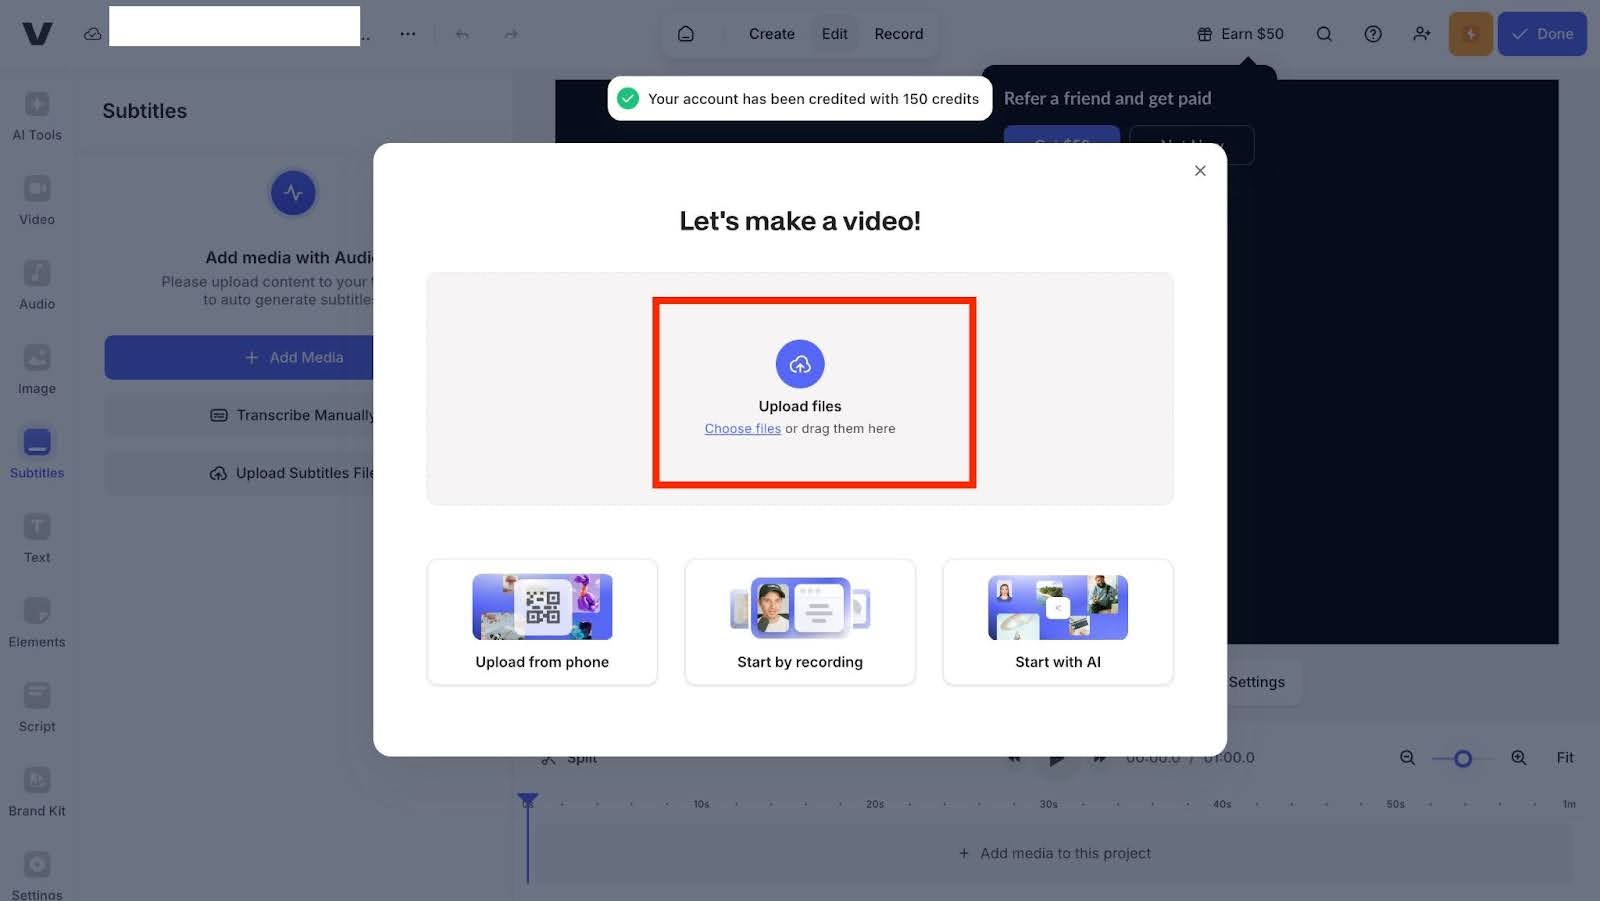
Step 1: Sign Up and Upload Your Video
Start by visiting Veed.io and signing up for an account. After successfully registering, the system will redirect you to the main dashboard. From there, click on the “Subtitles” option to get started.
Step 2: Upload Your Video
Next, click anywhere around the “Upload files” area to upload your video. This will take you directly to the video editor, where you can begin editing your subtitles.
Step 3: Auto-Generate Subtitles
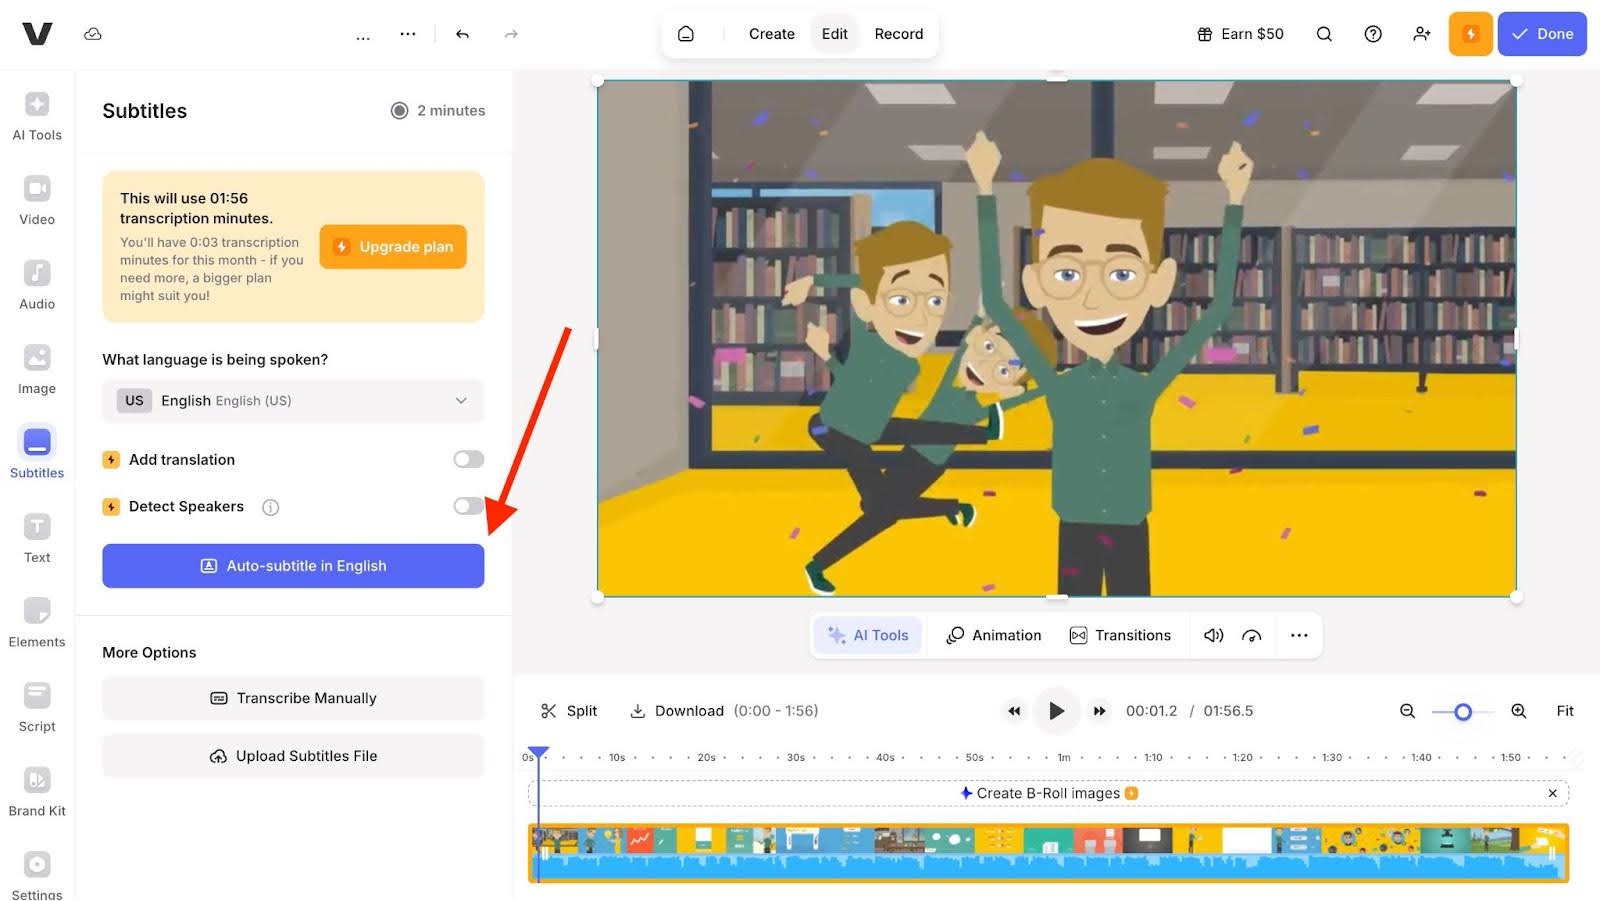
Once your video is uploaded, you’ll see the following on your screen:
- Left Panel:
- Video duration
- A dropdown to select the language (default is English US)
- An "Add translation" toggle if you want multi-language subtitles
- A “Detect Speakers” toggle that automatically identifies different speakers (great for interviews)
- A blue button that says “Auto-subtitle in English”
- Some more options
- Center: Video preview showing your content
- Bottom: Timeline with video segments
Click the blue “Auto-subtitle in English” button, and Veed will automatically transcribe your video into subtitles. This may take a few moments, depending on the length of the video.
Step 4: Review and Edit Subtitles
Once the subtitles are generated, you’ll have two tabs on the left side:
- Style: Here you’ll find different subtitle design templates to choose from.
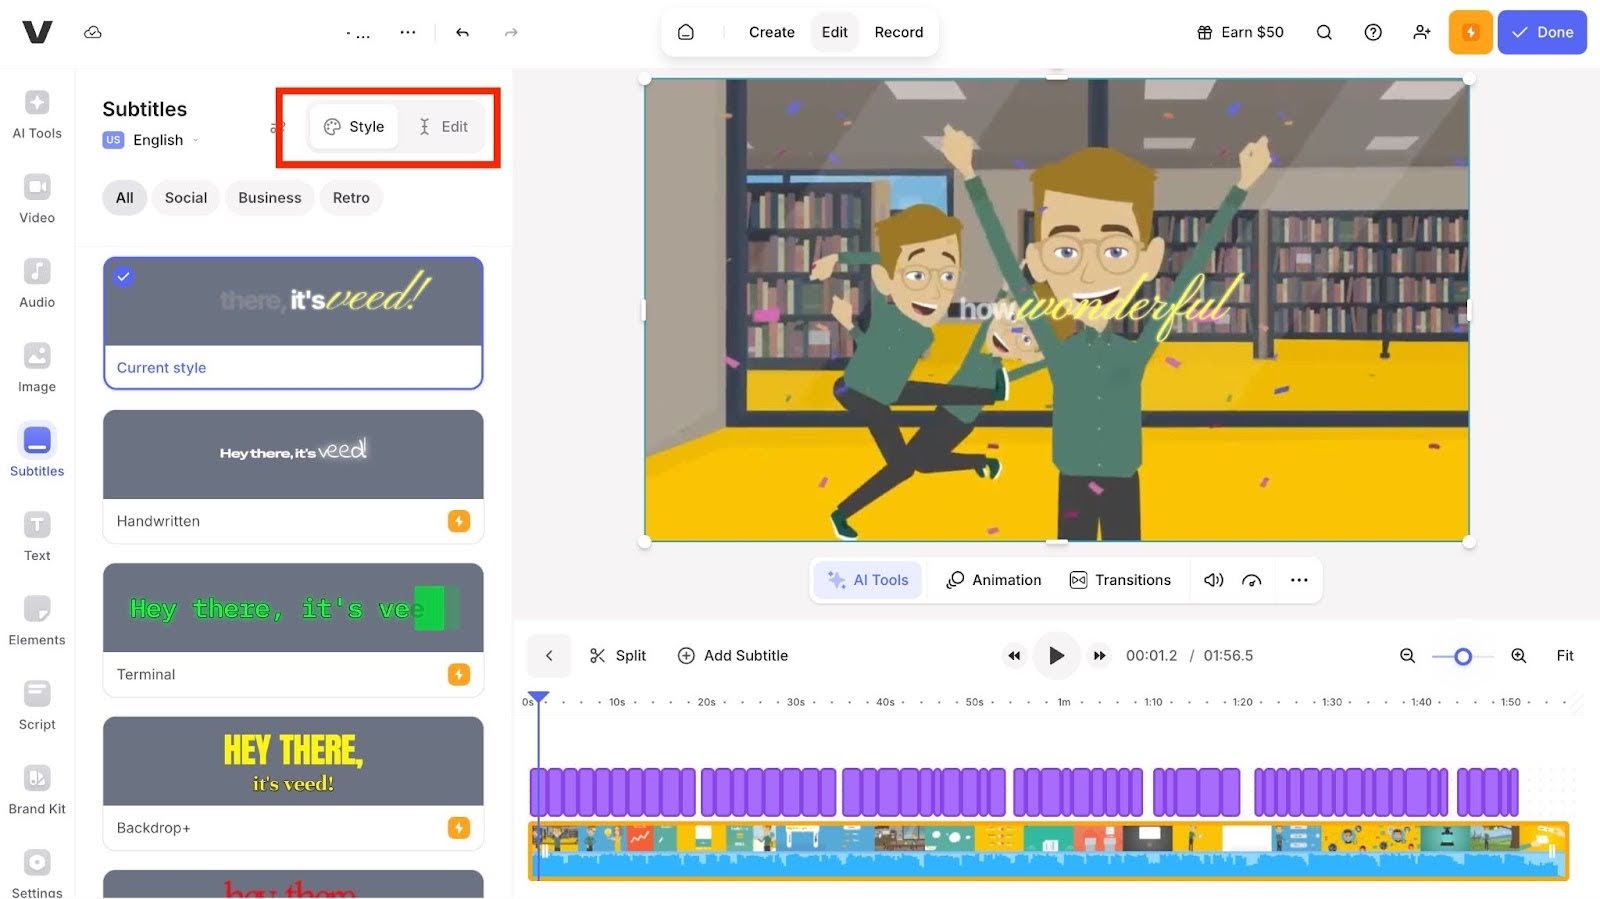
- Edit: This is where you can make changes to the subtitle text if needed.
On the right side of the screen, you’ll see the video preview window, where you can view your video and see how the subtitles look as the video plays. Below the preview, there's a rectangular panel for adjusting the subtitle appearance. Here, you can:
- Change the font style and size
- Modify the position of the subtitles by dragging them in the preview window
- Adjust the animation and effects applied to the text
Under the panel, you’ll find playback controls. You can press Play to preview the video or Pause to stop it at any point.
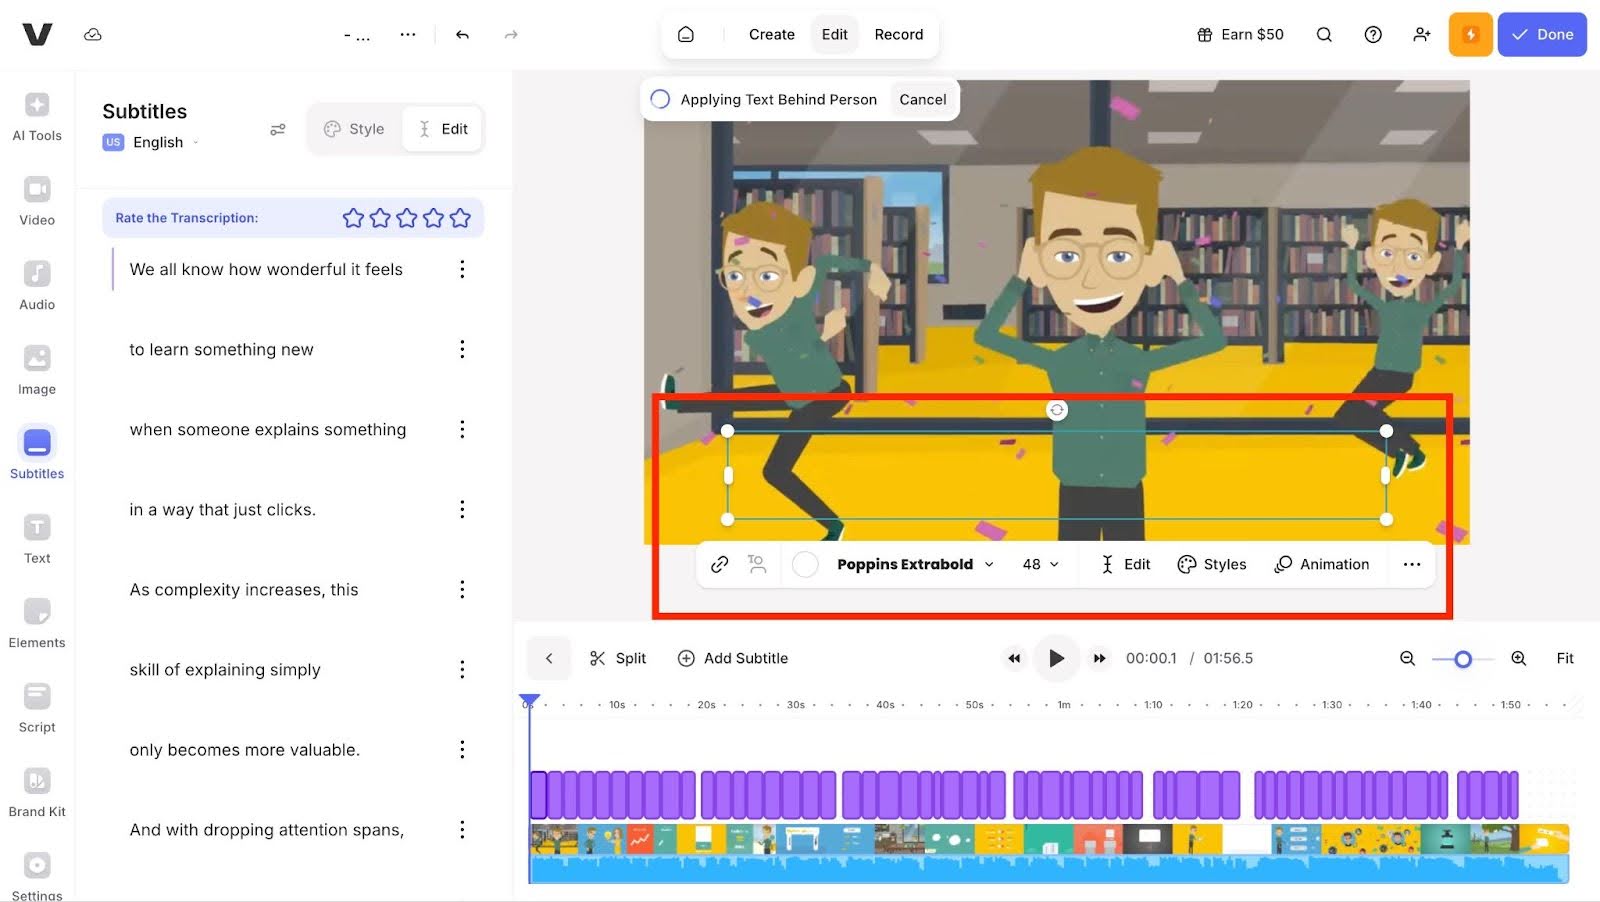
Next, below the playback controls, you’ll see the timeline, which displays the entire video. The purple bars indicate where the subtitles appear. The Fit slider allows you to zoom in for a detailed view of the video or zoom out to see the full timeline.
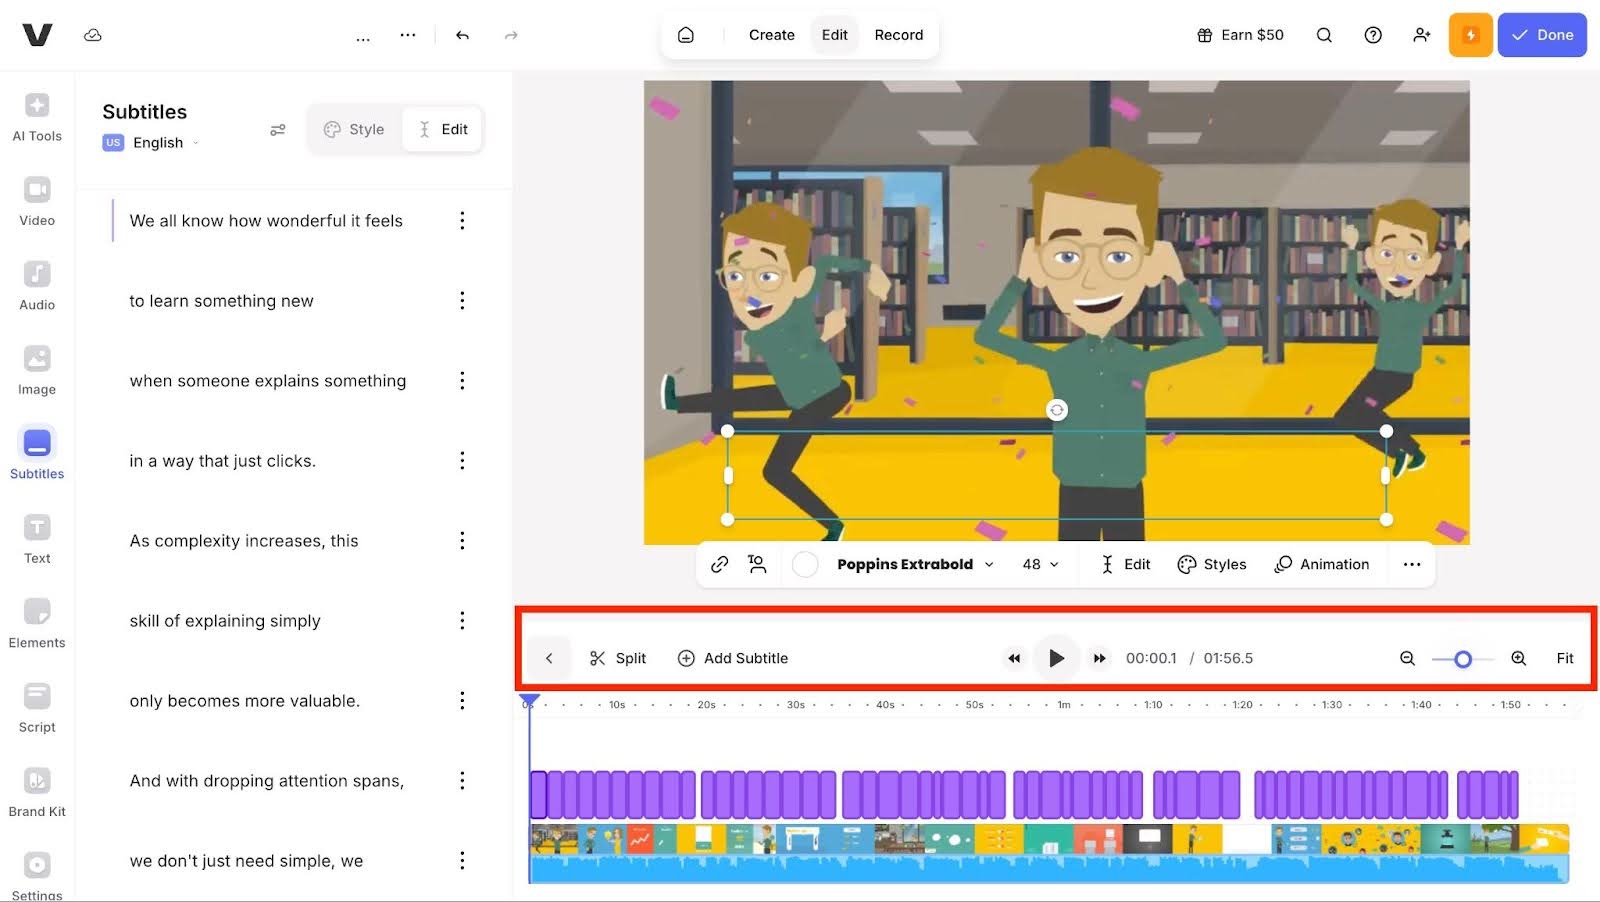
You can drag the playhead (the line with an inverted triangle) along the timeline to scrub through the video and check how the subtitles line up with the audio. You can also use the Split button to cut the video or the Add Subtitle button to add more subtitles at the current point in the video.
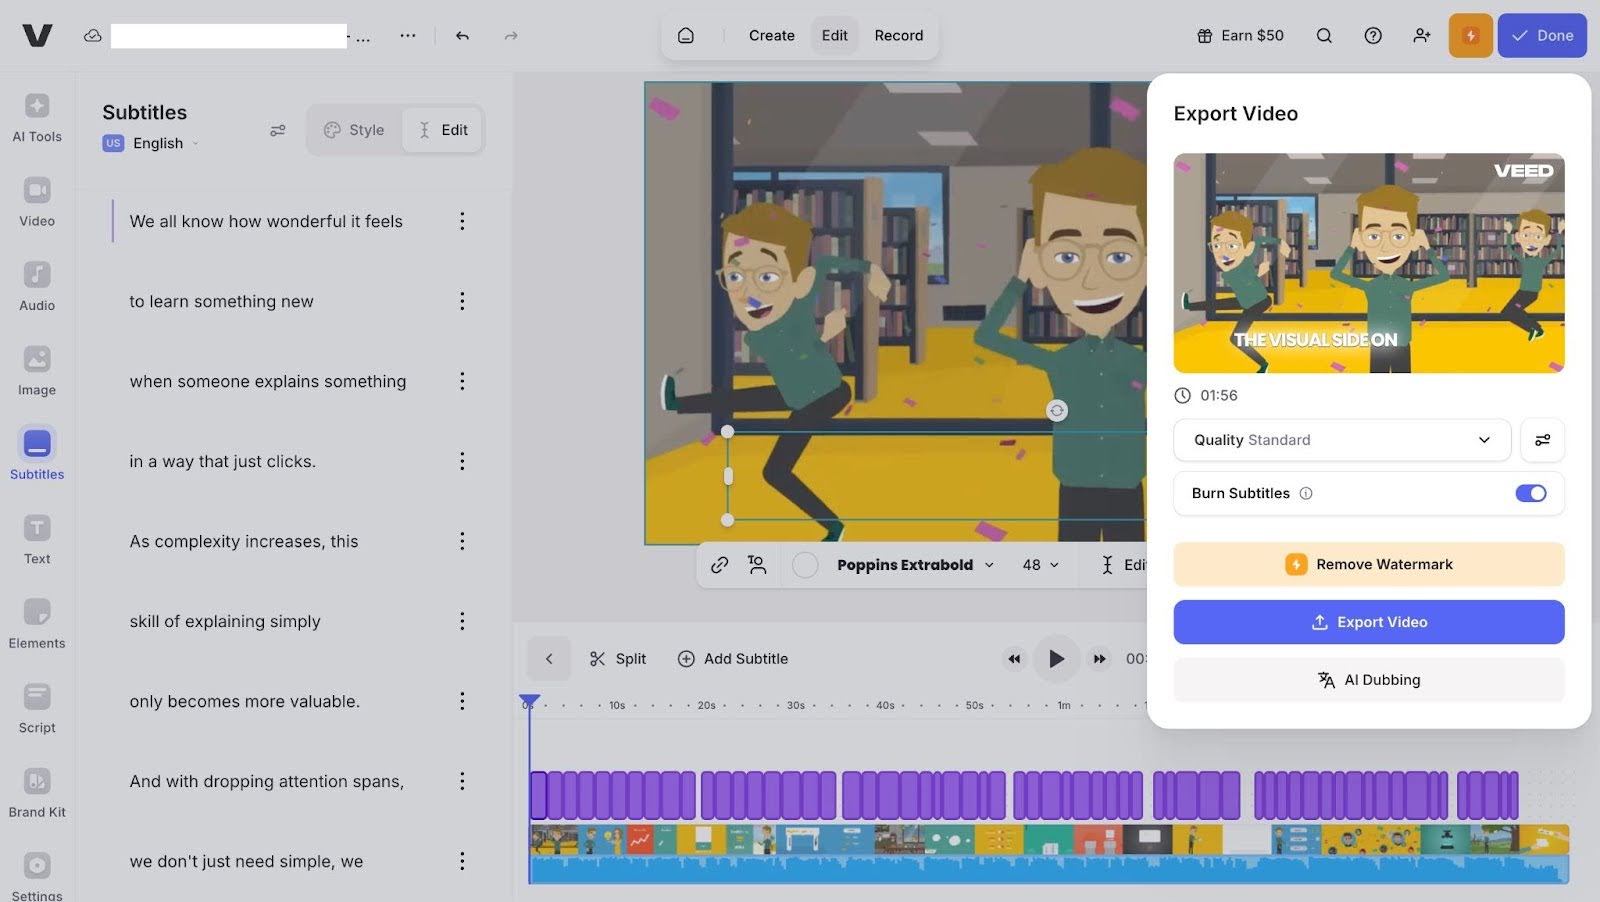
Once you’re happy with your subtitles, click the “Done” button at the top right. A modal will pop up. You can
- Select Video Quality: Use the “Quality” dropdown to choose your preferred video quality from a long list of options. The “Standard” option works for most cases, but you can select a higher quality if needed (note: higher quality options may be available only on a paid plan).
- Adjust Settings: Click the adjustment icon (the gear icon) to set the framerate limit, resolution, quality, and compression settings.
- Burn Subtitles: Toggle the Burn Subtitles option if you want to permanently embed the subtitles in the video.
Once everything is set, click the Export button to save your video. Voila! Your video with subtitles is now ready to be shared with your audience.
Best Practices for Adding Subtitles to Your Videos
Keep Subtitles Short and Easy to Read
One of the biggest mistakes people make is adding too much text at once. Viewers should be able to read subtitles quickly without missing what’s happening in the video. Keep subtitles to one or two short lines at a time, and avoid long sentences. Short, clear phrases are easier to read, especially for people watching on mobile devices.
Sync Subtitles Properly with the Audio
Subtitles should appear at the exact time the words are spoken, not before and not long after. If subtitles are out of sync, the video becomes confusing and difficult to follow. Always preview your video and watch it fully before exporting to make sure the timing matches the speaker’s pace and natural pauses.
Use Simple Fonts and High-Contrast Colors
Your subtitles should be easy to read at a glance. Use simple fonts, avoid fancy styles, and make sure the text color contrasts with the background. White text with a dark shadow or background box usually works well. The goal is to make sure viewers can read the text clearly in every scene.
Place Subtitles Where They Don’t Block Important Content
Subtitles are usually placed at the bottom of the screen, but that doesn’t always work for every video. Make sure subtitles don’t cover faces, product shots, or important on-screen text. If necessary, move the subtitle position slightly higher or lower so viewers can see both the text and the visuals clearly.
Always Review and Edit Auto-Generated Subtitles
Auto subtitles save time, but they are not always perfect. Sometimes words are misspelled, punctuation is wrong, or names are misheard. Always review your subtitles before exporting the video. A quick edit can make your video look more professional and ensure your message is clear and accurate.
Add Subtitles to Your Videos with Ease Using Klap
Adding subtitles can be a time-consuming task, but it doesn’t have to be. If you want your content to reach a wider audience and improve engagement, subtitles are essential. However, doing it manually can be frustrating and slow.
At Klap, we streamline this process with AI-powered tools that automatically generate, edit, and style subtitles in just a few clicks, saving you time while ensuring accuracy.
Ready to simplify your video creation workflow? Sign up for Klap today and start creating videos with subtitles faster and more efficiently.
